In this lesson we will begin implementing the major components of our GUI starting with the ColorEditor class. This class will contain interactive components that let the operator select a color from a dialog or enter the integer value of a color, and immediately see the chosen color in a feedback window. As you’ll see, in addition to creating the base components for the color editor, we will have to come up with a dialog that displays a JColorChooser, a useful component for selecting a color. We’ll be examining these topics
- The JColorChooser Swing component
- Incorporating JColorChooser into a dialog for selecting a color
- Creating the ColorEditor component
Many of the demo applications for this lesson make use of a custom-made component for displaying a color selected in a color chooser. This is a simple window which is incidental to the techniques we’re trying to demonstrate, and I consider it throw-away code, but this is a lecture about formulating GUIs, so let’s start with a look at the ColorFeedbackFrame.
GitHub repository: Cartesian Plane Part 15
Previous lesson: Cartesian Plane Lesson 15 Page 4: Buttons
class ColorFeedbackFrame
The feedback window is contained in a JFrame which also contains two push buttons, Execute and Exit. The execute button drives the application, typically opening a dialog for selecting a color. Pressing the exit button terminates the application.
The frame’s content pane has a BorderLayout. The feedback window is a JPanel placed in the content pane’s center region. The buttons are contained in another JPanel which is positioned in the content pane’s south region.
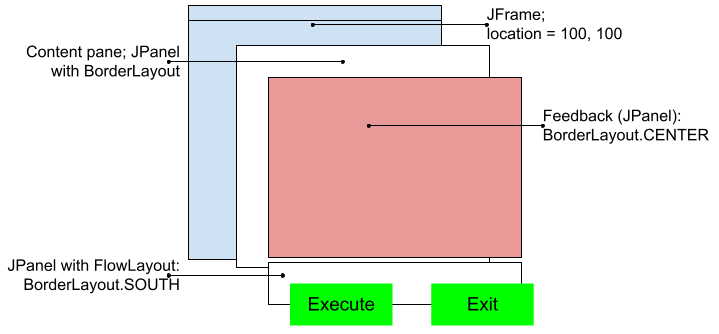
The frame is constructed and made visible by calling the class’s makeGUI( ActionListener listener ) method. The ActionListener passed by the caller is applied to the execute button. There’s on additional method for changing the color of the feedback window: setColor( Color color ) Here’s the code for this class.
1 2 3 4 5 6 7 8 9 10 11 12 13 14 15 16 17 18 19 20 21 22 23 24 25 26 27 28 29 30 31 32 33 34 35 | public class ColorFeedbackFrame { private JPanel feedbackWindow; public void makeGUI( ActionListener listener ) { JFrame frame = new JFrame( "Feedback Window" ); frame.setDefaultCloseOperation( JFrame.EXIT_ON_CLOSE ); JButton exit = new JButton( "Exit" ); JButton execute = new JButton( "Execute" ); JPanel buttons = new JPanel(); buttons.add( execute ); buttons.add( exit ); execute.addActionListener( listener ); exit.addActionListener( e -> System.exit( 0 ) ); feedbackWindow = new JPanel(); feedbackWindow.setPreferredSize( new Dimension( 150, 150 ) ); JPanel contentPane = new JPanel( new BorderLayout() ); contentPane.add( feedbackWindow, BorderLayout.CENTER ); contentPane.add( buttons, BorderLayout.SOUTH ); frame.setLocation( 200, 200 ); frame.setContentPane( contentPane ); frame.pack(); frame.setVisible( true ); } public void setColor( Color color ) { feedbackWindow.setBackground( color ); } } |
The JColorChooser Component

Our color selector is going to encapsulate an instance of JColorChooser. This is a versatile Swing component that offers the operator several ways to select or assemble a color; you can see an example by executing JColorChooserDemo1 from the project sandbox. You may find it similar to JFileChooser, but it differs in at least one important aspect: JFileChooser is usually bound to the context of its own, internally managed dialog; JColorChooser is more versatile.
If you look at the JColorChooser documentation, you’ll see that this class is not itself a dialog. If you want to employ the color-chooser in your GUI there are three ways to do so: 1) via the JColorChooser class method showDialog; 2) by creating and customizing a dialog via the class method createDialog; and 3) creating an instance of JColorChooser and embedding it in your own GUI. Let’s have a look at each of the three strategies. (Spoiler alert: our solution uses option 2.)
🟫 JColorChooser.showDialog( Component parent, String title, Color initColor )
This is the simplest way to utilize JColorChooser. Just invoke JColorChooser.showDialog(). Here’s the main method from the JColorChooserDemo1 application in the project sandbox:
public static void main(String[] args)
{
    SwingUtilities.invokeLater( () -> makeFeedbackWindow() );
    String  title   = "JColorChooser Demo";
    Color   color   = null;
    do
    {
        color = JColorChooser.showDialog( null, title, Color.BLUE );
        if ( color != null )
            feedback.setBackground( color );
    } while ( color != null );
    System.exit( 0 );
}
We call showDialog passing the parent (null), title and initial color. This posts a dialog that blocks until the operator dismisses it. If the operator chooses the OK button, the dialog is dismissed and the currently selected color is returned; if the operator chooses Cancel, the dialog is dismissed and null is returned.
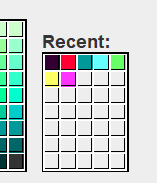
The drawback of this method is that a freshly initialized dialog is displayed every time showDialog is invoked; the dialog doesn’t “remember” the last color selected, or any of the previous selections that it records in the color “swatches” on the right side of the first tab of the GUI.
🟫 JColorChooser.createDialog()
As noted, JColorChooser is not, itself, a dialog. When we instantiate JColorChooser we get a panel which, if we wish, can be embedded in a dialog. In fact JColorChooser has a class method that will do this for us. The essential code from JColorChooserDemo2a in the project sandbox follows. The last two arguments are action listeners for the OK and Cancel buttons; for now they’re set to null. We’ll utilize them in JColorChooserDemo2b.
1 2 3 4 5 6 7 8 9 10 11 12 13 14 15 16 17 18 19 20 21 22 23 24 25 26 27 28 29 30 31 | public class JColorChooserDemo2a { private static JColorChooser colorPane; private static JDialog dialog; private static ColorFeedbackFrame feedback; public static void main(String[] args) { SwingUtilities.invokeLater( () -> build() ); } private static void build() { colorPane = new JColorChooser(); dialog = JColorChooser.createDialog( null, "Choose a Color", true, colorPane, null, null ); feedback = new ColorFeedbackFrame(); feedback.makeGUI( e -> { dialog.setVisible( true ); feedback.setColor( colorPane.getColor() ); }); } } |
If you run this application, you will see that, whether you push the OK button or the Cancel button in the dialog, the color selected in the JColorChooser will be transferred to the feedback window; this isn’t what we want. If the operator chooses Cancel we want to abandon the operation, ignoring the selected color. The problem now becomes: how do we know whether or not the operator cancelled the operation? There are several ways to do this, and they all involve the OK and Cancel action listeners, the last two arguments in the invocation of createDialog. Our logic, as seen in application JColorChooserDemo2b, is will use the listeners to set an instance field to a value that indicates what button was pushed:
private static final int OK_CHOICE     = 0;
private static final int CANCEL_CHOICE = 1;
private static int       choice        = -1;
// ...
JColorChooser colorPane = new JColorChooser();
JDialog       dialog =
    JColorChooser.createDialog(
        null,
        "Choose a Color",
        true,
        colorPane,
        e -> choice = OK_CHOICE,    // OK button ActionListener
        e -> choice = CANCEL_CHOICE // Cancel button ActionListener
    );
When we create the feedback frame, we place an action listener on the frame’s Execute button that will ignore the operation if choice is not set to OK_CHOICE.
feedback = new ColorFeedbackFrame();
feedback.makeGUI( e -> {
    dialog.setVisible( true );
    if ( choice == OK_CHOICE )
        feedback.setColor( colorPane.getColor() );
    });
🟫 Embedding a JColorChooser in a GUI
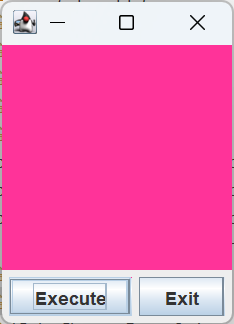
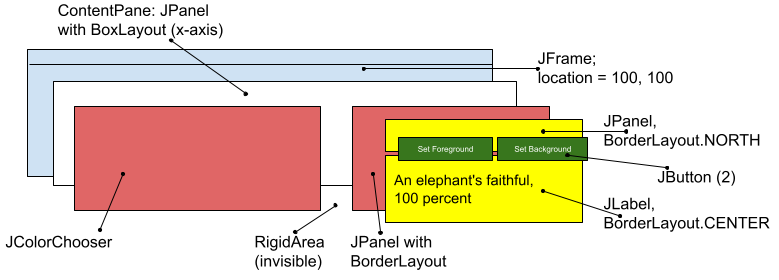
Using this option you can create any GUI layout you like and add a JColorChooser component to it, just like you would any other component. The following figure, produced by application JColorChooserDemo3 in the project sandbox, demonstrates this.
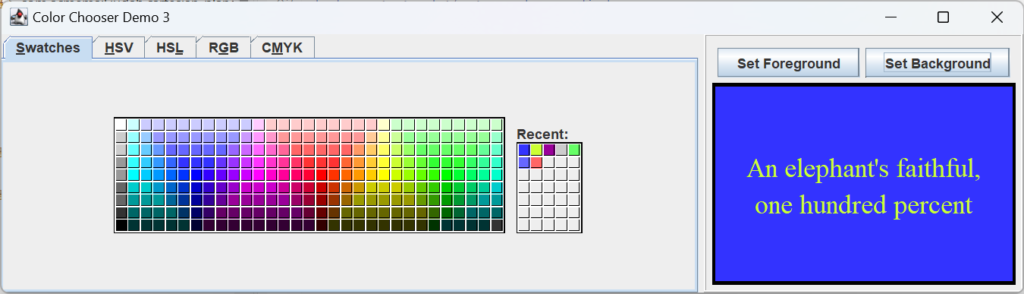
If you run this application you’ll see that it doesn’t employ a dialog at all; the JColorChooser doesn’t pop up and down, it just sits there, waiting for you to change the background or foreground of the feedback panel on the right. As you can see, the JColorChooser panel itself is configurable. In JColorChooserDemo3 we’ve chosen to eliminate the preview panel, by setting it to an empty JPanel: chooser.setPreviewPanel( new JPanel() ).
In the next section we’ll talk about how the GUI for JColorChooserDemo3 was composed. It may be of no interest to you, and can be skipped without missing any details needed later in the lesson.
🟫 Composing the JColorChooserDemo3 GUI
As usual, a JFrame is our top-level window. Its content pane is a JPanel managed via a BoxLayout with a horizontal (x-axis) orientation. The content pane has three component children, from left to right:
- A JColorChooser (without a preview pane; see above)
- A Dimension( 5, 0 ) rigid-area, created using Box.createRigidArea(), used as a horizontal spacer
- A JPanel with a BorderLayout layout manager, and a raised EtchedBorder; I’m calling this the feedback panel.
The feedback panel has another JPanel (the button panel) in its north region, and a JLabel with a LineBorder in its center region. The button panel has a FlowLayout, and contains the Execute and Exit buttons.
The ColorSelector Class
This class will encapsulate a JColorChooser embedded in a dialog. Now that we know what we’re doing, this is not a difficult class to implement. For a state we have two instance variables, one for the dialog that contains the ColorSelector, and one for storing the latest selected color:
private final JDialog dialog;
The dialog containing the JColorChooser panel. It’s an instance variable so that it can be used in the showDialog method:dialog.setVisible( true );private Color selectedColor;
The color most recently selected from the ColorSelector dialog. It’s an instance variable so that it can be accessed from the dialog’s OK button action listener, and from the showDialog method.
The class’s principal constructor builds the GUI behind the ColorSelector dialog (note: that means the constructor must be executed on the EDT). Here’s the constructor, followed by a few notes.
1 2 3 4 5 6 7 8 9 10 11 12 13 14 15 16 17 18 19 20 | public ColorSelector( Window owner, String title, Color color ) { JColorChooser colorPane = new JColorChooser(); dialog = JColorChooser.createDialog( owner, title, true, colorPane, e -> selectedColor = colorPane.getColor(), e -> selectedColor = null ); colorPane.setColor( color ); Dimension dialogSize = dialog.getPreferredSize(); Dimension screenSize = Toolkit.getDefaultToolkit().getScreenSize(); int xco = screenSize.width / 2 - dialogSize.width / 2; int yco = screenSize.height / 2 - dialogSize.height / 2; dialog.setLocation( xco, yco ); } |
- Line 3: Creates the JColorChooser that does most of the work for this class.
- Lines 4-12: Creates the dialog in which the JColorChooser is to be embedded.
- Lines 6,7: Supplies the owner and title of the dialog.
- Line 8: Makes this a modal dialog.
- Line 9: Embeds the color chooser.
- Line 10: The action listener for the OK button.
- Line 11: The action listener for the Cancel button.
For convenience, this class has two additional constructors. Each of these do nothing but chain to the three-parameter constructor, passing default values for properties not specified by the caller:
public ColorSelector()
{
    this( null, defTitle, Color.BLUE );
}

public ColorSelector( Color color )
{
    this( null, defTitle, color );
}
There is one public method. It displays the color selector, and returns the selected color (if the operator chooses OK) or null (if the operator chooses Cancel).
public Color showDialog()
{
    dialog.setVisible( true );
    return selectedColor;
}
The application ColorSelectorDemo1 shows how to use the ColorSelector. The complete code for this application follows.
1 2 3 4 5 6 7 8 9 10 11 12 13 14 15 16 17 18 19 20 21 22 23 24 25 26 27 28 29 | public class ColorSelectorDemo1 implements ActionListener { private ColorFeedbackFrame feedback; private ColorSelector selector; public static void main(String[] args) { ColorSelectorDemo1 demo = new ColorSelectorDemo1(); SwingUtilities.invokeLater( () -> demo.makeGUI( ) ); } private void makeGUI() { feedback = new ColorFeedbackFrame(); feedback.makeGUI( this ); selector = new ColorSelector(); } @Override public void actionPerformed( ActionEvent evt ) { Color color = selector.showDialog(); // Color will be non-null if the operator selects the OK button if ( color != null ) feedback.setColor( color ); } } |
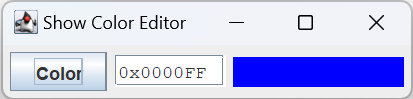
The ColorEditor Class
The purpose of our ColorEditor class is to coordinate three components for use in selecting a color:
- A feedback window. This window, a JPanel, displays the most recently selected color.
- An editor window. This is a JTextField in which the operator can enter the integer RGB value for a desired color. It understands decimal integer strings, explicit hexadecimal strings (e.g. 0xFFFFFF) and, à la HTML, recognizes that a numeric string beginning with a pound sign should be interpreted as hexadecimal (e.g. #FF00FF). A value entered into the editor, followed by tapping the enter key, will automatically update the feedback window.
- A JButton that posts a ColorSelector dialog. Any color selected in the dialog will automatically update the feedback window and the editor.
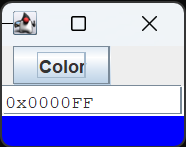
Note that the color editor is not itself a visual component, nor does it, by default, provide a specific layout for its three constituent components. For convenience we will provide a method that composes a layout in a JPanel, but we want to give the user the option to obtain the three components independently, and configure them any way he or she wishes. ColorEditorDemo1 does just that; it instantiates a ColorEditor, gets the editor’s three components, and lays them out vertically using a BoxLayout. Here’s the relevant code:
public static void main(String[] args)
{
    SwingUtilities.invokeLater(  () -> {
        ColorEditor editor  = new ColorEditor();
        JFrame      frame   = new JFrame( "Color Editor Demo1" );
        frame.setDefaultCloseOperation( JFrame.EXIT_ON_CLOSE );

        JPanel      panel   = new JPanel();
        BoxLayout   layout  = new BoxLayout( panel, BoxLayout.Y_AXIS );
        panel.setLayout( layout );
        panel.add( editor.getColorButton() );
        panel.add( editor.getTextEditor() );
        panel.add( editor.getFeedback() );
        frame.setContentPane( panel );
        frame.setLocation( 300, 300 );
        frame.pack();
        frame.setVisible( true );
    });
}
Here are the fields that we’ve declared in the ColorEditor class. They’re followed by some notes.
1 2 3 4 5 6 7 8 9 10 11 12 13 | private static final String defColorString = "0x0000FF"; private static final Color defColor = Color.decode( defColorString ); private final JButton colorButton = new JButton( "Color" ); private final JTextField textEditor = new JTextField( defColorString, 10 ); private final JPanel feedback = new JPanel(); private final ColorSelector colorDialog = new ColorSelector( defColor ); private final List<ActionListener> actionListeners = new ArrayList<>(); |
- Line 1: The default color formatted as a string. The user can override the default using the appropriate constructor. Note that we’ll need this string when instantiating the text editor.
- Line 2: The default color. Note that the value of this field is based on the value of defColorString; to change the default color you need only change defColorString.
- Line 5: The push button that posts the ColorSelector.
- Line 6: The text editor. It has an initial value of defColorString and enough room for ten characters.
- Line 8: The feedback window.
- Line 9: The ColorSelector that’s posted when ColorButton is pushed.
- Line 12: A list of ActionListeners. Every time the color changes each listener in this list will be notified. See also addActionListener and removeActionListener, below.
The class has three getters for returning the three GUI components. They work just like any other getter, I won’t bother showing you the code.
- getTextEditor()
- getColorButton()
- getFeedback()
The class has public methods for obtaining and changing the color editor’s current color. We define “current color” as whatever color is indicated by the string in the text editor. Note that this string may be invalid; if the string is a valid integer getColor() will return an Optional containing the converted color, otherwise we’ll return an empty Optional. Note also that changing the color requires all the ActionListeners to be notified; this happens via the private method fireActionListeners. The code for these three methods follows; note that setColor(Color color) strips the alpha bits from the color’s RGB value prior setting it in the JTextField.
1 2 3 4 5 6 7 8 9 10 11 12 13 14 15 16 17 18 19 20 21 22 23 24 25 26 27 28 29 30 31 32 | public void setColor( Color color ) { int iColor = color.getRGB() & 0x00FFFFFF; String sColor = String.format( "0x%06x", iColor ); textEditor.setText( sColor ); feedback.setBackground( color ); fireActionListeners(); } public Optional<Color> getColor() { Optional<Color> optColor = Optional.empty(); try { Color color = Color.decode( textEditor.getText().trim() ); optColor = Optional.of( color ); } catch ( NumberFormatException exc ) { // optColor is already set to an empty Optional; // no further error processing is required. } return optColor; } private void fireActionListeners() { ActionEvent event = new ActionEvent( textEditor, ActionEvent.ACTION_FIRST, null ); actionListeners.forEach( l -> l.actionPerformed( event )); } |
The constructor finishes configuring the three major components. Here it is, along with some notes.
1 2 3 4 5 6 7 8 9 10 11 12 13 14 15 16 | public ColorEditor() { Dimension editSize = textEditor.getPreferredSize(); feedback.setPreferredSize( editSize ); Font font = textEditor.getFont(); int size = font.getSize(); int style = font.getStyle(); String name = Font.MONOSPACED; Font newFont = new Font( name, style, size ); textEditor.setFont( newFont ); feedback.setBackground( defColor ); textEditor.addActionListener( e -> editColor() ); colorButton.addActionListener( e -> selectColor() ); } |
- Lines 3,4: Sets the preferred size of the feedback window. It has to be set to something, because the default preferred size for a label without text is 0, 0. We set it to the same size as the text editor, which seems reasonable; we know it will be large enough to be clearly visible, and it should look good if it’s positioned right next to the text editor.
- Lines 6-11: Changes the font of the text editor to a non-proportional font, which we usually like when displaying numeric vales. Note that the size and style have been copied from the default font.
- Line 13: Sets the initial color of the feedback window.
- Line 14: Adds to the text editor an ActionListener that will fire when enter is typed while this component has focus. The editColor method will formulate a new color based on the string contained in the text editor and use it to set the background of the feedback window. If the value is invalid, it displays ERROR in the text field, and sets the feedback window to the default color.
- 15: Adds to the color button an ActionListener that posts the color selector.
Following is the code for the two methods used immediately above, editColor and selectColor. I’ve also included the code for addActionListener and removeActionListener.
1 2 3 4 5 6 7 8 9 10 11 12 13 14 15 16 17 18 19 20 21 22 23 24 25 26 27 28 | public void addActionListener( ActionListener listener ) { actionListeners.add(listener ); } public void removeActionListener( ActionListener listener ) { actionListeners.remove( listener ); } private void editColor() { Optional<Color> optColor = getColor(); if ( optColor.isPresent() ) setColor( optColor.get() ); else { textEditor.setText( "#Error" ); feedback.setBackground( defColor ); } } private void selectColor() { Color color = colorDialog.showDialog(); if ( color != null ) setColor( color ); } |