As we have seen, JPanel is a Swing component that can have other components as children, and the children can be arranged horizontally, vertically and in more creative ways. Importantly, a JPanel can have as a child another JPanel, which can have child components in different arrangements, including… yet another JPanel. In this way a GUI can be assembled recursively, achieving complex and imaginative configurations. For an example, see the JFileChooser window hierarchy, that we examined in a previous lesson.
A layout manager is an object used to control the relative positions of components in a container according to some algorithm. For example, the FlowLayout layout manager arranges components from left to right, then top to bottom as space allows; the GridLayout layout manager arranges components in rows and columns; and the BoxLayout layout manager arranges components either horizontally or vertically. We’ve already had a quick peek at layout managers in a previous lesson. In this lesson we will have a more thorough look at the most common layout managers. We’ll have several examples of each of the following classes:
- FlowLayout;
- BoxLayout;
- BorderLayout;
- GridLayout; and
- CardLayout
We’ll also have a very brief example of the GridBagLayout class. Two layout managers we will not be considering are the GroupLayout and SpringLayout classes.
We won’t be covering any of these classes in exhaustive detail, because Oracle has already done a good job of that in their tutorial. Our goal is to have a good understanding of the various layout strategies as we begin to build more bits and pieces of our Cartesian plane application.
See also:
- A Visual Guide to Layout Managers in the Oracle Java Tutorial
- Java Layout Managers on the JavaTPoint web site
GitHub repository: Cartesian Plane Part 15
Previous lesson: Cartesian Plane Lesson 15 Page 1: GUI Development, Introduction
The FlowLayout Class
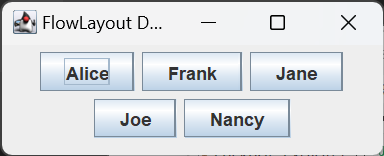
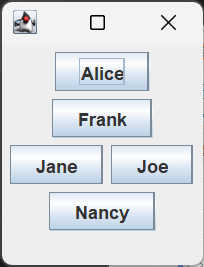
FlowLayout is the simplest layout manager. It positions components in a container from left-to-right and top-to-bottom, as space allows. If you run the application FlowLayoutDemo1 from the project sandbox, you will initially see one window with five buttons laid out horizontally at the top of the window. If you make the window narrower but taller, the components will be rearranged to occupy the allotted space.
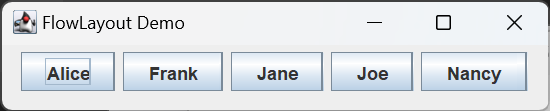
FlowLayout is the default layout manager for JPanels. Following is the code for FlowLayoutDemo1.
1 2 3 4 5 6 7 8 9 10 11 12 13 14 15 16 17 18 19 20 21 | public class FlowLayoutDemo1 { public static void main(String[] args) { SwingUtilities.invokeLater( () -> buildGUI() ); } private static void buildGUI() { JFrame frame = new JFrame( "FlowLayout Demo" ); frame.setDefaultCloseOperation( JFrame.EXIT_ON_CLOSE ); JPanel panel = new JPanel(); // flow-layout added by default Stream.of( "Alice", "Frank", "Jane", "Joe", "Nancy" ) .map( JButton::new ) .forEach( panel::add ); frame.setContentPane( panel ); frame.pack(); SandboxUtils.center( frame ); frame.setVisible( true ); } } |
The GridLayout Class
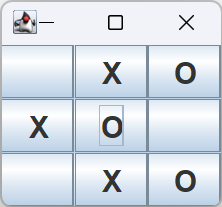
The GridLayout class organizes components in rows and columns. Application GridLayoutDemo1 from the project sandbox displays the GUI shown to the right. The constructor, GridLayout( int rows, int cols ), determines the shape of the grid. The code for this application is shown below.
Note that JPanel has a constructor that allows you to specify its layout manager, so new JPanel( new GridLayout( 3, 3 ) ) instantiates a JPanel arranged in a grid of three rows and three columns.
1 2 3 4 5 6 7 8 9 10 11 12 13 14 15 16 17 18 19 20 21 22 | // class GridLayoutDemo1 private static void makeGUI() { JFrame frame = new JFrame( "GridLayout Demo 1" ); frame.setDefaultCloseOperation( JFrame.EXIT_ON_CLOSE ); JPanel mainPanel = new JPanel( new GridLayout( 3, 3 ) ); mainPanel.add( getButton( "" ) ); mainPanel.add( getButton( "X" ) ); mainPanel.add( getButton( "O" ) ); mainPanel.add( getButton( "X" ) ); mainPanel.add( getButton( "O" ) ); mainPanel.add( getButton( "" ) ); mainPanel.add( getButton( "" ) ); mainPanel.add( getButton( "X" ) ); mainPanel.add( getButton( "O" ) ); frame.setContentPane( mainPanel ); frame.pack(); SandboxUtils.center( frame ); frame.setVisible( true ); } |
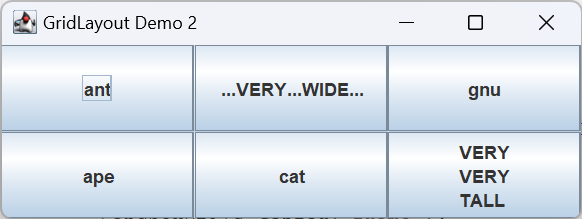
As demonstrated by application GridLayoutDemo2, every column in a grid layout is the same width, and every row is the same height. The width of a column is determined by the widest component in the grid; the height of a row is determined by the tallest row in the grid. The code for this application is shown below.
1 2 3 4 5 6 7 8 9 10 11 12 13 14 15 16 17 18 19 | // class GridLayoutDemo2 private static void makeGUI() { JFrame frame = new JFrame( "GridLayout Demo 2" ); frame.setDefaultCloseOperation( JFrame.EXIT_ON_CLOSE ); JPanel mainPanel = new JPanel( new GridLayout( 2, 3 ) ); mainPanel.add( new JButton( "ant" ) ); mainPanel.add( new JButton( "...VERY...WIDE..." ) ); mainPanel.add( new JButton( "gnu" ) ); mainPanel.add( new JButton( "ape" ) ); mainPanel.add( new JButton( "cat" ) ); mainPanel.add( new JButton( "<html>VERY<BR>VERY<br>TALL</html>" ) ); frame.setContentPane( mainPanel ); frame.pack(); SandboxUtils.center( frame ); frame.setVisible( true ); } |
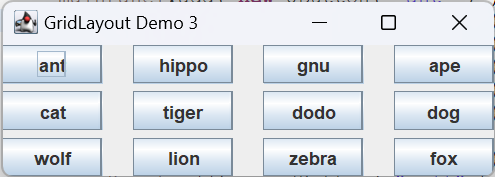
You can add spacing between rows and columns by using the overloaded constructor GridLayout( int rows, int cols, int hgap, int vgap ), where hgap is the spacing, in pixels, between columns, and vgap is the spacing, in pixels, between rows. The figure to the right was drawn by application GridLayoutDemo3 using the constructor invocation new GridLayout( 3, 4, 20, 5 ).
The BoxLayout Class
BoxLayout can be used to organize components horizontally (on the x axis) or vertically (on the y axis). They can also be organized on a line axis or a page axis, but, at least for now, we won’t be talking about those options. The BoxLayout constructor is a little unusual in that it requires you to pass the container it’s controlling on instantiation, so you can’t utilize the JPanel constructor to incorporate it; you have to use JPanel.setLayout directly:
    JPanel    hPanel  = new JPanel();
    BoxLayout hLayout = new BoxLayout( hPanel, BoxLayout.X_AXIS );
    hPanel.setLayout( hLayout );
    JPanel    vPanel  = new JPanel();
    BoxLayout vLayout = new BoxLayout( vPanel, BoxLayout.Y_AXIS );
    vPanel.setLayout( vLayout );
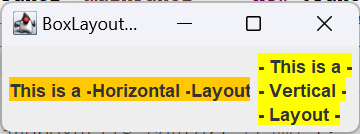
BoxLayoutDemo1 from the project sandbox shows a window with a horizontal arrangement on the left and a vertical arrangement on the right. The code used to build this window follows, below.
1 2 3 4 5 6 7 8 9 10 11 12 13 14 15 16 17 18 19 20 21 22 23 24 25 26 27 28 29 30 31 32 33 34 35 36 37 38 39 40 | // class BoxLayoutDemo1 private static void makeGUI() { JFrame frame = new JFrame( "BoxLayout Demo 1" ); frame.setDefaultCloseOperation( JFrame.EXIT_ON_CLOSE ); JPanel mainPanel = new JPanel(); mainPanel.add( getHorizontalPanel() ); mainPanel.add( getVerticalPanel() ); frame.setContentPane( mainPanel ); frame.pack(); SandboxUtils.center( frame ); frame.setVisible( true ); } private static JPanel getHorizontalPanel() { JPanel panel = new JPanel(); BoxLayout layout = new BoxLayout( panel, BoxLayout.X_AXIS ); Color color = Color.ORANGE; panel.setLayout( layout ); panel.add( getLabel( "This is a -", color ) ); panel.add( getLabel( "Horizontal -", color ) ); panel.add( getLabel( "Layout", color ) ); return panel; } private static JPanel getVerticalPanel() { JPanel panel = new JPanel(); BoxLayout layout = new BoxLayout( panel, BoxLayout.Y_AXIS ); Color color = Color.YELLOW; panel.setLayout( layout ); panel.add( getLabel( "- This is a -", color ) ); panel.add( getLabel( "- Vertical -", color ) ); panel.add( getLabel( "- Layout -", color ) ); return panel; } |
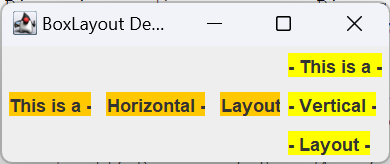
Spacing between components can be accomplished using a class method from the Box class. Box.createRigidArea( Dimension size ) creates a blank area of the given size between components. BoxLayoutDemo2 from the project sandbox builds on BoxLayoutDemo1 to create the figure to the right. The code looks like this:
1 2 3 4 5 6 7 8 9 10 11 12 13 14 15 16 17 18 19 20 21 22 23 24 25 26 27 28 29 30 31 32 | // class BoxLayoutDemo2 private static JPanel getHorizontalPanel() { JPanel panel = new JPanel(); BoxLayout layout = new BoxLayout( panel, BoxLayout.X_AXIS ); Dimension dim = new Dimension( 10, 0 ); Color color = Color.ORANGE; panel.setLayout( layout ); panel.add( getLabel( "This is a -", color ) ); panel.add( Box.createRigidArea( dim ) ); panel.add( getLabel( "Horizontal -", color ) ); panel.add( Box.createRigidArea( dim ) ); panel.add( getLabel( "Layout", color ) ); return panel; } private static JPanel getVerticalPanel() { JPanel panel = new JPanel(); BoxLayout layout = new BoxLayout( panel, BoxLayout.Y_AXIS ); Dimension dim = new Dimension( 0, 10 ); Color color = Color.YELLOW; panel.setLayout( layout ); panel.add( getLabel( "- This is a -", color ) ); panel.add( Box.createRigidArea( dim ) ); panel.add( getLabel( "- Vertical -", color ) ); panel.add( Box.createRigidArea( dim ) ); panel.add( getLabel( "- Layout -", color ) ); return panel; } |
Note: See also How To Use BoxLayout on the Oracle website for a discussion of:
- Box.createHorizontalGlue()
- Box.createVerticalGlue()
- Box.createHorizontalStrut()
- Box.createVerticalStrut()
Positioning of components can be adjusted by setting their X- and/or Y-alignment. The following figures depict a vertical (y-axis) BoxLayout, with components given one of the properties:
- alignment-x = JComponent.LEFT_ALIGNMENT
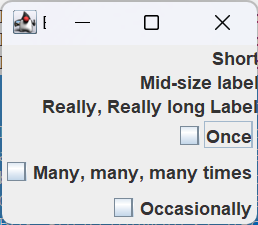
- alignment-x = JComponent.RIGHT_ALIGNMENT
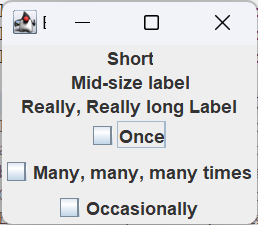
- alignment-x = JComponent.CENTER_ALIGNMENT
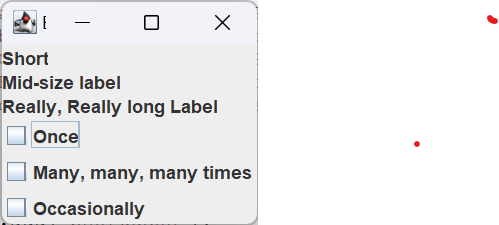
The code for the first figure follows. The code for the other two figures is identical except for one line in the method getVerticalPanel():
- BoxLayoutDemo3a:
float hPos = JComponent.LEFT_ALIGNMENT; - BoxLayoutDemo3b:
float hPos = JComponent.RIGHT_ALIGNMENT; - BoxLayoutDemo3c:
float hPos = JComponent.CENTER_ALIGNMENT;
1 2 3 4 5 6 7 8 9 10 11 12 13 14 15 16 17 18 19 20 21 22 23 24 25 26 27 28 29 30 31 32 33 34 35 36 37 38 39 40 41 42 43 44 45 46 47 48 49 50 51 | public class BoxLayoutDemo3a { public static void main(String[] args) { SwingUtilities.invokeLater( () -> makeGUI() ); } private static void makeGUI() { JFrame frame = new JFrame( "BoxLayout Demo 3" ); frame.setDefaultCloseOperation( JFrame.EXIT_ON_CLOSE ); JPanel mainPanel = getVerticalPanel(); frame.setContentPane( mainPanel ); frame.pack(); SandboxUtils.center( frame ); frame.setVisible( true ); } private static JPanel getVerticalPanel() { JPanel panel = new JPanel(); BoxLayout layout = new BoxLayout( panel, BoxLayout.Y_AXIS ); panel.setLayout( layout ); JLabel shortLabel = new JLabel( "Short" ); JLabel longLabel = new JLabel( "Really, Really long Label" ); JLabel medLabel = new JLabel( "Mid-size label" ); JCheckBox shortCBox = new JCheckBox( "Once" ); JCheckBox longCBox = new JCheckBox( "Many, many, many times" ); JCheckBox medCBox = new JCheckBox( "Occasionally" ); float hPos = JComponent.LEFT_ALIGNMENT; shortLabel.setAlignmentX( hPos ); longLabel.setAlignmentX( hPos ); medLabel.setAlignmentX( hPos ); shortCBox.setAlignmentX( hPos ); longCBox.setAlignmentX( hPos ); medCBox.setAlignmentX( hPos ); panel.add( shortLabel ); panel.add( medLabel ); panel.add( longLabel ); panel.add( shortCBox ); panel.add( longCBox ); panel.add( medCBox ); return panel; } } |
The CardLayout Class
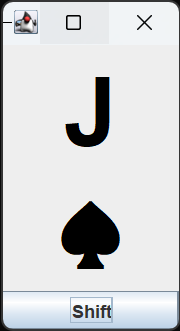
The CardLayout manager organizes a set of panels into a stack, like a deck of cards. Also like a deck of cards, only the top card can be seen at any time. The class has methods to switch between panels on the stack:
first(Container parent)displays the first panel in the stack (the one that was added first to the parent container of the stack);last(Container parent)displays the last panel in the stack;next(Container parent)displays the next panel in the stack (the next panel after the last panel is the first panel);previous(Container parent)displays the previous panel in the stack (the panel before the first panel is the last panel).
The CardLayoutDemo1 application in the project sandbox produced the figure to the right. If you execute this application, pushing the shift button switches to the next card in the stack. The code for this application is shown below.
1 2 3 4 5 6 7 8 9 10 11 12 13 14 15 16 17 18 19 20 21 22 23 24 25 26 27 28 29 30 31 32 33 34 35 36 37 38 39 40 41 42 43 44 45 46 47 48 49 50 51 52 | public class CardLayoutDemo1 { private static final char HEARTS = '\u2665'; private static final char SPADES = '\u2660'; private static final char CLUBS = '\u2663'; private static final char DIAMONDS = '\u2666'; public static void main(String[] args) { SwingUtilities.invokeLater( () -> makeGUI() ); } private static void makeGUI() { JFrame frame = new JFrame( "GridLayout Demo 1" ); frame.setDefaultCloseOperation( JFrame.EXIT_ON_CLOSE ); CardLayout layout = new CardLayout(); JPanel cardPanel = new JPanel( layout ); cardPanel.add( getCard( "J", SPADES ) ); cardPanel.add( getCard( "10", HEARTS ) ); cardPanel.add( getCard( "Q", DIAMONDS ) ); cardPanel.add( getCard( "A", CLUBS ) ); cardPanel.add( getCard( "5", HEARTS ) ); JButton rotate = new JButton( "Shift" ); rotate.addActionListener( e -> layout.next( cardPanel ) ); JPanel mainPanel = new JPanel( new BorderLayout() ); mainPanel.add( cardPanel, BorderLayout.CENTER ); mainPanel.add( rotate, BorderLayout.SOUTH ); frame.setContentPane( mainPanel ); frame.pack(); SandboxUtils.center( frame ); frame.setVisible( true ); } private static JComponent getCard( String text, char suit ) { String label = "<html><center>" + text + "<br>" + suit + "</center></html>"; JLabel card = new JLabel( label ); Color color = suit == DIAMONDS || suit == HEARTS ? Color.RED : Color.BLACK; Font font = card.getFont().deriveFont( 64f ); card.setFont( font ); card.setHorizontalAlignment( SwingConstants.CENTER ); card.setForeground( color ); return card; } } |
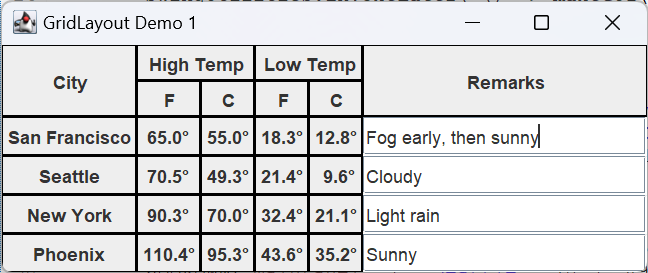
A Brief Look at GridBagLayout
We’re not going to talk about this class in detail. For one thing, it’s quite complicated. For another, while this class may be of some use for any programmer, it is mainly intended for use by GUI builders. The layout manager divides a window into rows and columns of cells, like a spreadsheet. Also like spreadsheets (or HTML tables), cells can span multiple rows and/or columns, and the appearance of their content can be controlled with great flexibility. The GUI shown in the following figure was created using a GridBagLayout by application GridBagLayoutDemo1, in the project sandbox.
When you add a component to a panel controlled by a GridBagLayout you specify a GridBagConstraints object which controls virtually all properties of the component’s position and appearance, including:
- The row and column the component is placed in;
- Whether the component spans multiple rows and/or columns;
- How the component is to be resized if the window that contains it changes size;
- How extra space is to be distributed;
- etc.
For a complete description of the GridBagConstraints class see the Java API documentation. For a more thorough discussion of the GridBagLayout class, see How to Use GridBagLayout in the Oracle Java tutorials.