In this lesson we’ll talk about documentation in general and, more specifically, how to use the Javadoc tool to document your Java project. To get an idea of the kind of documentation you can produce with Javadoc look at any Java class documentation page, String, for example. For more discussion of project documentation and Javadoc specifically, see the following references.
- How to Write a Good Documentation, from Berkeley Library
- Javadoc Home Page, from Oracle Corporation
- How to Write Doc Comments for the Javadoc Tool, from Oracle Corporation
For an example of an alternative software documentation tool that can be used for Java and most other common languages, see the excellent Doxygen tool, from Dmitri van Heesch.
GitHub repository: Cartesian Plane Part 5
Previous lesson: Cartesian Plane Lesson 4
Documentation
Documentation for a programming project is generated at many levels. If you’re a developer, you are most likely responsible for documentation for any public methods (a.k.a. functions, subroutines) and fields (a.k.a. variables, properties) you develop. Developers may also be responsible for module (or class) and package (or library) documentation. Let’s start at the bottom, with methods and properties.
Methods and Properties
As a programmer, you are responsible for documenting any public methods and fields that you include in your source code. Each public field has to be described, including its purpose and how to obtain its value. If it can be modified, you must document how to modify it and the consequences of any such modification. For any public method or function you write, you must describe its purpose, its parameters (if any), the value it returns, and the consequences of invoking it. This may sound like a lot of work, and sometimes it is, but the scope of work is usually fairly limited. Here’s an example of the documentation for a function I wrote many years ago.
// Function: getRegisterValue
// Description: gets the value of the register with a given name
// Parameter: name, the given name
// Returns: the value of the named register
int getRegisterValue( char *name )
If you follow the Java conventions, every public field needs at least a brief description consisting of a single sentence and a longer description if warranted. Every public method needs at least a brief description, a longer description if warranted, and a description of each of its parameters and return value. Preconditions (if any) must be listed, and the range of valid values for each parameter must be described.
Introduction to Javadoc
Javadoc documentation is generated from a specially formatted comment that precedes the element of the program that it describes. The comment begins with a “sentinel” (/**) that identifies it as a Javadoc comment. The documentation can contain special tags (for example, @param and @return) that describe the features of the element. Here’s an example of the documentation for a simple method in the Matrix class.
1 2 3 4 5 6 7 8 9 10 11 12 13 14 15 16 17 18 19 | /** * Returns a copy of the given row of the matrix. * Changes to the returned array * will not affect the encapsulated matrix. * If the given row number is out of range * an ArrayIndexOutOfBoundsException is thrown. * * @param rowNum the number of the row to return * * @return the given row of the matrix * * @throws ArrayIndexOutOfBoundsException * if the given row number is out of range */ public double[] getRow( int rowNum ) { double[] row = Arrays.copyOf( data[rowNum], data[rowNum].length ); return row; } |
The @throws tag indicates that this method may throw an exception. From this, Javadoc produces text in HTML that looks like this when displayed in a web browser:
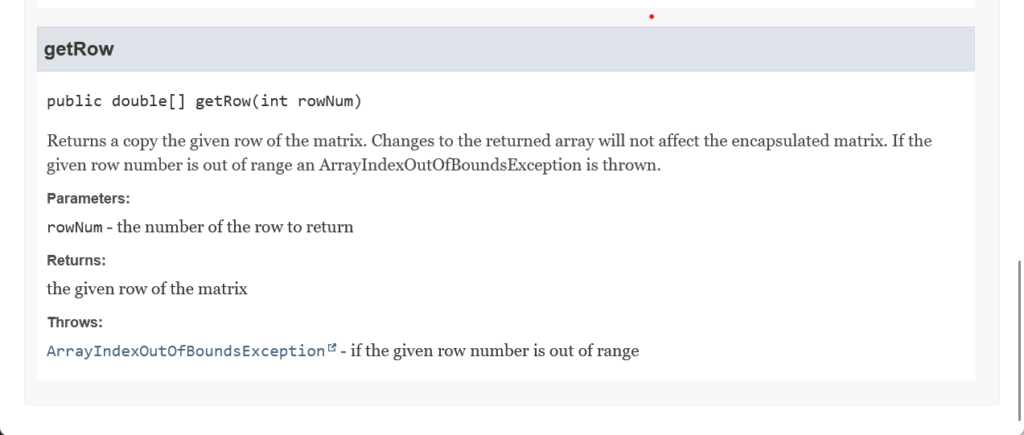
The first sentence (the brief description) is used in the method summary towards the top of the page and becomes a hyperlink to the more detailed documentation.

By the way, Eclipse will help you create your Javadoc comments. Position your cursor on the element of code that you want to document, pull down the Source menu, and select Generate Element Comment. The shortcut for this on Windows is alt-shift-J, a shortcut worth memorizing.
Another helpful tag is @see, which generates see also documentation. It can be used in several different ways.
- As a simple text reference:
@see “Bloch, Joshua. Effective Java. Addison-Wesley, 2018.” - As a link to an external resource:
@see <a href=”https://www.doxygen.nl/”>
van Heesch, Dimitri. <em>Doxygen</em>, https://www.doxygen.nl/.
</a> - As a link to a method or field in the same class:
@see #demoMethod020() - As a link to a class in the same package:
@see Utils - As a link to a method or field in a different class in the same package:
@see Utils#pause(long) - As a link to a class in a different package:
@see com.acmemail.judah.sandbox.Matrix - As a link to a method or field in a class in a different package:
@see com.acmemail.judah.sandbox.Matrix#getRow(int)
Here’s an example of using @see and the documentation it produces.
1 2 3 4 5 6 7 8 9 10 11 12 13 14 | /** * Demonstrates the use of the Javadoc @see statement. * * @see "Bloch, Joshua. Effective Java. Addison-Wesley, 2018." * @see <a href="https://www.doxygen.nl/"> * van Heesch, Dimitri. <em>Doxygen</em>, https://www.doxygen.nl/. * </a> * @see Utils * @see com.acmemail.judah.sandbox.Matrix * @see #demoMethod020() * @see Utils#pause(long) * @see com.acmemail.judah.sandbox.Matrix#getRow(int) */ public void demoMethod010() |

Some other common tags are:
- @author (class-level comments only): identifies the author of the class.
- @version (class-level comments only): identifies the version of the class.
- @since: identifies the version of the class in which the documented element was added
For a list of all tags, see How to Write Doc Comments for the Javadoc Tool from Oracle Corporation.
To generate the Javadoc from Eclipse, highlight some element of your code in Project Explorer; you can choose a class, a package, or a whole project. Pull down the Project menu and select Generate Javadoc, then click finish. Javadoc may find issues you must correct; these will be listed in the Eclipse console.

Eclipse will create a doc directory in your project root when your code is correct. If you open this in Project Explorer and scroll down a bit, you’ll find index.html. Open this file to see your formatted documentation.

There are quite a few possibilities for generating documentation from the command line. The following examples assume that you are starting with a command line positioned in the root directory of your project. Note that every example uses the -d <directory> command line option, which designates the destination of the generated web pages; if you omit this, all the generated files will be dumped in the current directory, which would cause quite a mess. Note also that there a lots of alternatives to the specific examples I am illustrating.
To generate documentation for a single source file, execute the javadoc command with the -d option and specify the path to the target .java file:
javadoc -d docx src\main\javacom\acmemail\judah\CartesianPlane\LineGenerator.java
To generate documentation for a package, make sure your classpath is set, execute the javadoc command with the -d option, and specify the name of the target package:
javadoc -cp src/main/java -d docx com.acmemail.judah.cartesian_plane.CartesianPlane
To generate documentation for multiple packages, make a file containing the names of all the target packages on separate lines; for this example, I made the file packages.txt shown below. Execute the javadoc command with the -d option, and specify the name of the packages file preceded by an at-sign (@):
com.acmemail.judah.cartesian_plane.graphics_utils
com.acmemail.judah.cartesian_plane.app
javadoc -cp src/main/java -d docx @packages.txt
Javadoc Conventions
There are some conventions that you should follow when writing Javadoc comments.
- Every public class, method, and field should be documented.
- Every comment should start with a brief description.
- The brief description should be a full sentence, starting with a capital letter and ending with a period.
- When a comment contains multiple tags, they should occur in the following order:
- @author
- @version
- @param
- @return
- @throws
- @see
- @since
Embedded HTML
Note: the following sections assume some familiarity with HTML, CSS, and table formulation using HTML and CSS. If you are unfamiliar with these tools, write your documentation without referencing the fancy web stuff. If you want to brush up on your web skills, here are some convenient references:
-
- HTML Tutorial, from W3Schools
- CSS Tutorial, from W3Schools
- HTML Tables, from W3Schools
- CSS Tables, from W3Schools
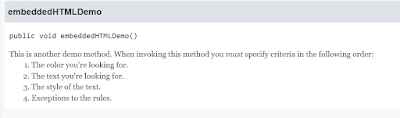
A Javadoc comment can contain embedded HTML. Here’s an example of a comment that uses the em tag and includes an ordered list. The documentation it produces is shown below.
1 2 3 4 5 6 7 8 9 10 11 12 | /** * This is another demo method. * When invoking this method * you <em>must</em> specify criteria * in the following order: * <ol> * <li>The color you're looking for.</li> * <li>The text you're looking for.</li> * <li>The style of the text.</li> * <li>Exceptions to the rules.</li> * </ol> */ |
Class-level Documentation
Let’s start writing the class documentation header for the CartesianPlane class. We’ll make detailed notes and use embedded HTML to include an image and a table. Adding a table to a web page can be tedious and require a lot of style information. We’ll try two different strategies for inserting the image and the table.
The first strategy is to use in-line style directives in the HTML code.
1 2 3 4 5 6 7 8 9 10 11 12 13 14 15 16 17 18 19 20 21 22 23 24 25 26 27 28 29 30 31 32 33 34 35 36 37 38 39 40 41 42 43 44 45 46 47 | /** * This class encapsulates the display of a Cartesian plane. * The plane consists of the following components, * each of which is customizable by the user. * <p> * <img * src="doc-files/SamplePlane.png" * alt="Sample Plane" * style="width:25%; height:auto;" * > * </p> * * <table style="border-collapse: collapse; border: .1em solid black; max-width: 50em;"> * <caption>Summary of Properties</caption> * <tr> * <th style="border: .1em solid black; padding: .3em;"> * Property * </th> * <th style="border: .1em solid black; padding: .3em;"> * Type * </th> * <th style="border: .1em solid black; padding: .3em;"> * Description * </th> * </tr> * <tr> * <td style="border: .1em solid black; padding: .3em;"> * gridUnit * </td> * <td style="border: .1em solid black; padding: .3em;"> * float * </td> * <td style="border: .1em solid black; padding: .3em;"> * The grid unit, * in pixels per unit. * If this property has a value of 25 * each unit of display * will have span 25 pixels. * The grid unit * is always the same * for both the x- and y-axes. * </td> * </tr> * </table> * * @author Jack Straub */ |

As you can see, this strategy is rather tedious. It would be nice if we could add some CSS selectors, and we can. There are two ways to do this.
The first way is to replace Javadoc’s default style sheet altogether. To do this, start by generating some Javadoc. If you look in the directory that Javadoc generates, you will see the file stylesheet.css. Make a copy of this file and modify it any way you wish. The next time you generate your documentation from Eclipse, choose next to go to the second screen of the Generate Javadoc dialog, check the Style sheet box, and enter the path to your style sheet in the text box provided.
From the command line use the -stylesheetfile <filename> option.
javadoc -cp src/main/java -d docx -stylesheetfile myStylesheet.css @packages.txt
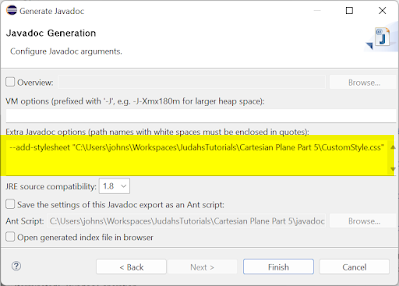
The other way to add your own CSS is through the Javadoc command line option –add-stylesheet <path to style sheet>. This adds your CSS to your project documentation in addition to the default Javadoc CSS. Eclipse does not support this option directly, but on the last screen of the Generate Javadoc dialog, you’ll find a text box where you can enter your own command line arguments:
Here is the auxiliary style sheet that I wrote for this project:
1 2 3 4 5 6 7 8 9 10 11 12 13 14 15 16 17 18 19 20 21 22 23 24 25 26 27 28 29 30 | table.js-plain { border-collapse: collapse; border: .1em solid black; max-width: 50em; } th.js-plain,td.js-plain { border: .1em solid black; padding: .3em; } tr.js-empty { background-color: #CCCCCC; height: 1em; } .js-codeblock { margin-top: 1em; margin-left: 5em; padding: 1em; border: .1em solid black; background-color: #EEEEEE; color: black; white-space: pre; font-family: "courier new", monospace; } |
Note that my selector names are prepended with “js-” in an attempt to avoid conflicts with the default style sheet. An abbreviated listing of my final class-level Javadoc for the CartesianPlane class follows below; for the complete listing, see the GitHub repository.
1 2 3 4 5 6 7 8 9 10 11 12 13 14 15 16 17 18 19 20 21 22 23 24 25 26 27 28 29 30 31 32 33 34 35 36 37 38 39 40 41 42 43 44 45 46 47 48 49 50 51 52 53 54 55 56 57 58 59 60 61 62 63 64 65 66 67 68 69 70 71 72 73 74 75 76 77 78 79 80 81 82 83 | /** * This class encapsulates the display of a Cartesian plane. * The plane consists of the following components, * each of which is customizable by the user. * <p> * <img * src="doc-files/SamplePlane.png" * alt="Sample Plane" * style="width:25%; height:auto;" * > * </p> * * <table class="js-plain"> * <caption>Summary of Properties</caption> * <tr> * <th class="js-plain"> * Property * </th> * <th class="js-plain"> * Type * </th> * <th class="js-plain"> * Description * </th> * </tr> * <tr> * <td class="js-plain"> * gridUnit * </td> * <td class="js-plain"> * float * </td> * <td class="js-plain"> * The grid unit, * in pixels per unit. * If this property has a value of 25 * each unit of display * will have span 25 pixels. * The grid unit * is always the same * for both the x- and y-axes. * </td> * </tr> ... * <tr> * <td class="js-plain"> * labelFontName * </td> * <td class="js-plain"> * String * </td> * <td class="js-plain"> * The name of the font used to draw the labels on the x- and y-axes. * </td> * </tr> * <tr> * <td class="js-plain"> * labelFontStyle * </td> * <td class="js-plain"> * int * </td> * <td class="js-plain"> * The style of the font used to draw the labels on the x- and y-axes * (from the Font class, * e.g. Font.PLAIN). * </td> * </tr> * <tr> * <td class="js-plain"> * labelFontSize * </td> * <td class="js-plain"> * float * </td> * <td class="js-plain"> * The size of the font used to draw the labels on the x- and y-axes. * </td> * </tr> * </table> * * @author Jack Straub */ |
class LineGenerator
Let’s finish the documentation for the LineGenerator class. We have three constant variables that must be documented.
   /**
     * Indicates that the iterable generates
     * horizontal lines.
     */
    public static final int HORIZONTAL  = 1;
    /**
     * Indicates that the iterable generates
     * vertical lines.
     */
    public static final int VERTICAL    = 2;
    /**
     * Indicates that the iterable generates
     * horizontal and vertical lines.
     */
    public static final int BOTH        = 3;
We have two public constructors that must be commented.
1 2 3 4 5 6 7 8 9 10 11 12 13 14 15 16 17 18 19 20 21 22 23 24 25 26 27 28 29 30 31 32 33 34 35 36 37 38 39 40 41 42 43 44 45 46 47 48 49 50 51 52 53 54 55 56 57 58 59 60 61 62 63 64 65 66 67 68 | /** * Constructor. * Instantiates a LineGenerator * with a given bounding rectangle, * grid unit and lines-per-unit. * The line length defaults to -1 * (grid lines will span the width or height * of the bounding rectangle) * and the orientation will default to BOTH * (the iterator will generate * horizontal and vertical lines). * * @param rect the given bounding rectangle * @param gridUnit the given grid unit * @param lpu the given lines-per-unit */ public LineGenerator( Rectangle2D rect, float gridUnit, float lpu ) { this( rect, gridUnit, lpu, -1, BOTH ); } /** * Constructor. * Instantiates a LineGenerator * with a given bounding rectangle, * grid unit, lines-per-unit, * grid line length and orientation. * The line length may be -1 * in which case grid lines will span the width or height * of the bounding rectangle. * The orientation may be HORIZONTAL * (the iterator will generate horizontal lines), * VERTICAL * (the iterator will generate vertical lines) * or BOTH * (the iterator will generate * horizontal and vertical lines) * * @param rect the given bounding rectangle * @param gridUnit the given grid unit * @param lpu the given lines-per-unit * @param length the given line length * @param orientation the given orientation */ public LineGenerator( Rectangle2D rect, float gridUnit, float lpu, float length, int orientation ) { gridWidth = (float)rect.getWidth(); gridHeight = (float)rect.getHeight(); centerXco = (float)rect.getCenterX(); maxXco = (float)rect.getMaxX(); centerYco = (float)rect.getCenterY(); maxYco = (float)rect.getMaxY(); this.gridUnit = gridUnit; this.lpu = lpu; this.length = length; this.orientation = orientation; gridSpacing = gridUnit / lpu; totalVerLines = (float)Math.floor( gridWidth / gridSpacing ); totalHorLines = (float)Math.floor( gridHeight / gridSpacing ); } |
We need Javadoc for the total horizontal lines and total vertical lines getters.
1 2 3 4 5 6 7 8 9 10 11 12 13 14 15 16 17 18 19 20 21 22 23 24 25 | /** * Gets the total number of horizontal lines * generated by this iterator. * (Only meaningful if orientation is HORIZONTAL or BOTH.) * * @return the total number of horizontal lines * generated by the iterator */ public float getTotalHorizontalLines() { return totalHorLines; } /** * Gets the total number of vertical lines * generated by this iterator. * (Only meaningful if orientation is VERTICAL or BOTH.) * * @return the total number of vertical lines * generated by the iterator */ public float getTotalVerticalLines() { return totalVerLines; } |
Finally, we need documentation for the iterator method required by implements Iterable.
1 2 3 4 5 6 7 8 9 10 11 12 13 14 15 16 17 18 | /** * Returns an iterator for horizontal and/or vertical lines. * The lines returned are determined by the orientation, * HORIZONTAL (horizontal lines only), * VERTICAL (vertical lines only) * or BOTH (horizontal and vertical lines). * The user may assume * that horizontal lines are generated * starting at the top of the bounding rectangle, * then sequentially to the bottom. * Vertical lines are generated * beginning at the left of the bounding rectangle * then sequentially to the far right. * * @return an iterator for horizontal and/or vertical lines */ @Override public Iterator<Line2D> iterator() |
The Main Class
In the CartesianPlane package, the only class left to document is the Main class. The documentation is minimal but still essential and must be written. Here it is.
1 2 3 4 5 6 7 8 9 10 11 12 13 14 15 16 17 18 19 20 | /** * This class encapsulates logic to instantiate * and display a CartesianPlane. * * @author Jack Straub */ public class Main { /** * Application entry point. * * @param args command line arguments; not used */ public static void main(String[] args) { CartesianPlane canvas = new CartesianPlane(); Root root = new Root( canvas ); root.start(); } } |
Package-level Documentation
To generate documentation at the package level, you need a package-info.java file in your package root directory. If you ask, Eclipse will create one of these when it creates a new package for your project. In Project Explorer, right-click on an element of your project and select New->package. In the New Package dialog, check the Create package-info toggle button at the bottom. Also, click the Generate Comments toggle.

If you need to create this file after creating the package, right-click on the package name in Project Explorer and select new->file. In the new file dialog, name the file package-info.java. Edit the file and add a package declaration at the top.
Once you have a package-info.java file, add a Javadoc comment immediately before the package declaration. For illustration purposes, I have made two new packages for our project, com.acmemail.judah.cartesian_plane.app and com.acmemail.judah.cartesian_plane.graphics_utils. For now, the app package will contain only the Main class, and the graphics_utils package will contain only the Root class.
Here is the text that I wrote in the package-info.java file in the cartesian_plane package and the documentation that it generates.
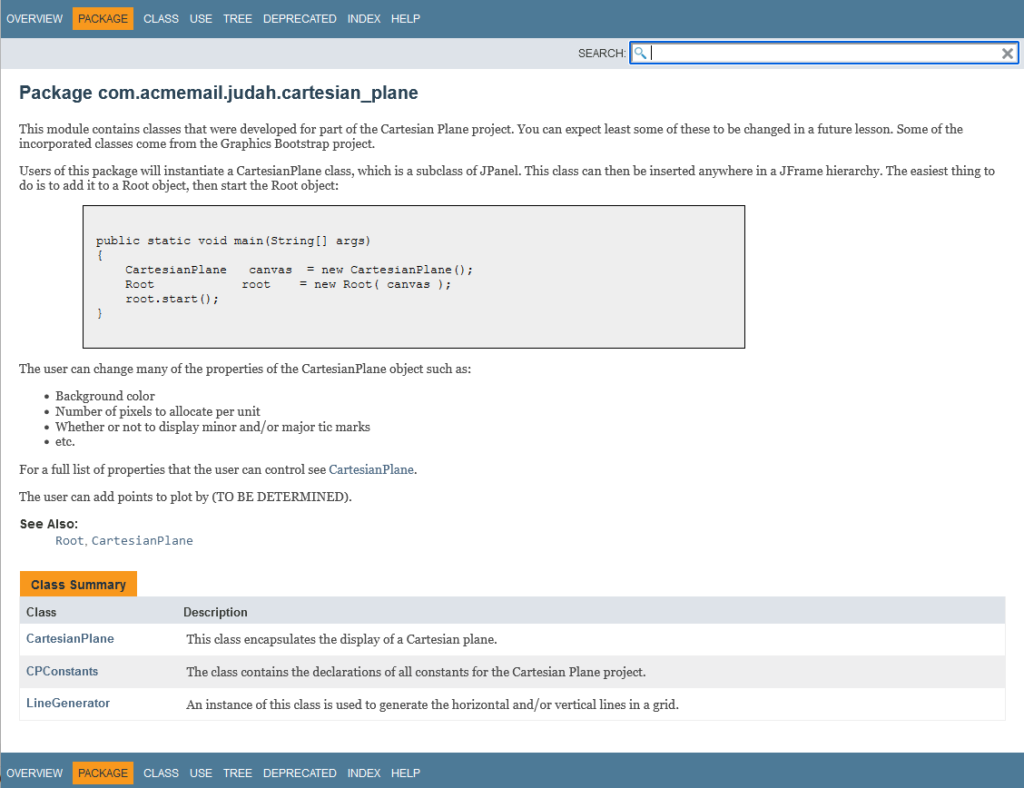
1 2 3 4 5 6 7 8 9 10 11 12 13 14 15 16 17 18 19 20 21 22 23 24 25 26 27 28 29 30 31 32 33 34 35 36 37 38 39 40 41 42 43 44 45 46 47 48 | /** * This module contains classes that were developed for * part of the Cartesian Plane project. * You can expect least some of these * to be changed in a future lessons. * Some of the incorporated classes come from the * Graphics Bootstrap project. * <p> * Users of this package * will instantiate a CartesianPlane class, * which is a subclass of JPanel. * This class can then be inserted * anywhere in a JFrame hierarchy. * The easiest thing to do * is to add it to a Root object, * then start the Root object: * </p> * <div class="js-codeblock" style="max-width: 50em;"> public static void main(String[] args) { CartesianPlane canvas = new CartesianPlane(); Root root = new Root( canvas ); root.start(); } * </div> * <p> * The user can change many of the properties * of the CartesianPlane object such as: * </p> * <ul> * <li>Background color</li> * <li>Number of pixels to allocate per unit</li> * <li>Whether or not to display minor and/or major tic marks</li> * <li>etc.</li> * </ul> * <p> * For a full list of properties * that the user can control * see {@linkplain CartesianPlane}. * </p> * <p> * The user can add points to plot * by (TO BE DETERMINED). * </p> * @see com.acmemail.judah.cartesian_plane.graphics_utils.Root * @see CartesianPlane */ package com.acmemail.judah.cartesian_plane; |
I’ve put minimal documentation into the package-info.java files for the other packages, selected the current project’s name in Package Explorer, and generated the Javadoc for the entire project. This is what I see when I open the index file.

The index page has a hyperlink to the documentation for each package; each package documentation page has a hyperlink to the documentation for each class in the package; and the class documentation page has a hyperlink to the documentation for every public method and property in the class.
The Overview Page
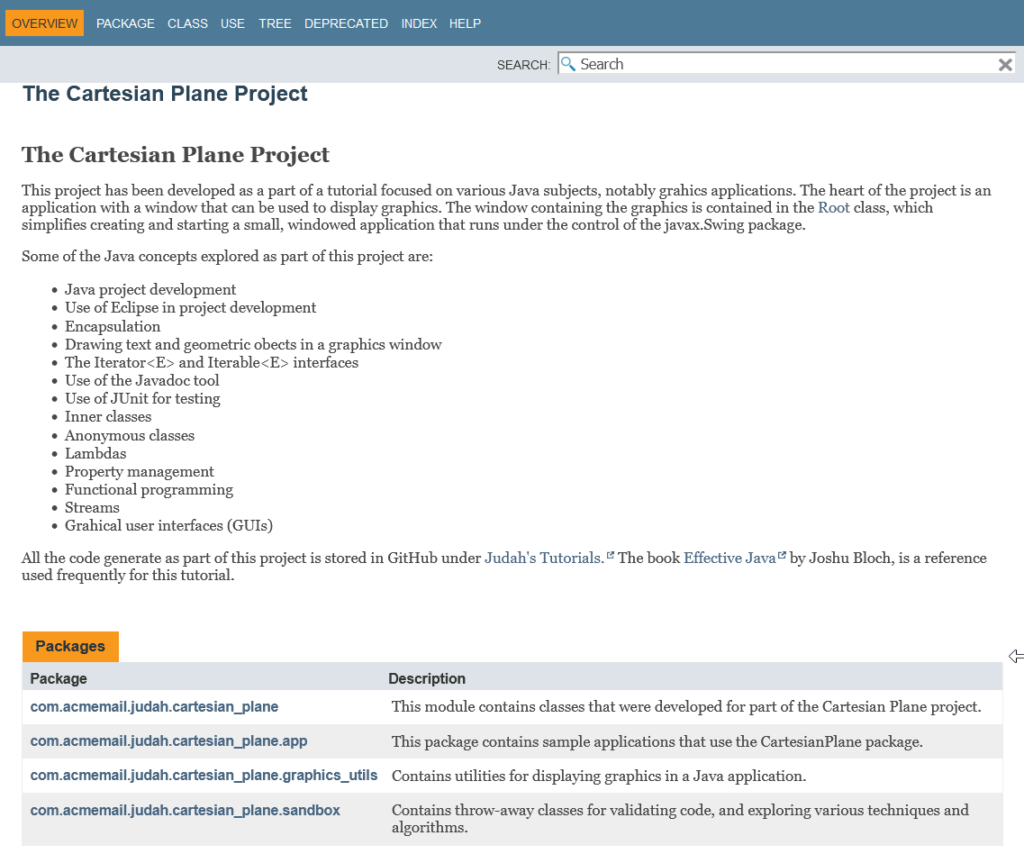
For Javadoc, the top of the documentation hierarchy is the overview file. This is just a normal HTML file, but it can contain Javadoc tags such as @see and {@linkplain}. By convention the file is named overview.html and is placed in the root of a project’s source tree (note that these are conventions; you can name the file anything and put it anywhere you like). The overview page typically provides a high-level view of a project, such as an application or an API consisting of multiple packages. For a good example of an overview file, see JAMA : A Java Matrix Package, from the National Institute of Standards and Technology (NIST). Here’s the overview page that I wrote for our project (not nearly as good as the NIST page); it’s stored in the src directory of the project root.
1 2 3 4 5 6 7 8 9 10 11 12 13 14 15 16 17 18 19 20 21 22 23 24 25 26 27 28 29 30 31 32 33 34 35 36 37 38 39 40 41 42 43 44 45 46 47 48 49 50 51 52 53 54 55 56 57 | <html> <body> <h1>The Cartesian Plane Project</h1> <p> This project has been developed as a part of a tutorial focused on various Java subjects, notably grahics applications. The heart of the project is an application with a window that can be used to display graphics. The window containing the graphics is contained in the {@linkplain com.acmemail.judah.cartesian_plane.graphics_utils.Root} class, which simplifies creating and starting a small, windowed application that runs under the control of the javax.Swing package. </p> <p> Some of the Java concepts explored as part of this project are: </p> <ul> <li>Java project development</li> <li>Use of Eclipse in project development</li> <li>Encapsulation</li> <li>Drawing text and geometric obects in a graphics window</li> <li>The Iterator<E> and Iterable<E> interfaces</li> <li>Use of the Javadoc tool</li> <li>Use of JUnit for testing</li> <li>Inner classes</li> <li>Anonymous classes</li> <li>Lambdas</li> <li>Property management</li> <li>Functional programming</li> <li>Streams</li> <li>Grahical user interfaces (GUIs) </ul> <p> All the code generate as part of this project is stored in GitHub under <a href="https://github.com/Judah-s-Tutorials/JudahsTutorials"> Judah's Tutorials. </a> The book <a href="https://www.amazon.com/Effective-Java-Joshua-Bloch/dp/0134685997/ref=sr_1_1?crid=3Q02PLH5ZQ2RS&keywords=effective+java&qid=1671321666&s=books&sprefix=effective+java%2Cstripbooks%2C143&sr=1-1&ufe=app_do%3Aamzn1.fos.18ed3cb5-28d5-4975-8bc7-93deae8f9840"> Effective Java, by Joshua Bloch" </a> is a reference used frequently for this tutorial. </p> <p> @see "Bloch, Joshua. Effective Java. Addison-Wesley, 2018." @see <a href="https://github.com/Judah-s-Tutorials/JudahsTutorials"> Judah's Tutorials </a> repository on GitHub </p> </body> </html> |
To include the overview in your Eclipse Javadoc generation, open the Generate Javadoc dialog and navigate to the last screen. Check the box next to Overview, enter the path to the overview doc in the text box (or use the browse button), and generate the documentation.

The index.html file in the doc directory now goes to the overview page.
To add the overview to your documentation from the command line, use the -overview option:
javadoc -cp src/main/java -d docx –add-stylesheet CustomStyle.css -overview src\overview.html @packages.txt
Regarding invoking Javadoc from the command line, I’m going to make one more file containing all the options that go into the command. I’ll call it javadocOptions.txt.
-cp src/main/java
-d docx
--add-stylesheet CustomStyle.css
-overview src/overview.html
Now, I can generate my documentation with this command:
javadoc @packages.txt @javadocOptions.txt
Summary
Good documentation is crucial to the success of any programming project. If you’re programming in Java, using Javadoc is the best way to document your code. In closing, let me make two more points.
- Documentation is required for public elements of your project. Documenting the private elements (private fields, helper methods, nested classes) is not required but is still helpful. I find that documenting all elements of the code helps me to organize my thoughts, and it’s undoubtedly beneficial to a maintenance programmer trying to decipher my code. It’s even helpful to me when I haven’t looked at the code in a while, and I’m saying to myself, “What was I thinking?” At a minimum, going forward with this project, I will include documentation for all private methods and nested classes.
- Don’t wait till the end of a project to write the documentation! You’ll get more helpful content if you write it while your code is fresh in your mind, and you’re not rushing to get it all done the last day before a deadline.