This lesson is about property management; associated topics include:
- What is a property?
- How is a property stored?
- How is a property assigned a value?
- How can I discover when the value of a property has changed?
In this lesson, we’ll talk about all of the above. Along the way, we’ll run into some fun programming topics, including:
- Accessing the command line
- Accessing the programming environment
- Accessing project resources
- Processing events
GitHub repository: Cartesian Plane Part 7a
Previous lesson: Cartesian Plane Lesson 6: Unit Testing, Page 2
Lesson 7: Property Management (Page 1)
Introduction
What is a property?
A property has a name and a value. The name is usually a string, something reasonably descriptive, such as ticMajorColor. The value can be any type. Because name/value pairs are often managed by hand, values are sometimes stored as strings, even though they represent some other type, such as an integer or decimal number. Suppose we had these name/value pairs represented in a text file maintained by a system admin:
title=Java Editor
convertTabsToSpaces=true
tabSize=4
Because the above values reside in a text file, they are necessarily stored as strings. At runtime, a program would parse this file and convert the value of convertTabsToSpaces to boolean and the value for tabSize to int.
How are properties stored?
Some properties are not stored; they are derived. For example, three properties of a circle are its radius, circumference, and area. However, the circumference and area properties are not usually stored; instead, the radius is stored, and the circumference and area are derived as needed. During program execution, the radius is likely stored in a float or double variable; however, if the value needs to be stored offline, it might be converted to a string for the abovementioned reasons.
How are properties assigned values?
During program operation, properties can be dynamically assigned using mutators, typically called setters in Java. But what about its initial value, the value assigned at program initiation? One answer to this is that the value is assigned as a variable initializer or during construction, for example:
private final float  epsilon = .001f; // .001f is an initializer
private final Random randy; // assigned an initial value in the contructor
// ...
public SomeApp( long seed )
{
    randy = new Random( seed );
    // ...
}
But what about values more closely controlled by the user? If the users are programmers, they can invoke the mutator. But what if the user is an operator who wants to assign different colors to their major and minor tic marks? That’s where it gets interesting. One of the most common algorithms for finding initial values (and the one we’ll use in the Cartesian plane project) goes like this:
⬛ Finding the Initial Value of a Property
- First, check the command line.
A property name/value pair can be specified on a command line as either a command option or a command-line argument. If the value for a given property is not found on the command line: - Check the environment.
(OK, what the heck is an environment? More about that soon. For the moment, be aware that it’s a place where name/value pairs can be found.) If the initial value for a property is not found in the environment: - Look in the user’s configuration file.
This is also known as an initialization file or ini file because such files often have an extension of .ini. For a given application, this file may or may not exist. An application might not allow a user to have a special configuration file; if it does, its use may be optional. In our Cartesian plane application, it will be optional. If the value for the given property is not found in the user’s configuration file: - Look in the application’s configuration file.
Once again, a given application might always, sometimes, or never have a configuration file. In our Cartesian plane example, we will always expect to have a configuration file, but we’ll allow the program to go on without one if, for some reason, it’s missing. And if the value we’re looking for isn’t there: - Use the initial value explicitly provided by the program developer.
Often, what this comes down to is the initial value assigned to a variable in its declaration, for example:Color bgColor = Color.BLUE;
In most best-practices discussions, you’ll hear that it is recommended for a developer always to give a variable an explicit initial value. If the programmer has neglected to do so: - The programming language determines the default value.
This is where it could get dicey:- Fields: In Java, you can expect that a primitive, numeric field (a class or instance variable) has a default initial value of 0; a primitive, Boolean variable has a default initial value of false; and a reference variable (i.e., an object reference such as String) has a default initial value of null.
- Local Variables: Local variables have no default; the value of an uninitialized local variable is random. One reason a program might fail sometimes but not others is because a negligent programmer failed to give a local variable an explicit initial value.
In our Cartesian plane project, we will follow the above rules. We will begin by converting most of the variables in the CPConstants class to properties. All default value constants, with variable names ending in _DV, will be given corresponding property name constants, with variable names ending in _PN. The property name itself will be a camel-case version of the start of the variable name. For example: public static final String GRID_UNIT_PN = "gridUnit";
public static final String GRID_UNIT_DV = "65";
Note: following the _PN, _DV naming convention will be crucial in the next lesson.
We will evolve our code over several generations as we go through the following sections of this lesson. Rather than implement and re-implement our sample code for every property in CPConstants, we’ll start with just the three properties described below; once our code gets into its final state (at least for this lesson), we’ll incorporate the remaining properties. Here are the changes to CPConstants for the first few properties:
/** Major tic mark color property name. */
public static final String  TIC_MAJOR_COLOR_PN      = "ticMajorColor";
/** Major tic mark color default value: int. */
public static final String  TIC_MAJOR_COLOR_DV      = "0X000000";

/** Major tic mark weight property name. */
public static final String  TIC_MAJOR_WEIGHT_PN     = "ticMajorWeight";
/** Major tic mark weight default value: float. */
public static final String  TIC_MAJOR_WEIGHT_DV     = "2";

/** Major tic mark length property name. */
public static final String  TIC_MAJOR_LEN_PN        = "ticMajorLength";
/** Major tic mark length default value: float. */
public static final String  TIC_MAJOR_LEN_DV        = "16";
Declaring the PropertyManager Class
Let’s take a moment to get the PropertyManager class started. This will take a bit of explaining because we’re going to implement it as a singleton. A singleton is a simple design pattern allowing a class to have only one instance. There are a couple of ways to do this, but the recommended strategy in Java is to use an enum with a single enumerated constant, named, by convention, INSTANCE. In case you’re unfamiliar with enums, they’re a special kind of class that extends java.lang.Enum and have a private constructor. They have a variety of advantages. For details, see Enum Types in the Oracle Java tutorial, and What are the differences between a Java enum and a class with private constructor? on Stack Overflow. For a little more information on singletons, in Java and in general, see Java singleton design pattern by W3Schools and Effective Java by Joshua Bloch. For the purpose of this discussion, the distinction between an enum and a “regular” class comes down to just a couple of lines of code:
public enum PropertyManager
{
    /** The single instance of this class. */
    INSTANCE;

    // ...

    private PropertyManager()
    {
        // ...
    }
Interrogating the Command Line
On the command line, Java distinguishes between command options and command-line arguments. Command options come immediately after the java command and before the name of the class containing the main method that initiates the application; arguments come after the class name.
java opt1 opt2 opt3 MainClass arg1 arg2 arg3Here’s a sample program from the project sandbox that demonstrates the distinction:
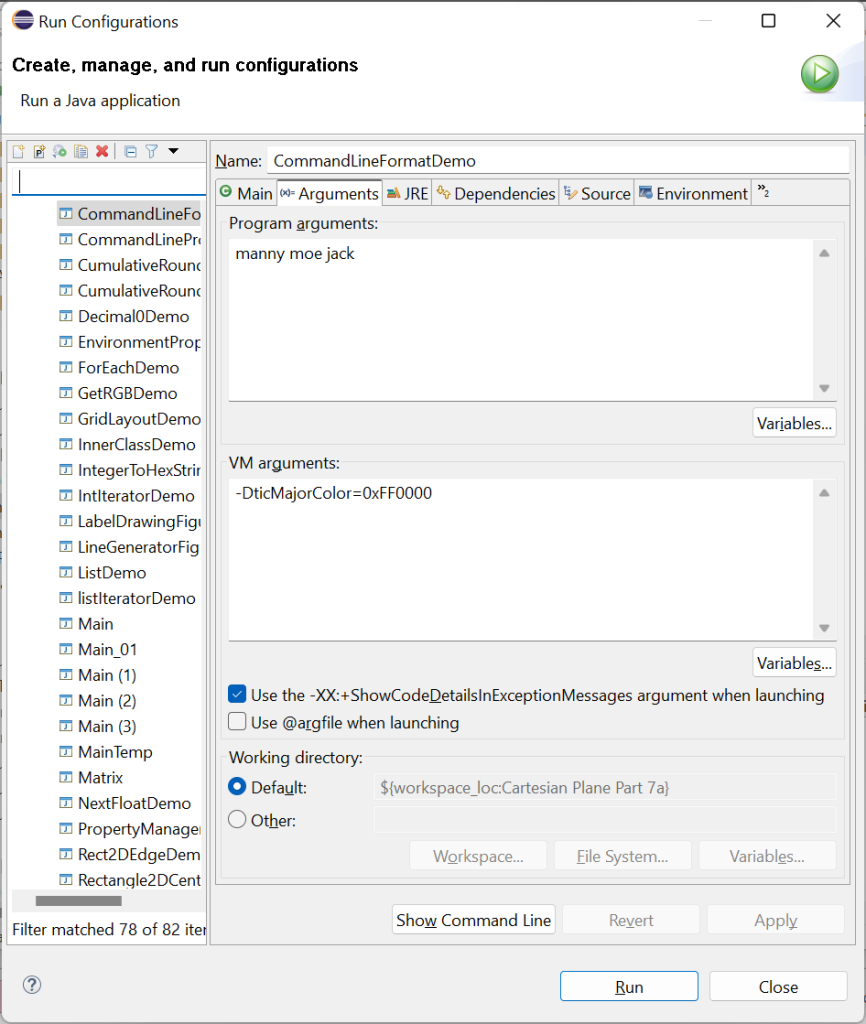
1 2 3 4 5 6 7 8 9 10 11 12 | public class CommandLineFormatDemo { public static void main( String[] args ) { for ( String str : args ) System.out.println( str ); } } Output: manny moe jack |
To run this program, position a command line in the target/classes directory of your project and enter this command (all on one line):
java -cp . -DticMajorColor=0xFF0000
    com.acmemail.judah.cartesian_plane.sandbox.CommandLineFormatDemo
    manny moe jack
You can see that the command-line arguments (manny, moe, jack) are accessed through the args parameter of the main method, but the command-line options (-cp . -DticMajorColor=0xFF0000) are not.
You can run a program with command options and command-line arguments from Eclipse by creating a run configuration. In Package Explorer, go to the project sandbox package, right-click on CommandLineFormat, and select Run As -> Run Configurations. In the run configuration dialog, click on the Arguments tab. Put your command-line arguments in the Program arguments text box and your command options in the VM arguments text box, then click the Run button.
The -Dname=value Command Line Option
The -Dname=value command option creates a property in the System class, where name and value are implemented as Strings. We can get the value of the property via the getProperty( String name ) class method in the System class; if the property can’t be found, null is returned:
String propVal = System.getProperty( "propName "ticMajorColor" )Our PropertyManager class will manage, well, properties. It will have a method called String getProperty(String propName, String defValue), which follows the procedure discussed in Finding the Initial Value of a Property to find a property’s initial value. Let’s start writing that method.
Note: the following code employs a technique you might not be familiar with, which is particularly helpful in writing if-else ladders. The first rung of the if-else ladder looks like this:
if ( (val = System.getProperty( propName )) != null )
    ;
else ...
In the code, Val is assigned from System.getProperty and immediately compared to null. If val is not null, the ladder terminates; otherwise, the logic proceeds to the next rung.
1 2 3 4 5 6 7 8 9 10 11 12 13 14 15 16 17 18 19 20 21 22 23 24 | /** * This method is called to get the initial value * of a named property. * The value is obtained * according to the algorithm * described in the class header. * * @param propName property name * @param defValue default value to be applied if necessary * * @return the value of the given property * * @see <a href="#initialValues"> * Establishing the Initial Values of Properties * </a> */ private String getProperty( String propName, String defValue ) { String val = null; if ( (val = System.getProperty( propName )) != null ) ; // ... return val; } |
Interrogating the Environment
⬛ What is an Environment Variable?
The environment is a collection of environment variables, where each variable describes a property represented as a pair of strings. Environment variables come from various places: they can be set by the system, an application, or the user. Here are a couple of examples from a Unix system:
HOSTNAME=homer11.u.washington.edu                                                                                       SHELL=/bin/bash
HOME=/rc00d87/jstraub
LOGNAME=jstraub
In Windows, you can set environment variables from the control panel or the command line using the set command:
set ticMajorColor=0xFF0000In Linux or MacOS, environment variables can be set in a shell script or from the command line. Exactly how you do that depends on the shell that you’re using. In bash or zsh you would use the export command:
export ticMajorColor=0xFF0000⬛ Getting the Value of an Environment Variable in Java
To get the value of an environment variable in a Java program, use the getenv(String name) class method from the System class; if the environment variable is not found, this method returns null. So the next rung in the if-else ladder in our PropertyManager.getProperty method looks like this:
1 2 3 4 5 6 7 8 9 10 | private String getProperty( String propName, String defValue ) { String val = null; if ( (val = System.getProperty( propName )) != null ) ; else if ( (val = System.getenv( propName )) != null ) ; // ... return val; } |
We will need to know about the Java Properties class for the next couple of steps in the process.
The Java Properties Class
An object of the Properties class is used to manage a collection of properties. You can add and remove name/value pairs and get the value for a specific property name. To get the value for a property, use the getProperty(String name) method. If the property can’t be found, it will return null.
String val = props.getProperty( TIC_MAJOR_WEIGHT_PN );
if ( val == null )
    val = TIC_MAJOR_WEIGHT_DV;
There’s an overload for this method that takes two Strings: getProperty(String name, String defVal ). If the named property can’t be found, this method returns defVal.
String val =
    props.getProperty(TIC_MAJOR_WEIGHT_PN ,TIC_MAJOR_WEIGHT_DV);
Most importantly, for the next step in this lesson, you can use a Properties object to load a properties file.
A properties file is a regular text file that contains name/value pairs of the form name=value, one pair per line. A properties file can contain blank lines which are ignored. Lines beginning with a # are considered comments and ignored. A properties file might look something like this:
    ###########################################################
    # Properties controlling the appearance of major tic marks
    ###########################################################
    # thickness of a major tic mark
    ticMajorWeight=2
    # length of a major tic mark (pixels)
    ticMajorLength=17
    # color of a major tic mark
    ticMajorColor=0x0000FF
    # major tic marks per unit
    ticMajorMPU=2
    # deterimes whether major tic marks are draw
    ticMajorDraw=true

    ###########################################################
    # Properties controlling the appearance of axes
    ###########################################################
    # thickness of the axes
    axisWeight=10
    # color of the axes
    axisColor=0x000000
Loading the User Properties File
To load a properties file, we first have to know whether there is one and, if there is, its location. Our application will have a property name for this location, with a default value of null; if the user wants a special property file, they’ll have to specify its location on the command line or in the environment. We’ll start by adding two constants to the CPConstants class.
/** Location of user properties file property name. */
public static final String  USER_PROPERTIES_PN      = "userProperties";
/** Location of user properties file default value. */
public static final String  USER_PROPERTIES_DV      = null;
In our project, we will write the PropertyManager class, which will have an instance variable to hold the user’s properties.
/**
 * Property name/value pairs from the user's properties file.
 * Used only during initialization.
 */
private final Properties userProperties = new Properties();
⬛ Loading the User’s Property File
We’ll have a helper method that loads the user properties file (if there is one). Here’s a quick sketch of what it will look like.
private void getUserProperties()
{
    String      propsFile   =
        getProperty(
            CPConstants.USER_PROPERTIES_PN,
            CPConstants.USER_PROPERTIES_DV
        );

    if ( propsFile != null && !propsFile.isEmpty() )
    {
        // 1. Open the user's properties file
        // 2. Load the user's properties
        // 3. Close the user's properties file
    }
}
We can use the getProperty method to get the path to the user’s properties file (if there is one) from either the command line or the environment. We test for success by examining the return value for null or (for the sake of completeness) an empty string. If we find a path to the file, we can open it, load it into the Properties object, and close it. This is where it gets messy, because any of the open, load, and close operations can fail with an I/O error, and we have to be ready to handle it. There are two slightly different strategies for doing this.
The first strategy is to use try/catch/finally blocks. In case you’re not familiar with finally, a finally block follows a try/catch block pair. If the code inside the try block causes an exception to be thrown, the code inside the catch block is executed. Then, whether an exception is thrown or not, the code inside the finally block is executed. Because we have to at least attempt to close a file we are no longer using, even if an exception is thrown, we put the close operation inside the finally block. Of course, the close operation might throw an exception, so the code inside the finally block has to be enclosed in yet another try/catch block pair. For more about try/catch/finally blocks, see:
- The try Block in the Oracle Java Tutorial
- Java Exceptions – Try…Catch on the W3 Schools website
Here is the main method from the sandbox class UserPropertiesDemo1.
1 2 3 4 5 6 7 8 9 10 11 12 13 14 15 16 17 18 19 20 21 22 23 24 25 26 27 28 29 30 31 32 33 34 35 36 37 38 39 40 41 42 43 44 45 46 47 48 | public static void main(String[] args) { Properties props = new Properties(); // Get the path to the user's properties file. String propName = CPConstants.USER_PROPERTIES_PN; String propFile = System.getProperty( propName ); if ( propFile == null || propFile.isEmpty() ) System.err.println( "Can't get " + propName ); else { System.out.println( "Attempting to load " + propFile ); // This variable needs to be declared before the try block // because its scope must extend to the finally block. FileInputStream inStream = null; try { // Once opened we must remember to eventually close the // input stream. This is done in the finally block which // is executed regardless of whether an exception is thrown. inStream = new FileInputStream( propFile ); props.load( inStream ); } catch ( IOException exc ) { System.err.println( "Open file error: " + exc.getMessage() ); } finally { // Annoyingly, closing a stream might also cause an // IOException, which must be caught. try { if ( inStream != null ) inStream.close(); } catch ( IOException exc ) { System.err.println( "Close file error: " + exc.getMessage() ); } } for ( Object name : props.keySet() ) { Object val = props.get( name ); System.out.println( name + ": " + val ); } } } |
A better strategy for processing the input file is to use a try with resources block. In this case, the try statement is followed by parentheses within which you declare the variables to hold the resource(s) you will try to open; the resource type must implement the Closeable interface. After executing the code inside the try block, Java will automatically close the resource, whether or not an exception is thrown.
Important: The resource to be closed must be declared inside the parentheses of the try statement:
// correct
try ( FileInputStream inStream = new FileInputStream( propsFile ) )
// incorrect
FileInputStream inStream;
try ( inStream = new FileInputStream( propsFile ) )
Below is the final code for our helper method. For more about try with resources, see:
- UserPropertiesDemo2 in the project sandbox package
- The try-with-resources Statement in the Oracle Java tutorial
- The documentation for the Java Closeable interface.
1 2 3 4 5 6 7 8 9 10 11 12 13 14 15 16 17 18 19 20 21 22 23 | private void getUserProperties() { String propsFile = getProperty( CPConstants.USER_PROPERTIES_PN, CPConstants.USER_PROPERTIES_DV ); if ( propsFile != null && !propsFile.isEmpty() ) { try ( FileInputStream inStream = new FileInputStream( propsFile ) ) { userProperties.load( inStream ); } catch ( IOException exc ) { String msg = "Error reading user properties file: \"" + propsFile + "\""; System.err.println( msg ); System.err.println( exc.getMessage() ); } } } |
Now, we can add the next step to our getProperty method.
1 2 3 4 5 6 7 8 9 10 11 12 | private String getProperty( String propName, String defValue ) { String val = null; if ( (val = System.getProperty( propName )) != null ) ; else if ( (val = System.getenv( propName )) != null ) ; else if ( (val = userProperties.getProperty( propName )) != null ) ; // ... return val; } |
⬛ Loading the Application Properties File
Loading the application properties file will be a little different because this file will be stored in a project resources directory. An application’s class-path includes its resources directory, and the resources directory becomes part of the application’s distribution; if you’re distributing your project as a jar file, the directory will become part of your jar file. First, we’ll need a resources directory, and then we’ll have to make it known to Eclipse. We should be able to create and add the directory directly in Eclipse, but in the past, I have found that to be a bit glitchy. So, I create the directory via the operating system and then add it to Eclipse.
By the way, we will have one resources directory, which will be associated with our production code. But you can have multiple resources directories; it’s not unusual to have one for your production code and another for your test code (something we’ll be doing later). Your resources directories can have subdirectories.
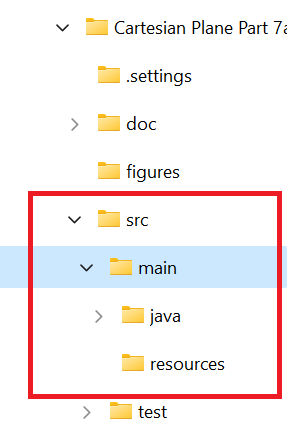
- From your operating system, go into your project directory at the same level as your production source code and create the resources directory. If you follow the same project structure as I do, you’ll want to go to project-root/src/main.

- In Package Explorer, right-click on your project name and select refresh. Your resources directory should now show up in Package Explorer.

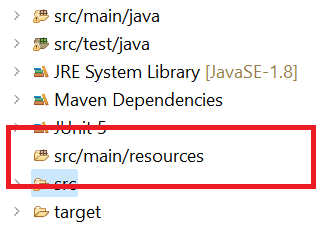
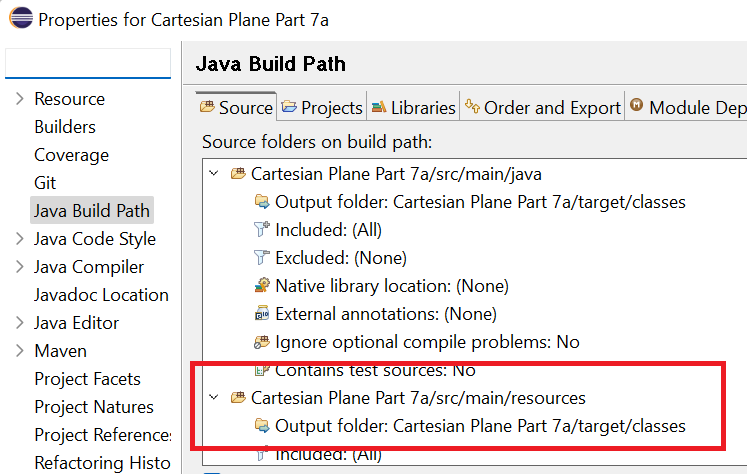
- In Package Explorer, right-click on your project name and select Build Path -> Configure Build Path. This will post the Java Build Path dialog, where you will select the Source tab. Your new folder should be listed on this tab (if not, you’ll have to click the Add Folder button and follow the prompts).

- In Package Explorer, right-click src/main/resources and select New -> File. Create the file AppProperties.ini; open it in the editor and add the lines:
    ticMajorWeight=2
    ticMajorLength=17
    ticMajorColor=0x0000FF
    ticMajorMPU=2
    ticMajorDraw=true
    axisWeight=10
    axisColor=0x000000
Now, we can add a helper method to PropertyManager to read the application properties file from the resources directory. Go to the AppPropertiesDemo class in the sandbox package to see how this will work. First, we will need the ClassLoader object for our project; we can get this from the class object in any class: ClassLoader loader = AppPropertiesDemo.class.getClassLoader();
Next, we use getResourceAsStream in the ClassLoader to open an input stream to the properties file: InputStream inStream = loader.getResourceAsStream( appPropertiesName );
Note: If you look around the web, you’ll see that the class has an instance method, getResourceAsStream, which does the same thing. While this seems to work fine when executing a Maven build from the command line, I have never gotten it to work inside Eclipse.
Notice that if getResourceAsStream fails, it does not throw an exception; instead, it returns null: if ( inStream == null )
{
String msg = "System properties file \""
+ appPropertiesName + "\" not found";
System.err.println( msg );
}
else
{
// load properties file here ...
}
If getResourceAsStream succeeds, the Properties object can load the properties file via the load(InputStream) method. However, this method might throw an exception, and we don’t have the option of using try-with-resources this time, so we’ll have to embed the logic in try/catch/finally blocks. For more about loading resources in Java, see:
- Loading Resources from classpath in Java with Example on the Tutorials Point website
- Location-Independent Access to Resources on the Oracle Java website
Here is the finished helper method from the PropertyManager class.
1 2 3 4 5 6 7 8 9 10 11 12 13 14 15 16 17 18 19 20 21 22 23 24 25 26 27 28 29 30 31 32 33 34 35 36 37 38 39 40 41 42 43 44 45 46 | /** * Read the application properties file from the resources directory. * Properties are loaded into the appProperties object. * * Precondition: appProperties object has been instantiated */ private void getAppProperties() { ClassLoader loader = PropertyManager.class.getClassLoader(); InputStream inStream = loader.getResourceAsStream( appPropertiesName ); if ( inStream == null ) { String msg = "System properties file \"" + appPropertiesName + "\" not found"; System.err.println( msg ); } else { try { appProperties.load( inStream ); } catch ( IOException exc ) { String msg = "Error reading system properties file: \"" + appPropertiesName + "\""; System.err.println( msg ); System.err.println( exc.getMessage() ); } } if ( inStream != null ) { try { inStream.close(); } catch ( IOException exc ) { String msg = "Error closing system properties file: \"" + appPropertiesName + "\""; System.err.println( msg ); System.err.println( exc.getMessage() ); } } } |
Now, we can finish the getProperty(String propName, String defValue) method.
1 2 3 4 5 6 7 8 9 10 11 12 13 14 15 16 | private String getProperty( String propName, String defValue ) { String val = null; if ( (val = System.getProperty( propName )) != null ) ; else if ( (val = System.getenv( propName )) != null ) ; else if ( (val = userProperties.getProperty( propName )) != null ) ; else if ( (val = appProperties.getProperty( propName )) != null ) ; else val = defValue; return val; } |
The PropertyManager Constructor
Now that all our helper methods are in place we’re ready for the PropertyManager constructor.
Note: Remember that PropertyManager has been implemented as an enum; enums have only private constructors.
The PropertyManager will have an instance variable that maps property names to property values; values will be stored as Strings and will need to be converted to other types as necessary: private final Map<String,String> propertyMap = new HashMap<>();
The constructor will:
- Using the helper methods, load the user and application properties.
- Use getProperty(String propName, String defValue) to obtain the initial value of each of the three implemented properties (see above) and
- Add the property name and its established value to the property map.
Remember: for now, we’re only doing this for three properties. We’ll fix that on the next page of this lesson.
1 2 3 4 5 6 7 8 9 10 11 12 13 14 15 16 17 18 19 20 21 22 23 24 25 | private PropertyManager() { String val = null; getAppProperties(); getUserProperties(); val = getProperty( CPConstants.TIC_MAJOR_COLOR_PN, CPConstants.TIC_MAJOR_COLOR_DV ); propertyMap.put( CPConstants.TIC_MAJOR_COLOR_PN, val ); val = getProperty( CPConstants.TIC_MAJOR_WEIGHT_PN, CPConstants.TIC_MAJOR_WEIGHT_DV ); propertyMap.put( CPConstants.TIC_MAJOR_WEIGHT_PN, val ); val = getProperty( CPConstants.TIC_MAJOR_LEN_PN, CPConstants.TIC_MAJOR_LEN_DV ); propertyMap.put( CPConstants.TIC_MAJOR_LEN_PN, val ); } |
Remember the getAs… methods from CPConstants (see String-to-X in Lesson 3)? We’ll put a version of each into PropertyManager. These methods each require a property name and return Objects, not primitives; that way, we can return null if a property is not found. Here are two of the methods; the rest can be found in the git repository.
1 2 3 4 5 6 7 8 9 10 11 12 13 14 15 16 17 18 19 20 21 22 23 24 25 26 27 28 29 30 31 32 33 34 35 36 37 38 39 | /** * Gets the value associated with a given property name * and returns it as a Float. * * @param propName the given property name * * @return the converted Float, or null if the property can't be found * * @throws NumberFormatException if the value associated with propName * cannot be converted to a Float */ public Float asFloat( String propName ) { Float fVal = null; String sVal = propertyMap.get( propName ); if ( sVal != null ) fVal = Float.parseFloat( sVal ); return fVal; } /** * Gets the value associated with a given property name * and returns it as an Integer. * * @param propName the given property name * * @return the converted Integer, or null if the property can't be found * * @throws NumberFormatException if the value associated with propName * cannot be converted to an Integer */ public Integer asInteger( String propName ) { Integer iVal = null; String sVal = propertyMap.get( propName ); if ( sVal != null ) iVal = Integer.parseInt( sVal ); return iVal; } |
Property Change Notification
When the value of a property changes, miscellaneous objects in an application may need to know about it. In Java, we can implement this via a property change event. If we write our PropertyManager class correctly, the programmer can register a property change listener. That is, an object that implements the PropertyChangeListener interface, which will be notified when the value of a property changes. A property change is just one of many different kinds of events that can occur during program execution; some other examples are: the operator pushes a button in a GUI (action event); the operator moves the mouse (mouse event); the keyboard focus is moved to a different GUI component (focus-lost and focus-gained events). Following the standard Java paradigm, event processing requires three artifacts:
- An event object that describes the event. Examples are ActionEvent, MouseEvent, and PropertyChangeEvent.
- An event listener interface that describes at least one method to be invoked with an event object when an event occurs. Examples are ActionListener with its actionPerformed(ActionEvent e) method, MouseListener with its MouseClicked(MouseEvent e) method, and PropertyChangeListener with its propertyChange(PropertyChangeEvent e) method.
- A means to register a listener for a particular event, for example JButton (the GUI component that encapsulates a push button) has the addActionListener(ActionListener l) method, JPanel has the addMouseListener(MouseListener l) method and JFrame has the addPropertyChangeListener(PropertyChangeListener l) method.
Note that, by convention, whenever you write an add-listener method, you should also write a corresponding remove-listener method:
addPropertyChangeListener(PropertyChangeListener listener)...
removePropertyChangeListener(PropertyChangeListener listener)...
Facilities that implement property change event processing often have two means to register event listeners:
- addPropertyChangeListener(PropertyChangeListener l), which registers listeners to be notified whenever any property changes; and
- addPropertyChangeListener(String p, PropertyChangeListener l), which registers listeners to be notified whenever property p changes; listeners wishing to be notified of changes to a specific property are called per-property listeners.
(Don’t forget we must also implement removePropertyChangeListener(PropertyChangeListener l) and removePropertyChangeListener(String p, PropertyChangeListener l).)
A quick note about beans: In Java, a bean is a class that follows a set of conventions. In this discussion, we don’t care about beans. For our purposes, there is nothing special about them. However support for property management in Java grew up with beans, so a lot of the tools we will use come from the java.beans package and much of the documentation comes from the beans facilities and tutorials. Nevertheless, you don’t have to know anything about beans to complete this lesson.
In the PropertyManager class, we will support property change listeners and per-property change listeners. Eventually, we will utilize a PropertyChangeSupport object to facilitate this process, but let’s begin by going through all the nitty gritty details ourselves. For more information on property change management, see How to Write a Property Change Listener in the Oracle tutorials.
Property Change Event Processing in Nitty Gritty Detail
First, we’ll need support for property change listeners to be notified whenever a property changes. That requires a List<PropertyChangeListener> instance variable and two instance methods for managing the list.
1 2 3 4 5 6 7 8 9 10 11 12 13 | /** List of property listeners. */ private final List<PropertyChangeListener> propertyListeners = new ArrayList<>(); // ... public void addPropertyChangeListener( PropertyChangeListener listener ) { propertyListeners.add( listener ); } public void removePropertyChangeListener( PropertyChangeListener listener ) { propertyListeners.remove( listener ); } |
Next, to support the per-property listeners, we will need an instance variable that maps property names to lists of PropertyChangeListeners: Map<String,List<PropertyChangeListener>> perPropertyListeners
And we’ll need two instance methods to manage it:
1 2 3 4 5 6 7 8 9 10 11 12 13 14 15 16 17 18 19 20 21 22 23 24 25 26 27 28 29 30 31 | /** Map of per-property listeners. */ private final Map<String,List<PropertyChangeListener>> perPropertyListeners = new HashMap<>(); // ... public void addPropertyChangeListener( String property, PropertyChangeListener listener ) { List<PropertyChangeListener> list = perPropertyListeners.get( property ); if ( list == null ) { list = new ArrayList<PropertyChangeListener>(); perPropertyListeners.put( property, list ); } propertyListeners.add( listener ); } public void removePropertyChangeListener( String property, PropertyChangeListener listener ) { List<PropertyChangeListener> list = perPropertyListeners.get( property ); if ( list != null ) list.remove( listener ); } // ... |
We’ll need a helper method to create and propagate a PropertyChangeEvent Object. To create this type of object, you will need:
- The value of the property before it is changed (Object oldValue)
- The value of the property after it is changed (Object newValue)
- The name of the property
- And the source of the change (the PropertyManager object, INSTANCE, will serve this purpose)
To propagate the event, you need to:
- Call the propertyChange method of every listener in the propertyListeners list.
- Call the propertyChange method of every listener in the list mapped to the property name in the perPropertyListeners map.
Here is our first take on the helper method (yes, there will be a second, final take).
1 2 3 4 5 6 7 8 9 10 11 12 13 14 15 16 17 18 19 20 21 | private void propagatePropertyChange( String propName, String oldVal, String newVal ) { PropertyChangeEvent eventObj = new PropertyChangeEvent( INSTANCE, propName, oldVal, newVal ); for ( PropertyChangeListener listener : propertyListeners ) listener.propertyChange( eventObj ); List<PropertyChangeListener> list = perPropertyListeners.get( propName ); if ( list != null ) { for ( PropertyChangeListener listener : propertyListeners ) listener.propertyChange( eventObj ); } } |
Now we can rewrite each of our setProperty overloads to use the helper method; for example, setProperty(String, float) would look like this:
1 2 3 4 5 6 7 | public Object setProperty( String propName, float propVal ) { String sVal = Float.toString( propVal ); String oVal = propertyMap.put( propName, sVal ); propagatePropertyChange( propName, oVal, sVal ); return oVal; } |
But before we rewrite all of our setProperty overloads, let’s think about what each of them is going to do:
- Convert the input value to a string.
- Add the converted value to the propertyMap, simultaneously obtaining the old value.
- Call propagatePropertyChange.
- Return the old value.
Most of that work can be offloaded to a common method. So, let’s change the propagatePropertyChange method to handle these tasks. While we’re at it, let’s not bother to propagate a change event unless the property has actually changed. Here’s our modified method:
1 2 3 4 5 6 7 8 9 10 11 12 13 14 15 16 17 18 19 20 21 22 23 24 25 26 27 28 | private Object propagatePropertyChange( String propName, String newVal ) { Object oldVal = propertyMap.put( propName, newVal ); // Don't propagate a property change event unless the // value of the property has actually changed. if ( !oldVal.equals( newVal ) ) { PropertyChangeEvent eventObj = new PropertyChangeEvent( INSTANCE, propName, oldVal, newVal ); for ( PropertyChangeListener listener : propertyListeners ) listener.propertyChange( eventObj ); List<PropertyChangeListener> list = perPropertyListeners.get( propName ); if ( list != null ) { for ( PropertyChangeListener listener : propertyListeners ) listener.propertyChange( eventObj ); } } return oldVal; } |
Now, each of our setProperty methods can be simplified to something more like this:
1 2 3 4 5 6 | public Object setProperty( String propName, float propVal ) { String sVal = Float.toString( propVal ); Object oVal = propagatePropertyChange( propName, sVal ); return oVal; } |
The PropertyChangeSupport Class
Now that we’ve seen all the mechanics behind property change events let’s see how to simplify them using the PropertyChangeSupport class.
An object of this class takes the place of the propertyListeners list and the perPropertyListeners instance variables. We still need our four add/remove property listener methods, but these will be changed to utilize the PropertyChangeSupport object, and the logic will be simplified. Note that the argument to the PropertyChangeSupport constructor is the source for the PropertyChangeEvent objects; for us, this is INSTANCE, but you can’t refer to INSTANCE in an initializer. So, instantiation of the PropertyChangeSupport object must be performed using the enum constructor.
1 2 3 4 5 6 7 8 9 10 11 12 13 14 15 16 17 18 19 20 21 22 23 24 25 26 27 28 29 30 31 32 33 34 | /** * List of property listeners; this object must be instantiated * in a constructor. */ private final PropertyChangeSupport changeSupport; // ... private PropertyManager() { changeSupport = new PropertyChangeSupport( this ); // ... } public void addPropertyChangeListener( PropertyChangeListener listener ) { changeSupport.addPropertyChangeListener( listener ); } public void removePropertyChangeListener( PropertyChangeListener listener ) { changeSupport.removePropertyChangeListener( listener ); } public void addPropertyChangeListener( String property, PropertyChangeListener listener ) { changeSupport.addPropertyChangeListener( property, listener ); } public void removePropertyChangeListener( String property, PropertyChangeListener listener ) { changeSupport.removePropertyChangeListener( property, listener ); } |
The last thing we have to do regarding the PropertyChangeSupport object is to work it into the propagatePropertyChange helper method. This method will now be much shorter because most of the original logic will be replaced by a single call to changeSupport.firePropertyChange.
1 2 3 4 5 6 7 8 9 10 11 12 13 14 15 16 17 | /** * Finalize property change logic and fire the property change listeners. * The prior value of the property, if any, is returned; * if the property has no prior value null is returned. * * @param propName name of the property to be changed * @param newVal the new value of the property to be changed * * @return the old value of the property that was changed */ private Object propagatePropertyChange( String propName, String newVal ) { Object oldVal = propertyMap.put( propName, newVal ); changeSupport.firePropertyChange( propName, oldVal, newVal ); return oldVal; } |
By the way, if newVal is equal to oldVal the firePropertyChange method will not propagate a change event.
⬛ Perform Minimal Testing
That’s almost it for this part of the property management lesson. The major functional change we still need to make is to implement property management for the remainder of our properties (we’ve only done three so far; there are a lot more than that). We’ll undertake that task in the next part of our lesson. The next part of this lesson is also where I want to concentrate on testing, however I don’t want to start implementing major changes to the logic and suddenly find myself debugging basic stuff I thought I was through with. So, let’s do at least enough testing to prove that our basic approach is sound. Here’s a quick sketch of our test.
- Verify that we correctly get property values from the command line.
We’ll set the ticMajorColor property on the command line to 0xFF0000 and in the environment to 0x00FF00 (recall that it is set to 0x0000FF in the initialization file ) and verify that the value from the command line is used. - Verify that we correctly get property values from the environment
We’ll set the ticMajorWeight property to 3.5 in the environment (recall that in the initialization file, it is set to 2); we will not set the value on the command line. Then, we’ll verify that the value from the environment is used. - Verify that we correctly get property values from the initialization file
Verify that the value of the ticMajorLength property is 17, which is the value in the initialization file. - Verify that property change events fire correctly
Verify that when a property has changed, property change listeners are correctly notified.
One test method can address the first three of the above items, but the last one will require a separate test method.
First, create the PropertyManagerTest file on the test source branch of our project. For the first test, give it this content:
1 2 3 4 5 6 7 8 9 10 11 12 13 14 15 16 17 18 19 20 21 22 | import org.junit.jupiter.api.Test; class PropertyManagerTest { @Test void testInit() { PropertyManager pmgr = PropertyManager.INSTANCE; float ticMajorWeight = pmgr.asFloat( CPConstants.TIC_MAJOR_WEIGHT_PN ); assertEquals( 3.5f, ticMajorWeight ); float ticMajorLen = pmgr.asFloat( CPConstants.TIC_MAJOR_LEN_PN ); assertEquals( 17, ticMajorLen ); Color expColor = new Color( 0x0000FF ); Color ticMajorColor = pmgr.asColor( CPConstants.TIC_MAJOR_COLOR_PN ); assertEquals( expColor, ticMajorColor ); } } |
In Package Manager, right-click on PropertyManagerTest and select Run As -> Run Configurations… When the run configuration dialog opens, go to the Arguments tab and enter -DticMajorColor=0xFF0000 in the VM Arguments box. Then go to the Environment tab and enter the name/value pairs ticMajorColor/0x00FF00 and ticMajorWeight/3.5. Push the run button and verify that the test passes.

For the second test, we’ll need a nested class. This class will implement PropertyChangeListener so we can register it with PropertyManager.addPropertyChangeListener. When a PropertyChangeEvent is fired, an instance of this class will keep track of the data passed in it. Then, we can interrogate it to determine if it was fired and if the data passed to it was correct. Here’s the nested class.
1 2 3 4 5 6 7 8 9 10 11 12 13 14 15 16 17 18 19 20 21 22 23 24 25 26 27 28 29 30 31 32 33 34 35 36 37 38 39 40 41 42 43 44 45 46 47 48 49 50 51 52 53 54 55 56 57 58 59 | /** * Keeps track of the contents * of a property change event * when it is fired. * * @author Jack Straub */ private static class TestListener implements PropertyChangeListener { private Object source = null; private Object oldVal = null; private Object newVal = null; private String name = null; @Override public void propertyChange( PropertyChangeEvent evt ) { source = evt.getSource(); oldVal = evt.getOldValue(); newVal = evt.getNewValue(); name = evt.getPropertyName(); } /** * Gets the value of the source variable. * @return the source */ public Object getSource() { return source; } /** * Gets the value of the old-value variable. * @return the oldVal */ public Object getOldVal() { return oldVal; } /** * Gets the value of the new-value variable. * @return the newVal */ public Object getNewVal() { return newVal; } /** * Gets the value of the property name variable. * @return the name */ public String getName() { return name; } } |
Here’s the code for the test itself.
1 2 3 4 5 6 7 8 9 10 11 12 13 14 15 16 17 18 19 20 | @Test public void testPropertyChangeFire() { PropertyManager pmgr = PropertyManager.INSTANCE; float expOldValue = 5; float expNewValue = expOldValue + 1; String expName = CPConstants.TIC_MAJOR_WEIGHT_PN; TestListener listener = new TestListener(); pmgr.setProperty( expName, expOldValue ); pmgr.addPropertyChangeListener( listener ); pmgr.setProperty( expName, expNewValue ); float actNewValue = pmgr.asFloat( expName ); assertEquals( expNewValue, actNewValue ); assertEquals( "" + expOldValue, listener.getOldVal() ); assertEquals( "" + expNewValue, listener.getNewVal() ); assertEquals( pmgr, listener.getSource() ); assertEquals( expName, listener.getName() ); } |
Remember that I don’t consider this a thorough test of the property manager. But if it passes, we know that we can concentrate on the next part of the lesson (which will include a thorough test) without encountering any surprises.