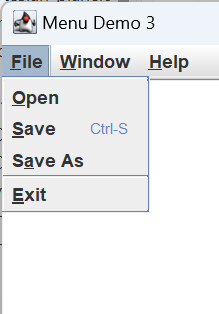
In the final part of this lesson, we will develop and install the menu bar for our Cartesian plane. When we get finished we’ll have a not-quite fully functional menu bar; the File menu will have Open, Save, and Save As buttons that we’re not ready to hook up yet. But the Exit button on the File menu will work, the Window menu will post or dismiss line properties and graph properties dialogs, and the help menu will have links to our About dialog and several help topics on the web.
See also:
- Cartesian Plane Lesson 16 Page 3: Menus
- How to Use Menus, in the Oracle Java Tutorial
GitHub repository: Cartesian Plane Part 16
Previous lesson: Cartesian Plane Lesson 16 Page 15: The About Dialog
Class CPMenuBar extends JMenuBar
Our menu bar will be encapsulated in the class CPMenuBar, a subclass of JMenuBar. To see how it works, run application ShowMenuBar in the apps package of the project. It will have three instance variables, all of which are initialized in the constructor:
private final Window topWindow;
This instance variable designates the owner of any dialog opened from the menu bar. The user specifies it in the constructor, and most likely will be the principal application JFrame. It may be null.private final JDialog lineDialog;
This is the non-modal dialog that will contain a LinePropertiesPanel object. Its visibility is controlled by the Window menu.private final JDialog graphDialog;
This is the non-modal dialog that will contain a GraphPropertiesPanel object. Its visibility is controlled by the Window menu.private final AboutDialog aboutDialog;
This is our modal About dialog. Its visibility is controlled by the Help menu.
⏹ Constructor
Our constructor is short and to the point. It initializes the instance variables and installs its menus with the help of sub-methods. The code follows.
public CPMenuBar( Window topWindow )
{
    this.topWindow = topWindow;
    lineDialog =
        LinePropertiesPanel.getDialog( topWindow );
    graphDialog =
        GraphPropertiesPanel.getDialog( topWindow );
    aboutDialog = new AboutDialog( topWindow );

    add( getFileMenu() );
    add( getWindowMenu() );
    add( configHelpMenu() );
}
⏹ Class SynchVisible extends ComponentAdapter
This static nested class will serve as a ComponentListener. Recall that ComponentListeners (see ComponentListener and ComponentAdapter on a previous page) are activated under several circumstances, including when a component is made visible (component shown) and when it’s made invisible (component hidden). Our listener makes sure that, if the line properties or graph properties dialog is closed (by picking the x in the upper right of the dialog’s title bar) the appropriate check box item on the Window menu is set to false. Here’s the code, followed by some notes.
1 2 3 4 5 6 7 8 9 10 11 12 13 14 15 16 17 18 19 20 21 | private static class SynchVisible extends ComponentAdapter { private final AbstractButton toggle; public SynchVisible( AbstractButton toggle ) { this.toggle = toggle; } @Override public void componentHidden( ComponentEvent evt ) { toggle.setSelected( false ); } @Override public void componentShown( ComponentEvent evt ) { toggle.setSelected( true ); } } |
- Line 1: Declares this class to be a subclass of ComponentAdapter. Recall that ComponentAdapter is a concrete class that implements all the methods required by interface ComponentListener. By extending ComponentAdapter we can override only the methods we care about and ignore the rest.
- Line 3: The checkbox menu item to be manipulated by this instance.
- Lines 11-14: Makes the checkbox menu item false when the associated window is hidden.
- Lines 17-20: Makes the checkbox menu item true when the associated window is shown.
The use of this class is illustrated in method getWindowMenu; the code and notes for this method follow.
1 2 3 4 5 6 7 8 9 10 11 12 13 14 15 16 17 18 19 20 21 22 | private JMenu getWindowMenu() { JMenu menu = new JMenu( "Window" ); menu.setMnemonic( KeyEvent.VK_W ); JCheckBoxMenuItem graphItem = new JCheckBoxMenuItem( "Edit Graph Properties", false ); JCheckBoxMenuItem lineItem = new JCheckBoxMenuItem( "Edit Line Properties", false ); graphItem.addItemListener( e -> graphDialog.setVisible( graphItem.isSelected() ) ); lineItem.addItemListener( e -> lineDialog.setVisible( lineItem.isSelected() ) ); lineDialog.addComponentListener( new SynchVisible( lineItem ) ); graphDialog.addComponentListener( new SynchVisible( graphItem ) ); menu.add( graphItem ); menu.add( lineItem ); return menu; } |
- Lines 3,4: Creates the Window menu, and sets its mnemonic to W.
- Lines 6-9: Creates the menu items to open the line properties and graph properties dialog.
- Lines 10,11: Adds an ItemListener to the graphItem checkbox which will change the visibility of the graph properties dialog when the state of the checkbox changes. (Recall that ItemListeners fire whenever the associated item toggles between selected and deselected).
- Lines 12,13: Adds an ItemListener to the lineItem checkbox which will change the visibility of the line properties dialog when the state of the checkbox changes.
- Line 16: Adds a component listener to the line properties dialog that will synchronize the state of the lineItem menu item whenever the visibility of the dialog changes.
- Line 17: Adds a component listener to the graph properties dialog that will synchronize the state of the graphItem menu item whenever the visibility of the dialog changes.
- Lines 18,19: Adds the lineItem and graphItem menu items to the Window menu.
⏹ Class URLDesc
Our help menu is going to have links to the web. To assist with that we have a static nested class, URLDesc, which establishes an association between a URL, and a brief description of the URL; the description will ultimately be used for the label of a menu item. The annotated code follows.
1 2 3 4 5 6 7 8 9 10 11 12 13 14 15 16 17 18 19 20 21 | private static class URLDesc { public final String urlDesc; public final URL url; public URLDesc( String urlStr, String desc ) { URL temp = null; try { temp = new URL( urlStr ); } catch ( MalformedURLException exc ) { exc.printStackTrace(); System.exit( 1 ); } url = temp; urlDesc = desc; } } |
- Line 3: The URL description, which will be used as the label for a menu item.
- Line 4: The URL to link to.
- Lines 6-20: Constructor. Parameter urlStr is a URL formatted as a string, for example, “https://www.google.com/”; desc is a brief description of the URL, for example, “Calculator.net”.
- Line 8: Temporary variable to solve a “chicken/egg” problem. We need to initialize the instance variable url. This variable is final, so it can only be set once. However, the URL has to be instantiated inside a try block, because it might throw a MalformedURLException. If we try to set url inside the try block (url=new URL(urlStr) we get a compiler error: “blank final field url may not have been initialized”. So inside the try block, we save the object in a temporary variable, and then initialize url outside the try block (line 18).
- Lines 9-17: Try/catch block to instantiate the URL object and, if necessary, catch the MalformedURLException.
- Lines 18,19: Completes the initialization of the instance variables.
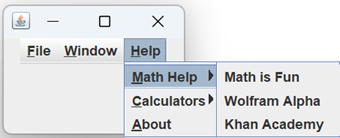
An example of the use of this class can be found in the method getMathTopicsMenu, which creates a submenu for the Help menu. Here’s the annotated code:
1 2 3 4 5 6 7 8 9 10 11 12 13 14 15 16 17 18 19 | private JMenu getMathTopicsMenu() { URLDesc[] siteDescs = { new URLDesc( "https://www.mathsisfun.com/", "Math is Fun" ), new URLDesc( "https://www.wolframalpha.com/", "Wolfram Alpha" ), new URLDesc( "https://www.khanacademy.org/", "Khan Academy" ) }; JMenu menu = new JMenu( "Math Help" ); menu.setMnemonic( KeyEvent.VK_M ); Stream.of( siteDescs ) .forEach( u -> { JMenuItem item = new JMenuItem( u.urlDesc ); item.addActionListener( e -> activateLink( u.url ) ); menu.add( item ); }); return menu; } |
- Lines 3-8: Creates an array of URLDesc objects.
- Line 9: Instantiates the submenu.
- Line 10: Sets the mnemonic for the submenu to M.
- Line 11: For each element of the array:
- Line 13: Creates a menu item using the label from the URLDesc object.
- Line 14: Adds to the menu item an action listener that will activate the link to the URL (see activateLink, below).
- Line 15: Adds the menu item to the submenu.
⏹ Remaining Helper Methods
There are two more helper methods that we haven’t discussed. The first one, log is trivial. It’s a temporary facility that prints a message to the console when one of the so far unused buttons on the File menu is pushed. It will be replaced when the code for the File menu is completed. The second is a bit more interesting.
🟦 Method activateLink
This method is used invoked from an ActionListener when an item associated with a hyperlink is pushed. We saw an example of its use when we discussed method getMathTopicsMenu, above. We’ve seen the code before in the MessagePane class; we start with a URL which we convert to a URI then hand off to the Desktop class for disposition. If an occurs, we display an error message and then ignore it. Here’s the code:
private void activateLink( URL url )
{
    Desktop desktop = Desktop.getDesktop();
    try
    {
        desktop.browse( url.toURI() );
    }
    catch ( IOException | URISyntaxException exc )
    {
        exc.printStackTrace();
        JOptionPane.showMessageDialog(
            null,
            exc.getMessage(),
            "Link Error",
            JOptionPane.ERROR_MESSAGE,
            null
        );
    }
}
⏹ Menu Configuration Methods
There are five methods for creating the three principal menus, File, Window, and Help, and more for configuring the Help menu submenus. They are listed below.
🟦 Method getFileMenu
This method configures the File menu. A listing and a brief discussion of the method follow.
1 2 3 4 5 6 7 8 9 10 11 12 13 14 15 16 17 18 19 20 21 22 23 24 25 26 27 28 29 30 31 | private JMenu getFileMenu() { JMenu menu = new JMenu( "File" ); menu.setMnemonic( KeyEvent.VK_F ); JMenuItem open = new JMenuItem( "Open", KeyEvent.VK_O ); JMenuItem save = new JMenuItem( "Save", KeyEvent.VK_S ); JMenuItem saveAs = new JMenuItem( "Save As", KeyEvent.VK_A ); JMenuItem exit = new JMenuItem( "Exit", KeyEvent.VK_X ); KeyStroke ctrlS = KeyStroke.getKeyStroke( KeyEvent.VK_S, ActionEvent.CTRL_MASK ); save.setAccelerator( ctrlS ); open.addActionListener( e -> log( "Open selected" ) ); save.addActionListener( e -> log( "Save selected" ) ); saveAs.addActionListener( e -> log( "Save As selected" ) ); exit.addActionListener( e -> System.exit( 0 ) ); menu.add( open ); menu.add( save ); menu.add( saveAs ); menu.add( exit ); // Not ready to be connected open.setEnabled( false ); save.setEnabled( false ); saveAs.setEnabled( false ); return menu; } |
- Lines 3,4: Creates the File menu and sets its mnemonic.
- Lines 6-9: Creates the menu items for the File menu. The second argument to each constructor invocation is the item’s mnemonic.
- Lines 11,12: Creates a Keystroke object representing control-S (press the S key while holding down the Ctrl key).
- Line 13: Sets the accelerator for the Save menu item. Recall that mnemonics will trigger an action when the associated menu or menu item is showing; accelerators will trigger an action whether the menu item is showing or not.
- Lines 15-18: Adds ActionListeners to all the menu items. Open, Save, and Save As, for now, will just print a message when they’re selected. Exit will terminate the application.
- Lines 20-23: Adds the menu items to the menu.
- Lines 26-28: Disables the Open, Save, and Save As menu items.
🟦 Method getWindowMenu
This method configures the Window menu. We discussed this method above.
🟦 Method configureHelpMenu
This method configures the Help menu. A listing and a brief discussion of the method follow.
1 2 3 4 5 6 7 8 9 10 11 12 13 14 | private JMenu configHelpMenu() { JMenu topicsMenu = getMathTopicsMenu(); JMenu calcsMenu = getCalculatorsMenu(); JMenuItem aboutItem = new JMenuItem( "About", KeyEvent.VK_A ); aboutItem.addActionListener( e -> aboutDialog.showDialog( true ) ); JMenu helpMenu = new JMenu( "Help" ); helpMenu.setMnemonic( KeyEvent.VK_H ); helpMenu.add( topicsMenu ); helpMenu.add( calcsMenu ); helpMenu.add( aboutItem ); return helpMenu; } |
- Lines 3,4: Creates the submenus for the help menu.
- Lines 5,7: Creates the About menu item, and gives in an ActionListener that will display the About dialog.
- Lines 8,9: Creates the Help menu and sets its mnemonic to H.
- Lines 10-12: Adds all the menu items to the Help menu.
🟦 Method getMathTopicsMenu
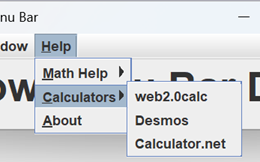
🟦 Method getCalculatorsMenu
Method getMathTopicsMenu configures the Math Topics submenu of the Help menu. We looked at it in detail, above. Method getCalculatorsMenu configures the Calculators submenu. It is little different from getMathTopicsMenu, and the code for it can be found in the GitHub repository.
Installing the Application Menu Bar
To install the menu bar go to the Root class in the …/graph_utils package. In the run method, add an instance of CPMenuBar to the north region of the application frame’s content pane:
public void run()
{
    frame = new JFrame( "Graphics Frame" );
    frame.setDefaultCloseOperation( JFrame.EXIT_ON_CLOSE );
    BorderLayout    layout  = new BorderLayout();
    contentPane = new JPanel( layout );

    /* Make the menu bar the north child of the content pane. */
    contentPane.add( new CPMenuBar( frame ), BorderLayout.NORTH );

    /* Make the Canvas the center child of the content pane. */
    contentPane.add( userPanel, BorderLayout.CENTER );

    frame.setContentPane( contentPane );
    frame.pack();
    frame.setVisible( true );
}
Any of the applications in the project’s …/app package that instantiates Root, DialogInputApp, for example, will now display the menu bar above the graph window.
Testing the Application Menu Bar
Testing the menu bar is going to be a lot like testing our other GUI components. We’re going to need a top-level window in which to display the menu bar, we’ll need access GUI components within the menu bar, and there will be times when we have to ensure that an operation is executed on the Event Dispatch Thread (EDT). To facilitate this we’ll have a JDialog which will be responsible for displaying the menu bar, locating components, and executing thread-sensitive operations.
We’ll start by talking a little bit more about the JMenu component.
⏹ More About the JMenu Component
Within a JMenu, a JMenuItem is not stored as you would expect from other containers, such as a JPanel. If you look at the documentation for JMenu you’ll see that the add(Component c) method is overridden. Instead of storing menu items in the Component[] array used by most subclasses of java.awt.Container, they are stored in a separate Component[] array. To look at the menu items we have to invoke the method getMenuComponents (see also getMenuComponent(int n) and getMenuComponentCount() in the JMenu class). Following is an excerpt from MenuTraversalDemo in the project sandbox. As you read it, keep in mind that a JMenu contains JMenuItems, but is itself a subclass of JMenuItem (see Containment Hierarchy vs. Inheritance Hierarchy, earlier in this lesson).
    private static void dumpMenu( JMenu menu, String indent )
    {
        System.out.println( indent + menu.getText() );
        String  nextIndent  = indent + "    ";

        Component[] comps   = menu.getMenuComponents();
        Stream.of( comps )
            .filter( c -> (c instanceof JMenuItem) )
            .map( c -> (JMenuItem)c )
            .forEach( jc -> {
                if ( jc instanceof JMenu )
                    dumpMenu( (JMenu)jc, nextIndent );
                else
                    System.out.println( nextIndent + jc.getText() );
            });
    }
⏹ Class CPMenuBarTestDialog
This class is responsible for displaying and interacting with the CPMenBar. It lives in the …/test_utils package under the test source tree. The principal concerns of this class are locating components in the menu bar’s containment hierarchy, and making sure operations are executed on the EDT when necessary. The encapsulated JDialog is very simple. For a content pane it has a JPanel with BorderLayout. The center region of the content pane contains a label in a large font, which is useful for nothing except making the dialog visible to users who are monitoring a test. The north region contains the menu bar.
🟦 Class and Instance Variables
Following is an annotated list of the CPMenuBarTestDialog’s class and instance variables.
1 2 3 4 5 6 7 8 9 10 11 12 | private static CPMenuBarTestDialog testDialog = null; private final JDialog dialog; private final CPMenuBar menuBar; private final JDialog lineDialog; private final JDialog graphDialog; private final JDialog aboutDialog; private JMenu adHocJMenu1; private JMenuItem adHocJMenuItem1; private boolean adHocBoolean1; |
- Line 1: This class is implemented as a singleton, and testDialog is a reference to its sole instance.
- Line 3: The class’s encapsulated dialog. It is initialized in the getTestDialog method.
- Line 4: The menu bar contained in the north region of dialog’s content pane. It is initialized in the constructor.
- Lines 6-8: The three dialogs encapsulated in the CPMenuBar; the dialog containing the line properties panel, the dialog containing the graph properties panel, and the About dialog. They are initialized in the constructor.
- Lines 10-12: Variables for use as needed in the class’s methods. They are mainly for use in lambdas, where modifying a local variable is not permitted. An example can be found in method isVisible( Component comp ):
GUIUtils.schedEDTAndWait( () ->adHocBoolean1 = comp.isVisible());
return adHocBoolean1;
🟦 Helper Methods
The helper methods in the CPMenuBarTestDialog class are oriented towards building the encapsulated JDialog (the one that contains the menu bar), and searching the window hierarchy for components. They are listed below.
∎ Method makeDialog()
This method is responsible for creating the dialog that will contain the CPMenuBar under test. As mentioned earlier, it is quite simple; a content pane with a JLabel in its center, and a CPMenuBar at the top. The method is called from the constructor, which is invoked in the class method CPMenuBarTestDialog. The code can be found in the GitHub repository.
∎ Method getDialog( String titleFragment )
This method traverses the window hierarchy looking for a JDialog with a title that contains titleFragment, for example, “Line”, “Graph” and “About”. It is invoked from the constructor. The code can be found in the GitHub repository.
∎ Method getMenuEDT( String text )
Starting at the menu bar, find the first JMenu with the given text; the EDT means it is expected to be invoked on the Event Dispatch Thread. The code can be found in the GitHub repository.
∎ Method getMenuItem( JMenu menu, String text )
This method traverses the JMenuItem children of a given JMenu, looking for an item with the given text. If it fails to find the item it returns null. The code can be found in the GitHub repository; see also getMenuItemEDT( String… labels ).
∎ Method getMenuItemEDT( String… labels )
Starting at the menu bar, this method searches for a menu item in the containment hierarchy indicated by labels; the EDT means it is expected to be invoked on the Event Dispatch Thread. For example, getMenuItemEDT( “Help”, “Calculators”, “Desmos” ) will search for the JMenuItem with text Desmos in the Calculators submenu of the Help menu. Note that all labels except the last must refer to a JMenu. Null is returned if the target item is not found. The annotated code is listed below.
1 2 3 4 5 6 7 8 9 10 11 12 | private JMenuItem getMenuItemEDT( String... labels ) { JMenuItem item = getMenu( labels[0] ); for ( int inx = 1 ; item != null && inx < labels.length ; ++inx ) { if ( !(item instanceof JMenu) ) item = null; else item = getMenuItem( (JMenu)item, labels[inx] ); } return item; } |
- Line 1: The ellipse (…) indicates that this is a varargs method (it has a variable length argument list), making labels equivalent to an array of type String.
- Line 3: Gets the JMenu with the text corresponding to the first element of labels.
- Line 4: Traverse the remaining elements of the labels array, breaking if item becomes null.
- Lines 6,7: If we haven’t finished traversing the labels array, item must be a JMenu; if it’s not, the search has failed. If it is a JMenu, continue searching it for the JMenuItem that matches the next label in the array.
🟦 Constructor
The constructor for CPMenuBarTestDialog is quite short. Since the class is implemented as a singleton, it is declared private. The complete code follows.
private CPMenuBarTestDialog()
{
    menuBar = new CPMenuBar( null );
    dialog = makeDialog();

    graphDialog = getDialog( "Graph" );
    lineDialog = getDialog( "Line" );
    aboutDialog = getDialog( "About" );
}
🟦 Public Methods that Obtain Dialogs
The CPMenuBarTestDialog class has three methods for obtaining the dialogs under the control of the menu bar. They’re simple getters; if you want to see the code you can find it in the GitHub repository. They are listed below.
∎ Method getLineDialog()
Returns the dialog containing the line properties panel.
∎ Method getGraphDialog()
Returns the dialog containing the line properties panel.
∎ Method getAboutDialog()
Returns the About dialog.
🟦 Public Methods that Start Dialogs
Of the three dialogs under the control of the menu bar, two of them (the line properties and graph properties dialogs) are non-modal, and the other dialog (the About dialog) is modal. We have two methods for starting a dialog, depending on whether or not it is modal.
∎ Method doClick( AbstractButton button )
This method is for starting non-modal dialogs. It just clicks a button, pauses for a short time to allow the dialog to become visible, and returns. Here’s the code for it:
public void doClick( AbstractButton button )
{
    SwingUtilities.invokeLater(() -> button.doClick() );
    Utils.pause( 500 );
}
∎ Method doClickInThread( AbstractButton button )
This method is for starting modal dialogs. It is a minor variation on many methods we have already seen that start modal dialogs. It spawns a new thread to click the button, pauses for a short time to allow the dialog to become visible, and returns the thread. An example of its use can be found in the method for testing the About dialog: JMenuItem about = tester.getMenuItem( "Help", "About" );
Thread thread = tester.doClickInThread( about );
// validate the about dialog here
Utils.join( thread );
The code for this method follows.
public Thread doClickInThread( AbstractButton button )
{
    Runnable    doClick = () -> button.doClick();
    Runnable    asEDT   =
        () -> SwingUtilities.invokeLater( doClick );
    Thread      thread  = new Thread( asEDT );
    thread.start();
    Utils.pause( 500 );
    return thread;
}
🟦 Public Methods that Test and Set Properties
We have some very simple methods that get and set component properties. The main reason for their existence is to ensure proper execution on the EDT. They are listed below, along with notes when appropriate. Their names should be self-explanatory, and the code can be found in the GitHub repository.
∎ public boolean hasFocus()
Returns true if the test dialog (the dialog that contains the CPMenuBar) has focus. Why do we need to know if it has focus? It’s for testing the menu items that contain hyperlinks to the web (see testActivateLink, below). The idea is:
- Start with the test dialog having the keyboard focus.
- Click a menu item with a hyperlink…
- … this causes the system’s default browser to appear, and move to the top of the window stack.
- If the above works, the default browser will now have the keyboard focus…
- … so if the test dialog no longer has the keyboard focus, we assume the test succeeded.
∎ public boolean isVisible( Component comp )
Returns true if the given component is visible.
∎ public void setVisible( Component comp, boolean visible )
Sets the state of the given component’s visibility.
∎ public void setEnabled( Component comp, boolean enabled )
Sets the state of the given component to enabled or disabled. We only need this method to improve our test coverage. Recall that the Open, Save, and Save As items on the File menu are presently disabled. If we want to exercise these buttons, thereby slightly improving our test coverage, we have to enable them, first.
🟦 Remaining Public Methods
That leaves two public methods that we haven’t discussed:
∎ public JMenu getMenu( String text )
This method returns the JMenu displaying the given text; see also getMenuEDT, above.
∎ public JMenuItem getMenuItem( String… labels )
This method searches for a menu item in the containment hierarchy indicated by labels; see also getMenuItemEDT, above.
⏹ JUnit Tests
Here’s a list of things we want to verify in our test class:
- Are all menu items present and in their correct positions?
By “correct position” we mean “in the correct menu”. We won’t bother with making sure the File menu is leftmost, and the Help menu is rightmost. We won’t worry about whether Open is first or last on the File menu. On the Help menu, we’ll make sure that the Math Help submenu is present and that it contains the three required items, but we won’t care if the Calculators menu comes before or after. - Does the application respond correctly when a menu item is selected?
We can’t yet test the Open, Save, or Save As menu items because they’re not hooked up yet. Testing the Exit button is problematic; if we push it our test will stop. We’ll address this issue in a later lesson. Meanwhile we can make sure that:- The correct dialog appears when we push the Edit Line Properties or Edit Graph Properties buttons.
- Ensure the above two items are checked (☑) when the associated dialog is visible and unchecked (☐) when not.
- The correct dialog appears when we push the Help/About button. We won’t worry about selecting hyperlinks in the About dialog; testing for that belongs in the AboutDialog test class.
- If a menu item maps to a hyperlink, make sure that the hyperlink is correctly processed… this deserves a little more discussion.
🟦 Testing Hyperlinks
This topic could get kind of complicated. How do we know if a menu item links to the correct page? What if we get a 404? What if the website is down? What we can test is:
- Does the application crash when a link is selected (preferably not)?
- Is another window opened when a link is selected?
Our test for the above will take place in test method testActivateLink. We will only test one link, the Math is Fun link on the Math Help submenu of the Help menu. If the application crashes when we select the link the test will automatically fail. To test whether a new window has been opened we check for keyboard focus. We start with our test dialog having focus. If selecting the hyperlink raises a new window, the new window will grab the focus, and our test dialog will lose it. (This is the way most window systems work, but it can be configurable. To execute our test correctly, the window system we’re using will have to be configured to work this way.) Here’s the annotated code for the testActivateLink method. Note that tester is an instance variable of type CPMenuBarTestDialog; it is initialized in our test class’s beforeEach method (see Infrastructure, below.)
1 2 3 4 5 6 7 8 9 10 11 | @Test public void testActivateLink() { JMenuItem mathIsFun = tester.getMenuItem( "Help", "Math Help", "Math is Fun" ); assertNotNull( mathIsFun ); assertTrue( tester.hasFocus() ); tester.doClick( mathIsFun ); Utils.pause( 500 ); assertFalse( tester.hasFocus() ); } |
- Lines 4,5: Gets the Math Is Fun menu item; see getMenuItem and getMenuItemEDT, above.
- Line 6: Verifies that the Math Is Fun menu item was found.
- Line 7: Makes sure we start with our test dialog having focus.
- Line 8: Selects the Math Is Fun menu item.
- Line 9: Gives the window system time to do its job.
- Line 10: Verifies that our test dialog no longer has focus.
Note: If you’re observing the test in action, a browser window will pop up, likely covering up the test dialog display. This was not an issue for me, but I like to watch the tests run, so before starting the test I made an instance of my browser very small, and moved it to the lower right corner of my screen.
🟦 Infrastructure
We have four instance variables that are initialized in our forEach method; a CPMenuBarTestDialog for the convenience of each @Test method, a JDialog for the dialogs that contain the menu bar’s line and graph properties panels, and a JDialog for the About dialog. In our afterEach method, each field is set to null, and all dialogs are disposed. Here’s a listing of our instance variables, and before/afterEach methods.
private CPMenuBarTestDialog tester;
private JDialog             lineDialog;
private JDialog             graphDialog;
private JDialog             aboutDialog;

@BeforeEach
public void beforeEach()
{
    tester = CPMenuBarTestDialog.getTestDialog();
    lineDialog = tester.getLineDialog();
    graphDialog = tester.getGraphDialog();
    aboutDialog = tester.getAboutDialog();
}

@AfterEach
void tearDown() throws Exception
{
    ComponentFinder.disposeAll();
    tester = null;
    lineDialog = null;
    graphDialog = null;
    aboutDialog = null;
}
🟦 Composition and Performance
For each menu (File, Window, Help) we have three methods: a) a public @Test method; b) a method to help with verifying the presence of the required menu items; and c) a method for validating the logic that results in dialogs being posted.
∎ public void testFileMenu()
This method simply initiates testing for each menu item by calling testFileItem and testFileDialog.
@Test
public void testFileMenu()
{
    JMenu       fileMenu    = tester.getMenu( "File" );
    assertNotNull( fileMenu );

    testFileItem( "Open" );
    testFileItem( "Save" );
    testFileItem( "Save As" );
    testFileItem( "Exit" );

    testFileDialog( "Open" );
    testFileDialog( "Save" );
    testFileDialog( "Save As" );
}
∎ private void testFileItem( String text )
Mostly, this method makes sure that an item with the given text is present in the File menu. For good measure, it also makes sure that the item has at least one ActionListener and checks the spelling of the item’s label. It’s listed below.
private void testFileItem( String text )
{
    String[]    args    = { "File", text };
    JMenuItem   item    = tester.getMenuItem( args );
    assertNotNull( item );
    assertTrue( text.equals( item.getText() ) );
    assertTrue( item.getActionListeners().length > 0 );
}
∎ private void testFileDialog( String text )
This method is kind of clunky because the Open, Save, and Save As buttons aren’t hooked up yet, and we’re not ready to test the Exit button. In fact, the Open, Save, and Save As buttons aren’t even enabled. But if we don’t click the buttons we don’t get test coverage, and I hate getting low test coverage, so we jump through a couple of hoops just to improve coverage. Here’s the code.
private void testFileDialog( String text )
{
    String[]    args    = { "File", text };
    JMenuItem   item    = tester.getMenuItem( args );
    assertNotNull( item );

    // Temporary logic, mainly to improve test coverage.
    // To be replaced by specific tests for "Open", "Save" and
    // "Save As", after those menu items are hooked up.
    tester.setEnabled( item, true );
    assertNotNull( item );
    tester.doClick( item );
    tester.setEnabled( item, false );
}
∎ public void testWindowMenu( String text )
∎ private void testWindowItem( String text )
These two methods are directly analogous to testFileMenu and testFileItem, respectively. You can find the code in the GitHub repository.
∎ private void testWindowDialog()
As we discussed above, this method is for testing the Edit Graph Properties and Edit Line Properties menu items. Our test applies to selecting/deselecting the menu items and making sure the associated dialogs become visible/invisible, as required. We also have the special case of posting a dialog by selecting a menu item, dismissing the dialog without using the menu item, and making sure the state of the menu item is properly synchronized. The commented code follows.
private void testWindowDialog( String menuItem, JDialog dialog )
{
    JMenuItem   item    = tester.getMenuItem( "Window", menuItem );
    // Start with dialog not visible
    assertFalse( item.isSelected() );
    assertFalse( tester.isVisible( dialog ) );

    // Make dialog visible by clicking check box item
    tester.doClick( item );
    assertTrue( item.isSelected() );
    assertTrue( tester.isVisible( dialog ) );

    // Make dialog non-visible by clicking check box item
    tester.doClick( item );
    assertFalse( item.isSelected() );
    assertFalse( tester.isVisible( dialog ) );

    // Make dialog visible by clicking check box item,
    // then make it non-visible by closing it directly;
    // make sure check box is made false.
    tester.doClick( item );
    assertTrue( item.isSelected() );
    assertTrue( tester.isVisible( dialog ) );
    tester.setVisible( dialog, false );

    // give the dialog a moment to close
    Utils.pause( 500 );
    assertFalse( item.isSelected() );
    assertFalse( tester.isVisible( dialog ) );
}
🟦 Following Hyperlinks
This test is executed via the public @Test method testActivateLink(). We have already discussed it, above.
Summary
On this page, we concluded our GUI development lesson. In our next lesson, we will complete our Cartesian plane application by adding a few more GUI components, and hooking up the File menu’s Open, Save, and Save As buttons.