On this page, we will develop a JUnit test suite for the PlotPanel class. To facilitate this, we will write a test class, PlotPanelTestGUI, that allows us to display and interact with the PlotPanel GUI components programmatically. We’ll start our discussion with PlotPanelTestGUI.
See Also:
GitHub repository: Cartesian Plane Part 17
Previous lesson: Cartesian Plane Lesson 17 Page 7: JUnit Test Utilities for JFormattedTextFields
Class PlotPanelTestGUI

Like many of the GUIs we have developed to assist with JUnit tests, PlotPanelTestGUI will display a main window containing a PlotPanel, use ComponentFinder to discover the parts of the panel we need for testing, and then act as a facilitator for interacting with those components, ensuring that all thread-sensitive operations are performed on the EDT. The PlotPanelTestGUI will be a subclass of FTextFieldTestMgr; Class FTextFieldTestMgr on page 7.
One of the things the test GUI will be assisting with is initiating and validating plots. It will have to be able to invoke any of the Equation methods yPlot, xyPlot, rPlot, and tPlot and verify that the invoked method supplies the correct stream. Let’s begin by talking about how our test GUI will facilitate that.
⏹ Generating and Validating a Plot Stream
Let’s use a YPLOT and the Exp4jEquation class as examples to review how this process works. Then, we’ll describe how the test GUI facilities interact with the process.
🟦 Producing a Plot Stream, Review
This process begins when the operator issues commands to create and configure an Exp4jEquation: Equation equation = new Exp4jEquation();
equation.setRangeStart( "-1" ); equation.setRangeEnd( "1" );
equation.setRangeEnd( "1" );
and then enters the equation itself, for example: equation.setYExpression( "y=x^2" );
The operator then issues a plot command, for example YPLOT. The YPLOT command invokes the yPlot method in the Exp4jEquation object. This method returns a Stream of type Point2D: Stream<Point2D> yPlot();

∎ Class PlotProcessDemo1
We’ve got a long way to go with this example, but PlotProcessDemo1 in the package …sandbox.plot_process shows us what we’ve got so far. It has an instance variable of type Exp4jEquation. The constructor configures the equation and adds a button which, when pressed, gets the stream returned by yPlot and traverses it, displaying the results of the traversal:
public class PlotProcessDemo1
{
    private static final String endl    = System.lineSeparator();
    private final Equation  equation    = new Exp4jEquation();
    private final JTextArea textArea    = new JTextArea( 15, 20 );
    // ...
    public PlotProcessDemo1()
    {
        equation.setYExpression( "x^2" );
        equation.setRangeStart( "-1" );
        equation.setRangeEnd( "1" );
        equation.setRangeStep( "1" );
        // ...
        JButton     plot        = new JButton( "Plot" );
        plot.addActionListener( this:: plotAction );
        // ...
    }
    private void plotAction( ActionEvent evt )
    {
        Stream<Point2D> stream  = equation.yPlot();
        append( "*****BEGIN  PLOT *****" );
        stream.forEach( p -> append( p.toString() ) );
        append( "****** END PLOT ******" );
    }
    private void append( String text )
    {
        textArea.append( text );
        textArea.append( endl );
        int     len     = textArea.getDocument().getLength();
        textArea.setCaretPosition( len );
    }
    // ...
}
∎ Class PlotProcessDemo2
The application PlotProcessDemo2 gets us closer to how CartesianPlain works (though we’ve still got a way to go). To start with, the plotAction method in the second demo doesn’t traverse the stream produced by yPlot. Referring to the figure below, at lines 16-19, we see that this method calls yPlot on the equation object and stores the Stream it returns in an instance variable. We’ve added a Redraw button (lines 8,9) which invokes the redrawAction method when selected. The redrawAction method (lines 20-25) issues a REDRAW notification (compare this to the plotAction method in the PlotPanel class on page 6). Previously, the application constructor (lines 11-14) has added a NotificationListener to the NotificationManager (compare this to the constructor in the CartesianPlane class). Consequently, when the REDRAW notification is raised, the redraw method in PlotProcessDemo2 will be invoked (lines 26-39). This, in turn, traverses the stream stored in the instance variable, recording all the Point2Ds that are produced.
1 2 3 4 5 6 7 8 9 10 11 12 13 14 15 16 17 18 19 20 21 22 23 24 25 26 27 28 29 30 31 32 33 34 35 36 37 38 39 40 41 | public class PlotProcessDemo2 { // ... private Stream<Point2D> stream = null; // ... public PlotProcessDemo2() { JButton redraw = new JButton( "Redraw" ); redraw.addActionListener( this::redrawAction ); // ... NotificationManager.INSTANCE.addNotificationListener( CPConstants.REDRAW_NP, this::redraw ); } private void plotAction( ActionEvent evt ) { stream = equation.yPlot(); } private void redrawAction( ActionEvent evt ) { append( "***** BEGIN PLOT *****" ); NotificationManager.INSTANCE .propagateNotification( CPConstants.REDRAW_NP ); } private void redraw( NotificationEvent evt ) { try { if ( stream != null ) stream.forEach( p -> append( p.toString() ) ); } catch ( IllegalStateException exc ) { String msg = "Error: a stream can only be traversed once."; append( msg ); } append( "****** END PLOT ******" ); } // ... } |
If you run this application and push the Plot and then the Redraw buttons you’ll see all the points in the stream printed out. But if you press the Redraw button again, you’ll get an error because a stream can only be traversed once. To execute redraw a second time, you must generate a new stream by pushing the Plot button. We’ll solve this problem in the next demo.
∎ Class PlotProcessDemo3
In PlotProcessDemo3, instead of storing a Stream we store a Stream supplier:
public class PlotProcessDemo3
{
    private Supplier<Stream<Point2D>> streamSupplier      = null;
    // ...
    private void plotAction( ActionEvent evt )
    {
        streamSupplier = () -> equation.yPlot();
    }
    // ...
}
And every time you push the Redraw button, the redraw method gets a new stream from the supplier, which it then traverses:
private void redraw( NotificationEvent evt )
{
    if ( streamSupplier != null )
    {
        Stream<Point2D> stream  = streamSupplier.get();
        stream.forEach( p -> append( p.toString() ) );
    }
    append( "****** END PLOT ******" );
}
∎ Class PlotProcessDemo4
Turning our attention to the final details, we note CartesianPlane does not use Streams of type Point2D. If you look at the setStreamSupplier method in the CartesianPlane class, you’ll see that it requires a Supplier of type Stream<PlotCommand>: setStreamSupplier( Supplier<Stream<PlotCommand>> supplier )
In the plotAction method of the PlotPanel class (page 6), we address this issue by mapping the Stream returned by the plot methods to a Stream of type PlotPointCommand (recall that PlotPointCommand is a subclass of PlotCommand). We’ll do the same thing in the plotAction method of PlotProcessDemo4. As you can see below, we also eliminated the redraw method. We added the NotificationManager logic to the bottom of plotAction, which is how the plotAction method in the PlotPanel class works:
1 2 3 4 5 6 7 8 9 10 11 12 13 | private final Plotter cartPlane = new Plotter(); // ... private void plotAction( ActionEvent evt ) { Supplier<Stream<PlotCommand>> streamSupplier = () -> equation.yPlot() .map( p -> PlotPointCommand.of( p, cartPlane ) ); cartPlane.setStreamSupplier( streamSupplier ); append( "***** BEGIN PLOT *****" ); NotificationManager.INSTANCE .propagateNotification( CPConstants.REDRAW_NP ); } |
You’ll notice on line 7 in the above code that we need a CartesianPlane object to instantiate a PlotPointCommand. The execute method of a PlotPointCommand object needs to be able to call the plotPoint(float xco, float yco) method in the CartesianPlane class. To handle this, we’ve made the nested class Plotter. This class is a subclass of CartesianPlane and overrides the setStreamSupplier and plotPoint methods. We’ve also moved the redraw method to the Plotter class. It is registered as a NotificationListener in the Plotter constructor. Here’s the Plotter class in its entirety.
private class Plotter extends CartesianPlane
{
    private Supplier<Stream<PlotCommand>>   supplier;

    public Plotter()
    {
        NotificationManager.INSTANCE.addNotificationListener(
            CPConstants.REDRAW_NP,
            e -> redraw()
        );
    }

    @Override
    public void plotPoint( float xco, float yco )
    {
        Point2D point   = new Point2D.Float( xco, yco );
        append( point.toString() );
    }

    @Override
    public void
    setStreamSupplier( Supplier<Stream<PlotCommand>> supplier )
    {
        this.supplier = supplier;
    }

    public void redraw()
    {
        Stream<PlotCommand> stream  = supplier.get();
        stream.filter( c -> (c instanceof PlotPointCommand) )
            .map( c -> (PlotPointCommand)c )
            .forEach( c -> c.execute() );
        append( "****** END PLOT ******" );
    }
}
🟦 Validating Plot Streams: Class PlotPanelTestGUI.PlotManager
The PlotManager class is implemented as a static nested class in PlotPanelTestGUI. It extends CartesianPlane and looks a lot like the subclass of CartesianPlane that we saw in PlotProcessDemo4. Like the PlotProcessDemo4 nested class, PlotManager overrides setStreamSupplier and plotPoint. It adds a bit of code to plotPoint that rounds the x- and y-coordinates of the Point2D object to one decimal point. This makes it easier for the JUnit test class to perform tests such as assertEquals(expPoint, actPoint). The code for the overridden methods is shown below.
private static class PlotManager extends CartesianPlane
{
    private Supplier<Stream<PlotCommand>>   supplier;
    private Point2D                         point;

    @Override
    public void
    setStreamSupplier( Supplier<Stream<PlotCommand>> supplier )
    {
        this.supplier = supplier;
    }

    @Override
    public void plotPoint( float xco, float yco )
    {
        float   xcoR    = roundToOneDecimal( xco );
        float   ycoR    = roundToOneDecimal( yco );
        point = new Point2D.Float( xcoR, ycoR );
    }

    private float roundToOneDecimal( float toRound )
    {
        float   rounded = Math.abs( toRound ) * 10;
        rounded = (int)(rounded + .5);
        rounded /= 10 * Math.signum( toRound );
        return rounded;
    }
    // ...
}
The big difference between PlotManager and the nested class in PlotProcessDemo4 is that PlotManager doesn’t listen to notifications. Instead, tests in the JUnit test class initiate the plot process as discussed below:
Note: In the following diagram, point is an instance variable in the PlotManager class.
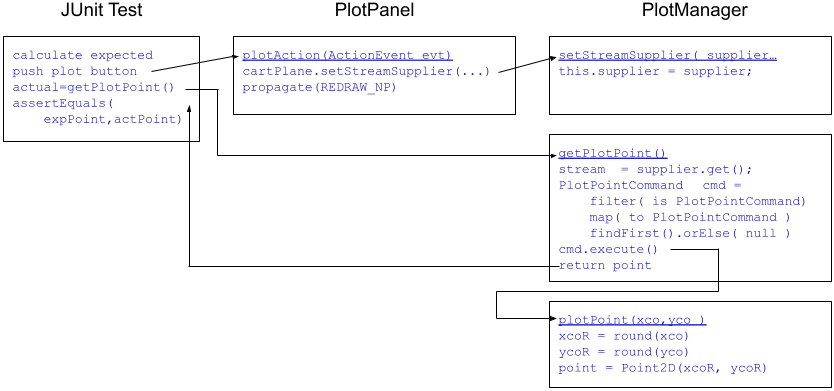
- The JUnit test calculates the expected result for this test.
- The JUnit test pushes the Plot button in the test GUI.
- The plotAction action listener PlotPanel is activated. The action listener derives a Supplier<Stream<PlotCommand>> in part by calling a method such as yPlot in the Equation object (see plotAction on page 6) and installs the supplier in the CartesianPlane (which, in this case, is the PlotManager object). It also propagates a REDRAW notification, which does not affect our test program.
- The JUnit test calls the getPlotPoint method (see below) in the PlotManager class. The getPlotPoint method begins traversing the stream established in step 3 but stops after finding one PlotPointCommand. The PlotPointCommand is executed (cmd.execute()), causing the plotPoint method to be invoked.
- The plotPoint method instantiates a Point2D object with x- and y-coordinates rounded to one decimal point. The object is saved in the point instance variable.
- The Point2D object is returned by plotPoint to the JUnit test, becoming the actual result for this test.
- The JUnit test compares the expected result to the actual result.
The annotated listing for getPlotPoint follows.
1 2 3 4 5 6 7 8 9 10 11 | public Point2D getPlotPoint() { Stream<PlotCommand> stream = supplier.get(); PlotPointCommand cmd = stream.filter( c -> (c instanceof PlotPointCommand) ) .map( c -> (PlotPointCommand)c ) .findFirst().orElse( null ); assertNotNull( cmd ); cmd.execute(); return point; } |
- Line 3: Obtains the Stream from the Supplier.
- Line 5: Begins streaming, filtering out any object that is not a PlotPointCommand (we could skip the filtering if we wanted to; we know that all the elements of the Stream are PlotPointCommands).
- Line 6: Cast the PlotCommand from line 5 to a PlotPointCommand.
- Line 7: Stop the stream traversal after getting the first result; assign the result to the cmd variable (line 4).
- Line 8: Verify that the stream traversal yielded a non-null result.
- Line 9: Execute the PlotPointCommand. The execute method in the PlotPointCommand looks like this:
plane.plotPoint( xco, yco );
where plane is a CartesianPlane object which, in the context of the JUnit test, is this PlotManager object. - Line 10: Return the value of the point instance variable to the JUnit test.
⏹ PlotPanelTestGUI extends FTextFieldTestMgr, Overview
The PlotPanelTestGUI‘s superclass, FTextFieldTestMgr, provides much of the support we need. In addition, the following will be required for PlotPanelTestGUI.
- Create a PlotPanel and install an Equation and a CartesianPlane object (the CartesianPlane will be a PlotManager object; see Validating Plot Streams above).
- Locate the GUI components that the JUnit test needs to interact with.
- Select an option in the GUI’s combo box.
- Provide a means to capture and analyze the plot streams that would normally be the domain of a CartesianPlane object.
We’ve already discussed PlotManager, the GUI’s nested class for emulating CartesianPlane. Next, we’ll examine the class and instance variables, helper, and public methods.
🟦 Class PlotPanelTestGUI Class and Instance Variables
As shown below, PlotPanelTestGUI has four instance variables. The plotPanel field refers to the PlotPanel under test. The comboBox and plotButton fields are linked to the PloatPanel’s JComboBox and Plot pushbutton. The plotManager field is the instance of the PlotManager nested class, which is used to simulate a CartesianPlane object.
public class PlotPanelTestGUI extends FTextFieldTestMgr
{
    private final PlotPanel         plotPanel;
    private final JComboBox<?>      comboBox;
    private final JButton           plotButton;
    private final PlotManager       plotManager = new PlotManager();
    // ...
}
🟦 Class PlotPanelTestGUI Helper Methods
Following is a discussion of the helper methods in the PlotPanelTestGUI infrastructure.
∎ JButton getPlotButton()
∎ JComboBox<?> getComboBox()
∎ JLabel getLabel( String text )
We’ve seen these methods, or others very much like them, in recent pages. They all use ComponentFinder to locate JComponent children of the PlotPanel, for example: JComponent comp = ComponentFinder.find( plotPanel, predicate );
The getPlotButton method gets the sole JButton in the PlotPanel, getComboBox gets the sole JComboBox, and getLabel(String text) gets the JLabel with the given text. The code for these methods can be found in the GitHub repository.
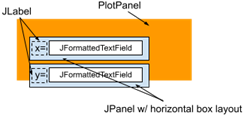
∎ void getTextField( String text )
This method identifies individual JFormattedTextFields in the PlotPanel GUI. It’s a little more interesting because we must find a way to distinguish between the four JFormattedTextFields. We start by assuming that each text field is in a JPanel along with an identifying JLabel. So we 1) search the PlotPanel for the JLabel, 2) Get the parent container of the JLabel, and 3) search the parent container for the JFormattedTextField. After finding the text field, it is added to the textFieldMap in the superclass. Here’s the code for this method.
private void getTextField( String text )
{
    JLabel                  label   = getLabel( text );
    Predicate<JComponent>   pred    =
        c -> (c instanceof JFormattedTextField);
    Container               cont    = label.getParent();
    assertNotNull( cont );
    assertTrue( cont instanceof JComponent );
    JComponent              comp    =
        ComponentFinder.find( (JComponent)cont, pred );
    assertNotNull( comp );
    assertTrue( comp instanceof JFormattedTextField );
    putTextField( text, (JFormattedTextField)comp );
}
🟦 Class PlotPanelTestGUI Constructor, Public Methods
Following is a description of the public elements of the PlotPanelTestGUI class.
∎ Constructor
The constructor for this class fully initializes this object and builds and displays the GUI. The following is an annotated listing of the constructor.
1 2 3 4 5 6 7 8 9 10 11 12 13 14 15 16 17 18 19 20 21 | public PlotPanelTestGUI() { JFrame frame = new JFrame( "Plot Panel Test Dialog" ); JPanel contentPane = new JPanel( new BorderLayout() ); plotPanel = new PlotPanel(); plotPanel.setCartesianPlane( plotManager ); contentPane.add( plotPanel ); frame.setContentPane( contentPane ); frame.pack(); frame.setVisible( true ); Stream.of( "x=", "y=", "t=", "r=" ) .forEach( this::getTextField ); comboBox = getComboBox(); plotButton = getPlotButton(); putSupplier( "y=", () -> getEquation().getYExpression() ); putSupplier( "x=", () -> getEquation().getXExpression() ); putSupplier( "t=", () -> getEquation().getTExpression() ); putSupplier( "r=", () -> getEquation().getRExpression() ); } |
- Lines 3-10: Creates and displays the GUI.
- Line 6: Install the CartesianPlane emulator on the PlotPanel.
- Lines 12,13: Locate each of the PlotPanel’s JFormattedTextFields and add them to the textFieldMap in the superclass (see getTextField(String text) above).
- Lines 14,15: Locate the PlotPanel’s JButton and JComboBox.
- Lines 17-20: Initialize the Supplier map in the superclass.
∎ void clickPlotButton()
Calls the doClick() method of the PlotPanel’s Plot pushbutton. The code is in the GitHub repository.
∎ Equation newEquation()
Overrides newEquation in the superclass so that the new equation can be loaded into the PlotPanel. Here’s the code.
public Equation newEquation()
{
    Equation    equation    = super.newEquation();
    plotPanel.load( equation );
    return equation;
}
∎ void setPlotType( Command cmd )
The setPlotType method selects the given command in the PlotPanel’s combo box. It verifies that the command was correctly selected and the property DM_MODIFIED_PN has been set to true. Here’s the code for this method.
public void setPlotType( Command cmd )
{
    comboBox.setSelectedItem( cmd );
    assertEquals( cmd.toString(), equation.getPlot() );
    assertTrue( pmgr.asBoolean( CPConstants.DM_MODIFIED_PN ) );
}
Class PlotPanelTest
This section of the page will start by discussing our strategy for determining whether equations are being plotted using the correct parameters. Then, we’ll discuss our overall test strategy and discuss the implementation details.
⏹ Strategy for Validating Plot Parameters
Let’s start this discussion by listing some things we don’t have to test.
- We don’t have to verify that the stream of points issued by an Equation facility is correct. That’s the job of, for example, the Exp4jEquation unit tests.
- We don’t have to verify that the parameters for beginning, ending, and stepping through a plot are correct. That’s the job of the upcoming ParameterPanel unit tests.
- We don’t have to verify that our application detects invalid expressions and doesn’t crash if it encounters one. That’s the job of several of the unit tests that we’ve previously written.
- By the way, isn’t it nice that we took the trouble to test our code up to this point? We can be reasonably sure that if something goes wrong with these tests, the problem is limited to PlotPanel issues and isn’t due to an error in the Exp4jEquation and related classes.
So, with respect to plotting, what do we have to test? This is best illustrated with an example. Suppose we put a valid expression in the y= text field, set the combo box to YEQUALS, and then push the Plot button. Then we must ask:
- Is the expression in the y= text field used to plot the equation?
- Is the yPlot method in the Equation object being invoked?
We can verify this if we:
- Set up the equations for our four JFormattedTextFields to produce unique values;
- Set the combo box to YPLOT;
- Push the Plot button, and
- Verify that the first point in the generated point stream is correct.
We’ll use the following configurations to test each of the four categories of equations.
- To test YPLOT:
- Set the y= expression to 2x;
- Set the range parameters in the currently open equation to “1” and “2”;
- Set the combo box to YPLOT;
- Push the Plot button, and
- Verify that the first point plotted is (1,2);
- To test XYPLOT:
- Set the y= expression to sin(t);
- Set the x= expression to cos(t);
- Set the range parameters in the currently open equation to “π/2” and “π/2”;
- Set the combo box to XYPLOT;
- Push the Plot button, and
- Verify that the first point plotted is (0,1);
- To test RPLOT:
- Set the r= expression to 1.5;
- Set the range parameters in the currently open equation to “π” and “π”;
- Set the combo box to RPLOT;
- Push the Plot button, and
- Verify that the first point plotted is (-1.5,0);
- To test TPLOT:
- Set the t= expression to π/r;
- Set the range parameters in the currently open equation to “2” and “2”;
- Set the combo box to TPLOT;
- Push the Plot button, and
- Verify that the first point plotted is (0,2);
⏹ Overall Test Strategy
Here are the primary things we need to verify in addition to plotting.
- For each text field:
- If the operator enters an invalid expression, is it displayed in red? If the expression is valid, is it not displayed in red?
- If the text field contains an uncommitted value, is the expression in italics? After it’s committed, is it displayed in a plain font?
- Is the expression committed if the operator enters a valid expression and presses Enter? If the expression is invalid, is it not committed when the operator types Enter?
- Is a text field containing a valid expression committed when the text field loses focus?
- If a text field contains an invalid expression, will the focus be forced to stay with the text field?
- Is the currently open equation’s appropriate property updated when an expression is committed?
- Is the DM_MODIFIED_PN property updated when an expression is committed?
- Does pi^P correctly change pi to π?
- Is the currently open equation updated when the selection in the combo box changes?
- Is the DM_MODIFIED_PN property updated when the selection in the combo box changes?
- Are all text fields in the PlotPanel enabled if an equation is open?
- If no equation is open, are all text fields in the PlotPanel disabled?
⏹ Class and Instance Variables; Object Initialization
We have only a few class and instance variables for this test: a shortcut for referring to PropertyManager.Instance, a reference to the test GUI, and a reference to the currently open equation. We have a BeforeAll method that starts the test GUI and a BeforeEach method that instantiates a new equation and verifies the state of the DM_MODIFIED_PN property. The variable declarations and setup methods are listed below.
public class PlotPanelTest
{
    private static final PropertyManager    pmgr    =
        PropertyManager.INSTANCE;
    private static PlotPanelTestGUI         testGUI;

    private Equation    currEquation;

    @BeforeAll
    static void setUpBeforeClass() throws Exception
    {
        GUIUtils.schedEDTAndWait( () -> testGUI =
            new PlotPanelTestGUI() );
    }

    @BeforeEach
    public void setUp() throws Exception
    {
        currEquation = testGUI.newEquation();
        assertFalse( isModifiedProperty() );
    }
⏹ Helper Methods
We have one helper that encapsulates a “simple test” for each type of equation: private void testSimple( String fieldID, int keyCode )
The fieldID parameter identifies the type of equation; it is the same as the label on the corresponding text field, y=, x=, r=, or t=. The keyCode parameter determines how a value typed into a text field should be committed; it should be either VK_ENTER or VM_TAB. This method supports two parameterized tests, which look like this:
@ParameterizedTest
@ValueSource( strings= {"x=", "y=", "t=", "r="} )
public void testEnter( String fieldID )
{
    testSimple( fieldID, KeyEvent.VK_ENTER );
}

@ParameterizedTest
@ValueSource( strings= {"x=", "y=", "t=", "r="} )
public void testTab( String fieldID )
{
    testSimple( fieldID, KeyEvent.VK_TAB );
}
An annotated listing of the simpleTest method is found below.
1& 2 3 4 5 6 7 8 9 10 11 12 13 14 15 16 17 18 19 20 21 22 23 24 25 26 27 28 29 30 31 32 33 34 35 36 37 38 39 40 41 42 43 | private void testSimple( String fieldID, int keyCode ) { String orig = testGUI.getExpression( fieldID ); testGUI.click( fieldID ); assertFalse( testGUI.isChangedTextFont( fieldID ) ); assertTrue( testGUI.isValidTextColor( fieldID ) ); assertFalse( isModifiedProperty() ); testGUI.clearText( fieldID ); assertFalse( testGUI.isChangedTextFont( fieldID ) ); assertTrue( testGUI.isValidTextColor( fieldID ) ); assertFalse( testGUI.isCommitted( fieldID ) ); assertFalse( isModifiedProperty() ); testGUI.type( KeyEvent.VK_A ); assertTrue( testGUI.isChangedTextFont( fieldID ) ); assertTrue( testGUI.isValidTextColor( fieldID ) ); assertFalse( testGUI.isCommitted( fieldID ) ); assertFalse( isModifiedProperty() ); testGUI.type( KeyEvent.VK_ADD ); assertTrue( testGUI.isChangedTextFont( fieldID ) ); assertFalse( testGUI.isValidTextColor( fieldID ) ); assertFalse( testGUI.isCommitted( fieldID ) ); assertFalse( isModifiedProperty() ); testGUI.type( KeyEvent.VK_B ); assertTrue( testGUI.isChangedTextFont( fieldID ) ); assertTrue( testGUI.isValidTextColor( fieldID ) ); assertFalse( testGUI.isCommitted( fieldID ) ); assertFalse( isModifiedProperty() ); assertEquals( orig, testGUI.getExpression( fieldID ) ); testGUI.type( keyCode ); assertFalse( testGUI.isChangedTextFont( fieldID ) ); assertTrue( testGUI.isValidTextColor( fieldID ) ); assertTrue( testGUI.isCommitted( fieldID ) ); assertTrue( isModifiedProperty() ); String currExpr = testGUI.getExpression( fieldID ); assertEquals( currExpr, testGUI.getValue( fieldID ) ); } |
- Line 1: Method declaration. The fieldID parameter is x=, y=, r=, or t=; keyCode is either KeyEvent.VK_ENTER or KeyEvent.VK_TAB.
- Line 3: From the currently open equation, get the value of the expression for the given field.
- Lines 5-8: Click on the indicated text field. Verify:
- The text font indicates committed.
- The text color indicates valid.
- The DM_MODIFIED_PN property is false (indicating that the Equation object has not been changed).
- Lines 10-14: Clear the indicated text field. Verify:
- The text font indicates committed.
- The text color indicates valid.
- The text is uncommitted.
- The DM_MODIFIED_PN property is false.
- Lines 16-20: Type ‘a’ into the text field. Verify:
- The text font indicates changed.
- The text color indicates valid.
- The text is uncommitted.
- The DM_MODIFIED_PN property is false.
- Lines 22-26: Type ‘+’ into the text field. Verify:
- The text font indicates changed.
- The text color indicates invalid (a+ is not valid).
- The text is uncommitted.
- The DM_MODIFIED_PN property is false.
- Lines 28-32: Type ‘b’ into the text field. Verify:
- The text font indicates changed.
- The text color indicates valid (the expression a+b is valid).
- The text is uncommitted.
- The DM_MODIFIED_PN property is false.
- Verify that the expression in the Equation object has not yet changed.
- Lines 35-39: Type keyCode (VK_ENTER or VK_TAB) into the text field, thereby committing the text. Verify:
- The text font indicates committed.
- The text color indicates valid.
- The text is committed.
- The DM_MODIFIED_PN property is true.
- Lines 41,42: Verify that the Equation object’s associated property matches the text field’s committed value.
⏹ Principal JUnit Test Methods
Following are the public test methods for our JUnit tests.
🟦 public void testIsEnabled()
This method verifies that all text fields are enabled if an equation is open. Otherwise, if no equation is open, it verifies that all text fields are disabled. The code looks like this:
@Test
public void testEnabled()
{
    assertTrue( testGUI.isEnabled() );
    testGUI.closeEquation();
    assertFalse( testGUI.isNotEnabled() );
}
🟦 public void testEnter( String fieldID )
🟦 public void testTab( String fieldID )
These are parameterized tests that run through testSimple(String fieldID, int keyCode) for each of the text fields in the GUI. We discussed these methods above.
🟦 public void testInvalidEnter( String fieldID )
🟦 public void testInvalidTab( String fieldID )
The testInvalidEnter(String fieldID) method tests the behavior of the text fields in the context of an invalid expression. For example:
- Verify that an invalid expression is displayed in red.
- Verify that an invalid expression can’t be committed.
- Verify that a text field containing an invalid expression does not give up focus.
- Verify that the expression can be correctly committed once corrected.
The testInvalidEnter(String fieldID) commits its final value using VK_ENTER; testInvalidTab runs through a shorter version of the same test, then commits its final value by pressing VK_TAB. Following is an annotated listing of testInvalidEnter. The code for both methods can be found in the GitHub repository.
1 2 3 4 5 6 7 8 9 10 11 12 13 14 15 16 17 18 19 20 21 22 23 24 25 26 27 28 29 30 31 32 33 34 35 36 37 38 39 40 41 42 43 | @ParameterizedTest @ValueSource( strings= {"x=", "y=", "t=", "r="} ) public void testInvalidEnter( String fieldID ) { // Start by entering invalid text testGUI.click( fieldID ); JComponent comp = testGUI.getFocusedField(); testGUI.clearText( fieldID ); testGUI.paste( "ap" ); assertTrue( testGUI.isChangedTextFont( fieldID ) ); assertFalse( testGUI.isValidTextColor( fieldID ) ); assertFalse( testGUI.isCommitted( fieldID ) ); assertFalse( isModifiedProperty() ); // Type ENTER, make sure invalid text not committed testGUI.type( KeyEvent.VK_ENTER ); assertTrue( testGUI.isChangedTextFont( fieldID ) ); assertFalse( testGUI.isValidTextColor( fieldID ) ); assertFalse( testGUI.isCommitted( fieldID ) ); assertFalse( isModifiedProperty() ); // Type TAB, make sure focus does not move testGUI.type( KeyEvent.VK_TAB ); assertTrue( testGUI.isChangedTextFont( fieldID ) ); assertFalse( testGUI.isValidTextColor( fieldID ) ); assertFalse( testGUI.isCommitted( fieldID ) ); assertTrue( comp.isFocusOwner() ); assertFalse( isModifiedProperty() ); // Complete text entry so equation is valid. testGUI.type( KeyEvent.VK_I ); assertTrue( testGUI.isChangedTextFont( fieldID ) ); assertTrue( testGUI.isValidTextColor( fieldID ) ); assertFalse( testGUI.isCommitted( fieldID ) ); assertFalse( isModifiedProperty() ); // Verify that enter commits the text testGUI.type( KeyEvent.VK_ENTER ); assertFalse( testGUI.isChangedTextFont( fieldID ) ); assertTrue( isModifiedProperty() ); assertTrue( testGUI.isValidTextColor( fieldID ) ); assertTrue( testGUI.isCommitted( fieldID ) ); } |
- Line 5: Click on the text field identified by the parameter.
- Line 7: Get the text field with the keyboard focus (the field we just clicked on).
- Lines 8,9: Enter an invalid expression into the text field.
- Lines 10-13: Verify that the text field’s font indicates that it has changed, its text color indicates that the text is invalid, the text has not been committed, and the currently open equation has not been modified.
- Lines 16-20: Verify that typing Enter does not commit the text field’s value or otherwise change the state of the application.
- Lines 23-28: Type Tab. Verify that the application’s state doesn’t change and that the text field retains ownership of the focus.
- Lines 31-35: Change the text to a valid expression. Verify that the text color changes, but the application’s state remains unchanged.
- Lines 38-42: Type Enter and verify that the text is committed. Verify the font indicates committed, the color indicates valid and the DM_MODIFIED_PN indicates that the currently open equation has changed.
🟦 public void testPi( String fieldID )
This method verifies that the pi^P logic works in every text field. Here’s an annotated listing of this method.
1 2 3 4 5 6 7 8 9 10 11 12 13 14 15 16 17 18 19 20 21 22 23 | @ParameterizedTest @ValueSource( strings= {"x=", "y=", "t=", "r="} ) public void testPi( String fieldID ) { String before = "a + 2pi - 5"; String expResult = calculateExpPIResult( before ); testGUI.click( fieldID ); testGUI.clearText( fieldID ); testGUI.paste( before ); assertTrue( testGUI.isChangedTextFont( fieldID ) ); assertTrue( testGUI.isValidTextColor( fieldID ) ); assertTrue( testGUI.positionAtPI() > 0 ); testGUI.typeCtrlP(); assertTrue( testGUI.isChangedTextFont( fieldID ) ); assertTrue( testGUI.isValidTextColor( fieldID ) ); String actResult = testGUI.getText( fieldID ); testGUI.type( KeyEvent.VK_ENTER ); assertFalse( testGUI.isChangedTextFont( fieldID ) ); assertTrue( testGUI.isValidTextColor( fieldID ) ); assertEquals( expResult, actResult ); } |
- Line 5: The original expression containing the term pi.
- Line 6: The expected result after substituting π for pi.
- ines 7-9: Click on the target field and enter the original expression.
- Lines 10,11: Verify that the text field’s font and color are correct.
- Lines 13,14: Position the text field’s cursor after pi and type ^P.
- Lines 15,16: Verify that the text field’s font and color are correct.
- Line 18: Get the text from the text field.
- Line 19: Type Enter, thereby committing the text field’s value.
- Lines 20,21: Verify that the font and color of the text field indicate conmitted and valid.
- Line 22: Compare the expected and actual results.
🟦 public void testComboBox( String strCmd )
This method verifies that the four plot commands can be selected in the PlotPanel’s GUI. It verifies that changing the selection correctly updates the currently open Equation object and the DM_MODIFIED_PN property. The code for this method follows.
@ParameterizedTest
@ValueSource( strings= {"YPLOT", "XYPLOT", "TPLOT", "RPLOT" } )
public void testComboBox( String strCmd )
{
    pmgr.setProperty( CPConstants.DM_MODIFIED_PN, false );
    Command cmd = Command.valueOf( strCmd );
    assertNotNull( cmd );
    testGUI.setPlotType( cmd );
    assertEquals( strCmd, currEquation.getPlot() );
    assertTrue( isModifiedProperty() );
}
🟦 public void testPlotY()
🟦 public void testPlotXY()
🟦 public void testPlotR()
🟦 public void testPlotT()
These tests verify that the configured plot is initiated when the Plot button is pushed. See also Strategy for Validating Plot Parameters above. The annotated code for YPLOT follows. All the code can be found in the GitHub repository.
1 2 3 4 5 6 7 8 9 10 11 12 13 14 15 16 17 18 | @Test public void testPlotY() { String toPlot = "2x"; Point2D expResult = new Point2D.Double( 1, 2 ); currEquation.setRangeStart( "1" ); currEquation.setRangeEnd( "2" ); testGUI.enterEquation( "y=", toPlot ); assertTrue( isModifiedProperty() ); assertTrue( testGUI.isCommitted( "y=" ) ); testGUI.setPlotType( Command.YPLOT ); testGUI.clickPlotButton(); Point2D actResult = testGUI.getPlotPoint(); assertEquals( expResult, actResult ); assertTrue( isModifiedProperty() ); } |
- Line 4: Establish the equation to plot: y=2x.
- Line 5: Establish the first point of the expected plot: x=1, y=2.
- Lines 6,7: Establish the range of the plot, start=1, end=2.
- Line 9: Enter and commit the equation to plot in the y= text field.
- Lines 10,11: Sanity check; after executing line 9 the y= expression should be committed and the currently open equation modified.
- Lines 13,14: Select YPLOT in the PlotPanel’s combo box and push the Plot button.
- Line 15: Get the plotted point from the test GUI.
- Line 16: Compare the expected and actual plot points.
Summary
On this page, we developed a JUnit test for the PlotPanel. This entailed writing a test GUI tailored for PlotPanel. The test GUI, in turn, is a subclass of a more generic class for testing panels containing JFormattedTextFields, FTextFieldTestMgr; see Class FTextFieldTestMgr on page 7. On the next page, we’ll develop the GUI for managing the start, end, step, precision, radius name, theta name, and parameter name properties.