On this page we will develop the JUnit tests for validating the visual performance of the LinePropertiesPanel class. This doesn’t have to be too comprehensive of a test. We don’t, for example, have to verify that the JSpinner for the stroke property displays the correct value; in the functional test we verified that it has the correct value. Verifying that the value is correctly displayed is the job of the JUnit test for the JSpinner class.
Our testing strategy will be much the same as we used for testing our Feedback controls; we’ll save images of the LinePropertiesPanel to our test data directory; then, at test time, we’ll display a panel with the same properties as the saved image, then compare the image we get at test time to the saved images. As we did with testing the Feedback controls, we’ll need two utility applications and a detail object to encapsulate the saved images:
- LPP_TADetail to encapsulate the images;
- LPP_TA to generate the test data; and
- LPP_TAVisualizer to examine the test data.
We’ll start with a discussion of those these facilities, which we’ll place in the …test_utils.lp_panel package under the test source tree.
See also:
- Lesson 16 Page 6: FBCompTADetail
- Lesson 16 Page 6: FBCompTA
- Lesson 16 Page 6: FBCompLengthTA
- Lesson 16 Page 6: FBCompTAVisualizer
- Lesson 16 Page 6: LengthDataVisualizer
- Lesson 16 Page 6: FBCompTAVisualizer GUI Details
- Lesson 16 Page 6: FeedbackTest
- Lesson 16 Page 6: LengthFeedbackTest
Abbreviations used on this page:
- LPP – Line Properties Panel
- TA – Test Assistant
GitHub repository: Cartesian Plane Part 16
Previous lesson: Cartesian Plane Lesson 16 Page 11: Testing the Line Properties Panel GUI, Functional Testing
Class LPP_TADetail
Class LPP_TADetail can be compared directly to FBCompTADetail on page 6, though it is a bit simpler. Here’s the class in its entirety, accompanied by some brief notes.
1 2 3 4 5 6 7 8 9 10 11 12 13 14 15 16 17 18 19 20 21 22 23 24 25 26 27 28 29 30 31 32 33 34 35 36 37 38 39 40 41 42 43 44 45 46 47 48 49 | public class LPP_TADetail implements Serializable { private static final long serialVersionUID = 6319143056478680248L; private final Class<? extends LinePropertySet> lppType; private final int imageType; private final int[][] raster; public LPP_TADetail( Class<? extends LinePropertySet> clazz, BufferedImage image ) { this.lppType = clazz; imageType = image.getType(); raster = getRaster( image ); } public Class<? extends LinePropertySet> getLPPType() { return lppType; } public BufferedImage getBufferedImage() { int cols = raster[0].length; int rows = raster.length; BufferedImage image = new BufferedImage( cols, rows, imageType ); for ( int yco = 0 ; yco < rows ; ++yco ) for ( int xco = 0 ; xco < cols ; ++xco ) { int rgb = raster[yco][xco]; image.setRGB( xco, yco, rgb ); } return image; } private static int[][] getRaster( BufferedImage image ) { int cols = image.getWidth(); int rows = image.getHeight(); int[][] raster = new int[rows][cols]; for ( int row = 0 ; row < rows ; ++row ) for ( int col = 0 ; col < cols ; ++col ) raster[row][col] = image.getRGB( col, row ); return raster; } } |
- Lines 1,3: Objects of this class are going to be serialized to a file. So the class must implement the marker interface Serializable and declare a serialVersionUID. Our serialVersionUID was generated by Eclipse using the Java utility serialver.
- Line 5: The Class class for one of our LinePropertySet classes, representing the specific type of LinePropertySet associated with the data in this object. Examples include LinePropertySetAxes, LinePropertySetGridLines, etc.
- Lines 6,7: An object of this class needs to encapsulate a BufferedImage, but recall the BufferedImage is not serializable. So to save the image we convert it to a type, such as BufferedImage.TYPE_INT_ARGB, and a 2-dimensional array of color values known as a raster.
- Lines 9-17: Constructor; initializes the class type, and converts a BufferedImage to a type and a raster.
- Lines 19-22: Getter for the class type.
- Lines 24-36: Getter for the encapsulated BufferedImage, which must be reconstituted from the imageType and raster fields.
- Lines 39-48: Helper method to extract a raster from a BufferedImage.
Data Storage
Test data files for the LinePropertiesPanel will be stored in the LinePropertiesPanel subdirectory of our root test directory. There will be four data files, one for each category of lines. Then name of each file will be the name of the category followed by Image with an extension of .ser:
- test_data
- LinePropertiesPanel
- AxesImage.ser
- GridLinesImage.ser
- TicMajorImage.ser
- TicMinorImage.ser
- LinePropertiesPanel
Class LPP_TA
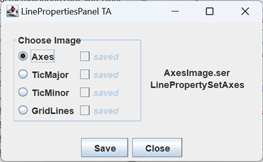
This class will be the application that we use to generate test images. It’s a bit simpler than the similar class FBCompTA which we previously looked at in detail. This first thing class does is invoke LinePropertySetInitializer.initProperties() in order to give all the line properties for all the categories predictable and (mostly) unique values. The main window for this application displays, for each category of lines, a radio button labeled with the category, and a check box labeled “saved.” It also has Save and Close buttons.
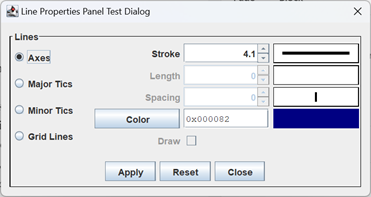
The application also displays a LPPTestDialog. The content of the dialog is a LinePropertiesPanel that reflects the category selected in the main window. The operator of the application should never change a value in the dialog. Instead, the operator examines the image displayed for a category selected from the main window; if the image “looks right” the operator saves the image by pushing the Save button, and selects another category from the main window. When an image for a particular category is saved, the check box next to the corresponding radio button in the main window is checked.
LPP_TA GUI
Let’s try not to spend too much time on the GUI for the LPP_TA class. There’s not much there that we haven’t seen before, so let’s just hit the highlights; the complete code can be found in the GitHub repository. The composition of the GUI is:

- Content pane: the root of the GUI is a JFrame with a JPanel as a content pane. The JPanel has a BorderLayout, with a main panel in its center region, and a control panel in the south.
- Main panel: this consists of two additional panels laid out horizontally. The left panel is the option panel, which contains the radio buttons and check boxes. The right panel is the feedback panel.
- Option panel: the option panel has a GridLayout of four rows and two columns. The first column has a radio button for each category of lines, axes, grid lines, etc. The second column has a check box which indicates whether, for a given category of lines, an image has been saved in a test data file.
- Feedback panel: this panel has two JLabels arranged vertically. The first displays the name of the file that will contain the image for the currently selected panel, the second displays the name of the class for that category.
- Control panel: this is a JPanel with a FlowLayout and the Save and Close buttons. The Save button saves the image for the currently selected line category; the Close button exits the application.
- Main panel: this consists of two additional panels laid out horizontally. The left panel is the option panel, which contains the radio buttons and check boxes. The right panel is the feedback panel.
LPP_TA Application
The logic behind the LPP_TA application includes the static nested class Descriptor. There will be one Descriptor object for each radio button. It encapsulates the text on the radio button label, the name of the file associated with the radio button, the class name and Class class of the LinePropertySet subclass it manages (e.g. LinePropertySetAxes) and the saved check box. It includes only the necessary fields and a constructor to initialize them. It looks like this:
private static class Descriptor
{
    public final String     text;
    public final String     fileName;
    public final String     className;
    public final JCheckBox  saved;
    public final Class<? extends LinePropertySet>   clazz;

    public <T extends LinePropertySet> Descriptor( Class<T> clazz )
    {
        final int   count       =
            LinePropertySet.class.getSimpleName().length();

        this.clazz = clazz;
        className   = clazz.getSimpleName();
        text = className.substring( count );
        fileName = text + "Image.ser";
        String  savedText   = "<html><em>saved</em></html>";
        saved = new JCheckBox( savedText );
        saved.setEnabled( false );
    }
}
The radio buttons are type PRadioButton<Descriptor>. Here’s the code (and annotations) that creates and initializes the buttons.
1 2 3 4 5 6 7 8 9 10 11 12 13 14 15 16 17 18 19 | Descriptor[] descriptors = { new Descriptor( LinePropertySetAxes.class ), new Descriptor( LinePropertySetTicMajor.class ), new Descriptor( LinePropertySetTicMinor.class ), new Descriptor( LinePropertySetGridLines.class ), }; JPanel panel = new JPanel( new GridLayout( 4, 2 ) ); Border border = BorderFactory.createTitledBorder( "Choose Image" ); panel.setBorder( border ); Stream.of( descriptors ) .map( d -> new PRadioButton<>( d ) ) .peek( b -> b.setText( b.get().text ) ) .peek( panel::add ) .peek( b -> panel.add( b.get().saved ) ) .peek( buttonGroup::add ) .forEach( b -> b.addActionListener( this::selectAction ) ); |
- Lines 1-7: Creates an array containing the Class class of each category of lines.
- Lines 9-12: Instantiates a JPanel with a GridLayout and a TitledBorder.
- Line 13: Streams each of the Descriptors from the descriptors array.
- Line 14: For each Descriptor, creates a PRadioButton<Descriptor>.
- Line 15: Sets the text on the radio button.
- Line 16: Adds the radio button to its parent JPanel.
- Line 17: Adds the JCheckBox with the saved text to the JPanel.
- Line 18: Adds the radio button to a PButtonGroup.
- Line 19: Adds an ActionListener to the radio button.
⏹ Event Processing: Radio Button Selection
This application doesn’t care when a radio button is deselected, so each radio button has an ActionListener. The ActionEvent object that gets generated when a radio button is selected includes the PRadioButton<Descriptor> object. The Descriptor has all the data necessary to update the GUI. The logic is contained in method selelectAction; here’s an abbreviated description of this method; the complete code can be found in the GitHub repository.
1 2 3 4 5 6 7 8 9 10 11 12 13 14 15 16 17 18 | private void selectAction( ActionEvent evt ) { PRadioButton<Descriptor> button = (PRadioButton<Descriptor>) evt.getSource(); Descriptor descrip = button.get(); String cName = descrip.className; className.setText( cName ); fileName.setText( descrip.fileName ); Predicate<PRadioButton<LinePropertySet>> pred = b -> cName.equals( b.get().getClass().getSimpleName() ); PRadioButton<LinePropertySet> target = lppDialog.getRadioButtons().stream() .filter( pred ) .findFirst().orElse( null ); lppDialog.doClick( target ); } |
- Lines 3-5: Gets the source of the event (the PRadioButton), and the Descriptor from the source.
- Lines 7-9: Configures the feedback panel using data from the Descriptor.
- Lines 11,12: Declares a Predicate to compare the class name from the Descriptor to the class name of another object…
- Note that the type of the parameter b is PRadioButton<LinePropertySet>, a radio button from the LPPTestDialog.
- b.get() gets the LinePropertySet from the PRadioButton.
- b.get().getClass() gets the Class class from the LinePropertySet.
- Line 14: Streams the radio buttons (type PRadioButton<LinePropertySet> from the LPPTestDialog.
- Line 15: Filters out any PRadioButton except the one containing the LinePropertySet whose class name matches the class name from the Descriptor (line 7).
- Line 16: Gets the first object that passes the filter, and assigns it to target (line 13).
- Line 17: Clicks the radio button (that is, the PRadionButton<LinePropertySet> in the test dialog).
⏹ Event Processing: Save Button Selection
When the Save button is pushed, we have to get the LinePropertiesPanel image from the LPPTestDialog, and write it to a file. The directory we write to is derived from two class fields:
    public static final String  LPP_DIR = "LinePropertiesPanel";
    private static final File   lppPath = Utils.getTestDataDir( LPP_DIR );
Note that LPP_DIR is public, so it can be coordinated with other test facilities that need the name of the directory used for LinePropertiesPanel testing. Recall also that Utils.getTestDataDir will make sure that the directory and all of its ancestors exist, creating them if necessary. The name of the file comes from the Descriptor object stored with the currently selected radio button in the application frame. Also in the Descriptor object is the JCheckBox with the saved label that we need to check after performing the save operation. The image to save can be obtained by calling the getPanelImage in the LPPTestDialog. The actual write operation is performed in the helper method saveDetail(LPP_TADetail detail, String fileName) which executes actions we should be familiar with by now:
- Using a try-with-resources statement, open fileName in a FileOutputStream.
- Wrap the FileOutputStream in an ObjectOutputStream.
- Write the LPP_TADetail object to the file.
The method invoked when the Save button is pushed (see save.addActionListener( this::saveAction ) in the getControlPanel method) looks like this:
private void saveAction( ActionEvent evt )
{
    PRadioButton<Descriptor>    button  =
        buttonGroup.getSelectedButton();
    Descriptor      descrip = button.get();
    BufferedImage   image   = lppDialog.getPanelImage();
    LPP_TADetail    detail  =
        new LPP_TADetail( descrip.clazz, image );
    saveDetail( detail, descrip.fileName );

    descrip.saved.setSelected( true );
}
Class LPP_TAVisualizer GUI
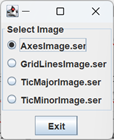
This application will look a lot like FBCompTAVisualizer. The application begins by invoking LinePropertySetInitializer.initProperties(); this way the data in any LinePropertiesPanel we instantiate will be the same as used by the LinePropertiesPanel we created in LPP_TA. The main frame of the application GUI will find all the test files in the LinePropertiesPanel test data directory and display a radio button for each.
The application will also post a LPPTestDialog. When a radio button is selected in the main frame, the corresponding button will be selected in the dialog.
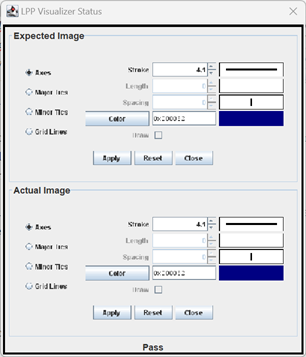
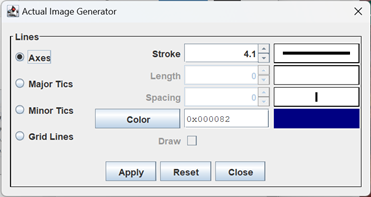
There will be a third window comparing the expected image, from the associated test data file, against the actual image gleaned from the LPPTestDialog.
We’ll dispense with a detailed discussion of the application GUI. The main window consists of a content pane with a BorderLayout and containing two additional panels: the option panel with the radio buttons, and the control panel with the Exit button. The LPPTestDialog we have already discussed in detail, elsewhere. The comparison window, the feedback panel, is implemented as a static nested class. It’s a subclass of JPanel, and consists of a content pane with a BorderLayout and two additional panels arranged vertically. The complete code can be found in the GitHub repository.
LPP_TAVisualizer Application
As noted, the window that contains the expected and actual images is implemented as a static nested dialog. After being instantiated as a dialog, the class is of most interest to us because we can call methods to display the expected image, the actual image and the result of comparing the two. To display an image, we pass a BufferedImage; then, as we have done before, we convert the BuffereImage to an Icon and display it on a JLabel. After changing the label the dialog may need adjustment, which we can do by packing it: expLabel.setIcon( getIcon( image ) );
pack();
The helper method getIcon is of some interest because it employs a graphics function we haven’t seen yet: scaling. In this application we scale the images (reduce their size) in order to save space. The resulting images aren’t very good, but for our purposes their good enough. Here’s the annotated code.
1 2 3 4 5 6 7 8 9 10 11 12 13 | private static ImageIcon getIcon( BufferedImage image ) { final double scale = .75; int newWidth = (int)(image.getWidth() * scale + .5); int newHeight = (int)(image.getHeight() * scale + .5); int hint = Image.SCALE_REPLICATE; Image scaledImage = image.getScaledInstance( newWidth, newHeight, hint ); ImageIcon icon = new ImageIcon( scaledImage ); return icon; } |
- Line 3: This is our scale factor. We want to reduce both the width and the height to 75% of their original size. Scaling the width and the height by the same amount maintains its aspect ratio. If we wished, we could use different scale factors for the width and height. You can also use a scale factor of greater than 1 to produce a larger image.
- Lines 4-7: Scales the width and height by the desired factor. The “+ .5” is a round-to-int operation.
- Lines 8-10: Performs the scaling operation. The signature of the method that does the scaling is:
getScaledInstance(int width, int height, int hints)
The width and height parameters are, as you’ve no doubt guessed, the width and height of the scaled image. The hints parameter is a collection of bit flags that can be or’d together to specify multiple options, for example:int hints = Image.SCALE_FAST | Image.SCALE_REPLICATE;
The options are:- Image.SCALE_SMOOTH: use a scaling algorithm that produces a “smooth” (high-quality) result. This may be a relatively slow operation.
- Image.SCALE_FAST: use a scaling algorithm works relatively fast, possibly at the expense of quality.
- Image.SCALE_REPLICATE: use a “simple-minded” algorithm that simply eliminates or duplicates rows and columns to produce the scaled image. Compare with Image.SCALE_AREA_AVERAGING.
- Image.SCALE_AREA_AVERAGING: use an algorithm that replaces pixels with an average of its neighboring pixels.
- See also:
- Image Scaling, in Wikipedia
- Getting Started with NVIDIA Image Scaling, on the NVIDIA developer site
- Lines 11,12: Creates an ImageIcon from the scaled image and returns it.
The radio buttons in the main frame are type PRadioButton<LPP_TADetail>. At the time the GUI is created:
- LPP_TADetail objects are created from every test data file.
- Each LPP_TADetail object is encapsulated in a PRadioButton.
Here’s an abbreviated discussion of how that’s accomplished:
1 2 3 4 5 6 7 8 9 10 11 12 13 14 15 16 17 18 19 20 21 22 23 24 25 26 27 28 29 30 31 32 33 34 35 36 37 38 39 | public class LPP_TAVisualizer { private static final File lppPath = Utils.getTestDataDir( LPP_TA.LPP_DIR ); private final File[] allFiles = lppPath.listFiles( f -> f.getName().endsWith( ".ser" ) ); private final PButtonGroup<LPP_TADetail> buttonGroup = new PButtonGroup<>(); // ... private JPanel getCenterPanel() { JPanel panel = new JPanel(); // ... Stream.of( allFiles ) .map( this::getRadioButton ) .peek( b -> b.addActionListener( this::selectAction ) ) .peek( buttonGroup::add ) .forEach( panel::add ); return panel; } private PRadioButton<LPP_TADetail> getRadioButton( File file ) { LPP_TADetail detail = getDetail( file ); String text = file.getName(); PRadioButton<LPP_TADetail> button = new PRadioButton<>( detail, text ); return button; } private LPP_TADetail getDetail( File file ) { // Using a try-with-resources statement: // ... Use file to get a FileInputStream // ... Wrap the FileInputStream in an ObjectInputStream // ... Read an object from the ObjectInputStream, and // ... Cast it to a LPP_TADetail object // Return the LPP_TADetail object } |
- Lines 3,4: Gets a File object encapsulating the LinePropertyPanel’s test directory. Note that the name of the directory is supplied by the LPP_TA class.
- Lines 5,6: Gets a list of all files from the test directory with names that end in .ser.
- Lines 7,8: Creates a button group to manage the PRadioButton<LPP_TADetail> buttons.
- Lines 10-21: Creates the JPanel that goes in the Center region of the content panel.
- Line 12: Creates the JPanel that will hold the radio buttons.
- Line 14: Streams all the File objects collected on lines 5,6.
- Line 15: Creates a radio button (see line 22).
- Line 16: Adds an ActionListener to the radio button.
- Line 17: Adds the radio button to the button group (see lines 7,8).
- Line 18: Adds the radio button to its parent JPanel.
- Lines 22-30: Creates the control panel that goes in the South region of the content pane.
- Line 25: Deserializes a LPP_TADetail from the given file (see line 31).
- Line 26: Gets the file name from the LPP_TADetail object; this will become the label on the radio button.
- Lines 27-29: Instantiates and returns the PRadioButton<LPP_TADetail>.
- Lines 31-39: Deserializes an LPP_TADetail object using a try-with-resources block, etc.
When a radio button on the application’s main window is selected we have to a) update the test dialog, and b) update the feedback panel. This happens in the selectAction event handler. Let’s finish up this section with an abbreviated discussion of that method; the actual code can be found in the GitHub repository.
1 2 3 4 5 6 7 8 9 10 11 12 13 14 15 16 17 18 19 20 | private void selectAction( ActionEvent evt ) { PRadioButton<LPP_TADetail> button = (PRadioButton<LPP_TADetail>)evt.getSource(); LPP_TADetail detail = button.get(); Class<?> lppType = detail.getLPPType(); PRadioButton<LinePropertySet> target = testDialog.getRadioButtons().stream() .filter( b -> b.get().getClass() == lppType ) .findFirst().orElse( null ); testDialog.doClick( target ); BufferedImage actImage = testDialog.getPanelImage(); BufferedImage expImage = detail.getBufferedImage(); boolean areEqual = Utils.equals( actImage, expImage ); String status = areEqual ? "Pass" : "Fail"; fbDialog.showActualImage( actImage ); fbDialog.showExpectedImage( expImage ); fbDialog.showStatus( status ); } |
- Lines 3,4: Gets the radio button from the event source.
- Line 5: Gets the LPP_TADetail object from the radio button.
- Line 6: Gets the LinePropertySet Class class from the detail object.
- Line 8: Streams the PRadioButton<LinePropertySet> objects from the test dialog.
- Line 9: Filters out all objects except the radio button that encapsulates a LinePropertySet of the same class as lppType (line 6).
- Gets the first radio button from the stream that passes the filter, and assigns it to target (line 7).
- Line 10: Clicks the button (once again, this is the radio button from the test dialog).
- Line 13: Gets the image from the LinePropertiesPanel displayed in the test dialog.
- Line 14: Gets the image encapsulated in the LPP_TADetail object.
- Lines 15,16: Compares the images using the utility in our test Utils class.
- Lines 17-19: Updates the feedback dialog.
JUnit Test Class LinePropertiesPanelVisualTest
The JUnit test for verifying the visual aspects of the LinePropertiesDialog consists of a single, parameterized (@ParameterizedTest) test method. The test has a method surce (@MethodSource( “streamDetail” )) that streams all the LPP_TADetail records found in the test data directory; the test method therefor executes once for each test data file. As we saw before, the @MethodSource method must be a class method, so many of the fields are going to be class fields. In particular the allDetails is going to be a class field that holds all the LPP_TADetail objects. The test declaration and @MethodSource method then look like this:
    @ParameterizedTest
    @MethodSource( "streamDetail" )
    public void test( LPP_TADetail detail )
    {
        ...
    }
    private static Stream<LPP_TADetail> streamDetail()
    {
        return allDetails.stream();
    }
The allDetails field is initialized in its declaration with the assistance of the lppPath field, which identifies the target test data directory, and two helper methods, getAllDetailObjects() and getDetail( File file ). An abbreviated discussion of these facilities follows; the complete code is found in the GitHub repository.
1 2 3 4 5 6 7 8 9 10 11 12 13 14 15 16 17 18 19 20 21 22 23 24 25 26 27 28 | class LinePropertiesVisualTest { private static final File lppPath = Utils.getTestDataDir( LPP_TA.LPP_DIR ); private static final List<LPP_TADetail> allDetails = getAllDetailObjects(); // ... private static List<LPP_TADetail> getAllDetailObjects() { File[] allFiles = lppPath.listFiles( f -> f.getName().endsWith( ".ser" ) ); List<LPP_TADetail> detailObjects = Stream.of( allFiles ) .map( f -> getDetail( f ) ) .toList(); return detailObjects; } private static LPP_TADetail getDetail( File file ) { LPP_TADetail detail = null; try ( FileInputStream fStream = new FileInputStream( file ); ObjectInputStream oStream = new ObjectInputStream( fStream ); ) // etc. ... } // ... } |
- Lines 3,4: Establishes the target test data directory. Note that the name of the directory comes from the LPP_TA class, and the full path comes from Utils.getTestDataDir().
- Lines 5,6: The list of LP_TADetail records from the test directory.
- Lines 8-17: Builds the list of LP_TADetail records:
- Lines 10,11: From the test data directory, gets an array of all file names with a .ser extension.
- Line 13: Streams all the file names.
- Line 14: Obtains the detail record from a named file.
- Line 15: Accumulates all records in a list, which is assigned to the variable detailObjects on line 12.
- Lines 18-26: Reads a file, extracts and returns the LPP_TADetail record. We’ve seen this code many times now.
We have a simple static nested class that implements a dialog to display the image from a LPP_TADetail object. It has a constructor, and a setIcon method, which extracts and displays the image from a LPP_TADetail object. The entire class looks like this:
private static class ExpDialog extends JDialog
{
   private JLabel   label   = null;
   public ExpDialog()
   {
        GUIUtils.schedEDTAndWait( () -> {
            label = new JLabel();
            JPanel   panel   = new JPanel( new BorderLayout() );
            panel.add( label,  BorderLayout.CENTER );
            setContentPane( panel );
            pack();
        });
    }
    public void setIcon( LPP_TADetail detail )
    {
        GUIUtils.schedEDTAndWait( () -> {
            BufferedImage   image   = detail.getBufferedImage();
            Icon            icon    = new ImageIcon( image );
            label.setIcon( icon );
            pack();
       });
    }
}
There are two more instance fields, one to hold a reference to the LPPTestDialog (testDialog), and one for the ExpDialog (expDialog). Additional initialization is performed in a @BeforeAll method; notice that the first thing it does is initialize the PropertyManager by calling LinePropertySetInitializer.initProperties():
@BeforeAll
static void setUpBeforeClass() throws Exception
{
    LinePropertySetInitializer.initProperties();

    testDialog = LPPTestDialog.getDialog();
    testDialog.setDialogVisible( true );
    testDialog.setLocation( 400, 100 );

    expDialog = new ExpDialog();
    expDialog.setLocation( 400, testDialog.getHeight() + 110 );
    expDialog.setVisible( true );

}
Helper method selectTestDialogOption(LPP_TADetail detail) looks in the test dialog for the PRadioButton containing a LinePropertySet object with a type that matches the class type stored in the detail object. The most interesting bits of the code look like this; you can find the complete code in the GitHub repository.
private void selectTestDialogOption( LPP_TADetail detail )
{
    Class<?>        lppType = detail.getLPPType();
    PRadioButton<LinePropertySet>   target  =
        testDialog.getRadioButtons().stream()
            .filter( b -> b.get().getClass() == lppType )
            .findFirst().orElse( null );
    // ...
    testDialog.doClick( target );
}
There’s one more helper method to compare the expected and actual images (assertImageEquals( LPP_TADetail detail ), see the GitHub repository); and the single @ParameterizedTest method which, given a LPP_TADetail object: a) selects the option in the test dialog that matches the detail object (this results in the display of the actual image); b) displays the expected image in the ExpDialog; and c) compares the expected and actual images. Here’s the code; the Utils.pause( 1000 ) line of code is just so that you can see the test as it progresses.
@ParameterizedTest
@MethodSource( "streamDetail" )
public void test( LPP_TADetail detail )
{
    selectTestDialogOption( detail );
    expDialog.setIcon(detail);
    Utils.pause( 1000 );
    assertImageEquals( detail );
}
Summary
On this page we completed testing of the LinePropertiesPanel. This required two utility applications:
- LPP_TA which generated and saved sample images of the LinePropertiesPanel; and
- LPP_TAVisualizer which allowed us to examine the saved images..
Our JUnit test, LinePropertiesVisualTest, opened the saved images, created a new image using the same data that was used to generate the saved image, and compared the two.
On the next page we will begin development of the GraphPropertiesPanel, which will allow us to configure additional properties of our Cartesian plane graph and each of its four margins: foreground and background colors, font and width.