As promised in an earlier lesson, in this lesson we’ll learn about JRadioButtons and the adjunct class ButtonGroup. We’ll write our own subclasses of both these facilities in order to better support the LinePropertiesPanel and GraphPropertiesPanel classes in later lessons.
See also:
- How to Use Buttons, Check Boxes, and Radio Buttons in the Oracle Java Tutorial
- SWING – JRadioButton Class on the TutorialsPoint web site
GitHub repository: Cartesian Plane Part 16
Previous lesson: Cartesian Plane Lesson 16 Page 1: Cartesian Plane Configuration GUI, Introduction
Radio Buttons
+ …
+ JComponent
+ AbstractButton
+ JToggleButton
+ JRadioButton
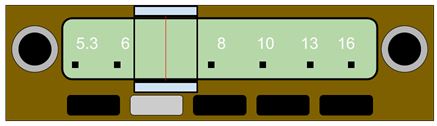
The concept of a radio button literally comes from buttons on a radio. My first car had a radio similar to the picture on the right. It only picked up AM stations. To change the station I had to physically move the indicator to the left, to select a lower frequency, and to the right to select a higher frequency. The radio could store five presets using the rectangular buttons on the bottom of the figure. If you pushed one of the buttons it moved the dial to a preselected location, and the button remained pushed down. If you pushed another button, the dial would move to a different location, the first button would pop up, and the second button would remain pressed. At any time you could have no more than one button selected.
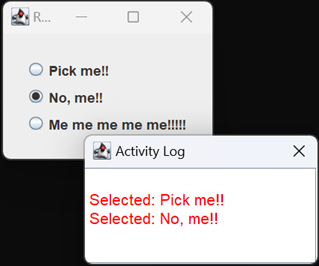
Radio buttons allow you to select at most one option out of many. Create one JRadioButton for each possible option. All the related radio buttons are then added to a ButtonGroup. The ButtonGroup ensures that only one button can be selected at a time; if a button is already selected when you choose a different one, the ButtonGroup will ensure that the original button is deselected. JRadioButton is a subclass of JToggleButton, and as such you can add an item listener or an action listener to detect changes in state. An item listener will be activated every time a button is selected or deselected; action listeners are only activated when a button is selected. For that reason, we usually use action listeners to monitor radio button states. Application RadioButtonDemo1 in the project sandbox demonstrates how to create three radio buttons, configure them in a group, and monitor their state. The relevant code is shown below, followed by a few notes.
1 2 3 4 5 6 7 8 9 10 11 12 13 14 15 16 17 18 19 20 21 22 23 24 25 26 27 28 29 30 31 | private void build() { JFrame frame = new JFrame( "Radio Button Demo 1" ); frame.setDefaultCloseOperation( JFrame.EXIT_ON_CLOSE ); JPanel contentPane = new JPanel( new BorderLayout() ); JPanel centerPanel = new JPanel(); Border border = BorderFactory.createEmptyBorder( 20, 20, 20, 20 ); centerPanel.setBorder( border ); BoxLayout layout = new BoxLayout( centerPanel, BoxLayout.Y_AXIS ); centerPanel.setLayout( layout ); contentPane.add( centerPanel, BorderLayout.CENTER ); ActivityLog log = new ActivityLog( frame ); ButtonGroup group = new ButtonGroup(); Stream.of( "Pick me!!", "No, me!!", "Me me me me me!!!!!" ) .forEach( s -> { JRadioButton button = new JRadioButton( s ); group.add( button ); centerPanel.add( button ); button.addActionListener( e -> log.append( "Selected: " + button.getText() )); }); frame.setContentPane( contentPane ); frame.setLocation( 100, 100 ); frame.pack(); frame.setVisible( true ); } |
- Lines 3,4: Creates a frame and sets its default close action.
- Line 5: Creates a panel with a BorderLayout to use as a content pane.
- Lines 7-14: Creates a panel to manage the radio buttons; the panel has a 20 pixel border, a vertical BoxLayout and is placed in the center portion of the content pane.
- Line 16: Creates and displays an activity log.
- Line 17: Creates the ButtonGroup that will manage our three radio buttons.
- Line 18: Generates a stream of three strings.
- Lines 19-25: For each string in the stream:
- Line 20: Instantiates a radio button with the given string for a label.
- Line 21: Adds the button to the button group.
- Line 22: Adds the button to the center panel of the content pane.
- Lines 23,24: Gives the button an ActionListener which sends feedback to the activity log whenever it is selected.
- Lines 27-30: Completes frame configuration and displays the frame.
To demonstrate the difference between ActionListeners and ItemListeners run application RadioButtonDemo1a in the project sandbox. This application shows how selecting Radio Button B when Radio Button A is already selected results in two ItemListeners being fired (for the deselection of Radio Button A and the selection of Radio Button B), but only one ActionListener being fired (for the selection of Radio Button B).

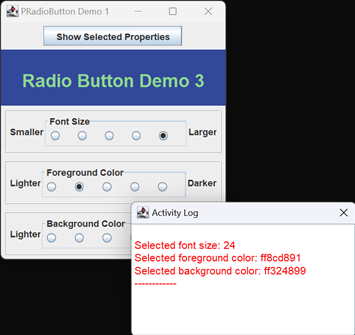
Application RadioButtonDemo2 is a bit more sophisticated. It creates five Font objects of increasing size and associates each with a radio button. When a radio button is selected, the associated font is installed in a JLabel which is displayed above the buttons. Application RadioButtonDemo3 builds on RadioButtonDemo2. It creates three ButtonGroups, one for controlling the label’s font size, one for controlling the color of its text, and one for controlling the background that the label is displayed on. Here’s the relevant code that creates the button group that controls the background color.
1 2 3 4 5 6 7 8 9 10 11 12 13 14 15 16 17 18 | private JLabel demoLabel; private JPanel demoPanel; ... private JPanel getBGColorPanel() { JPanel buttonPanel = new JPanel( new GridLayout( 1, 5 ) ); ButtonGroup buttonGroup = new ButtonGroup(); int baseIColor = 0x3F5ABF; IntStream.of( 0xC5CDEB, 0x8C9CD8, baseIColor, 0x324899, 0x263672 ) .mapToObj( Color::new ) .forEach( c -> { JRadioButton button = new JRadioButton(); button.addActionListener( e -> demoPanel.setBackground( c ) ); buttonGroup.add( button ); buttonPanel.add( button ); }); ... } |
Decoding Radio Button Groups: PRadioButton<T> and PButtonGroup<T>
So, in RadioButtonDemo3, we have three ButtonGroups. It seems like we should be able to, say, ask a particular ButtonGroup which (if any) of its buttons is selected, then get, from the selected button, the value of the property that it represents. But that’s not how ButtonGroups work.
From a ButtonGroup we can get the ButtonModel of the selected button, but that doesn’t go a long way towards identifying which button is selected: ButtonModel getSelected()
You also can’t ask the ButtonGroup to give you a list of the buttons it contains.
Note: ButtonGroup will give you an enumeration of the buttons it contains which you can convert to a list:
List<AbstractButton> list =
    Collections.list( group.getElements() );
So to help with the task of associating properties with radio buttons I propose making two new parameterized classes: PRadioButtton, a subclass of JRadioButton that encapsulates a value of some type, and PButtonGroup, a subclass of ButtonGroup that will organize, manipulate and interrogate a of list of PRadioButtons. I further propose parameterizing these classes so that we can have, for example, PRadioButton<Color>, a radio button representing a particular color value and PButtonGroup<Font>, a collection of radio buttons associated with Font objects.
Note: For the details of declaring parameterized types, see Generic Types – Learning the Java Language on the Oracle Java tutorial web site.
In its simplest form, parameterizing a class or interface is fairly easy. Start by declaring your class (or interface) with a type parameter specified using the diamond operator (<>). The type parameter is an identifier that acts as a sort of wild card substitute for type declarations; T is often used for this purpose, but any valid identifier will do:
public class Walrus<T>Within the body of the class, instead of explicitly declaring the type of a variable, parameter or method, we declare it to be type T, for example:
    public class Walrus<T>
    {
        private final T propField;
        public Walrus( T prop )
        {
            propField = prop;
        }
        public T getProp()
        {
            return propField;
        }
    }
Now when we parameterize a declaration, for example Walrus<Color>, the parameter Color takes the place of T everywhere in the class declaration, and we get something more or less equivalent to:
    private final Color propField;
    public Walrus( Color prop )
    {
        propField = prop;
    }
    public Color getProp()
    {
        return propField;
    }
Our PRadioButton class will store a value of a particular type, for example Font or Color, so we should consider it a Supplier of that type. Given that it’s going to be a subclass of JRadioButton, our class declaration looks like this:
    public class PRadioButton<T>
        extends JRadioButton
        implements Supplier<T>
The code for PRadioButton, which will reside in the project components package, appears in its entirety appears below. We’ll have two constructors; each will set the encapsulated property and, for convenience, one will allow the user to set the label on the radio button. Besides the constructors, all we need is a T get() method to satisfy the Supplier<T> implementation.
1 2 3 4 5 6 7 8 9 10 11 12 13 14 15 16 17 18 19 20 21 22 23 | public class PRadioButton<T> extends JRadioButton implements Supplier<T> { private final T property; public PRadioButton( T property ) { this.property = property; } public PRadioButton( T property, String text ) { super( text ); this.property = property; } @Override public T get() { return property; } } |
Class PButtonGroup<T> will subclass ButtonGroup, and maintain a list of type PRadioButton<T>. When we add a radio button to this group, it will be added to the encapsulated list, as well as being added to the superclass state:
public class PButtonGroup<T> extends ButtonGroup
{
    private final List<PRadioButton<T>> buttonList  = new ArrayList<>();
    public void add( PRadioButton<T> button )
    {
        buttonList.add( button );
        super.add( button );
    }
    ...
}
We’ll give it the ability to obtain the currently selected radio button, or the value associated with the currently selected radio button (both methods will return null if there is no currently selected button):
public PRadioButton<T> getSelectedButton()
{
    PRadioButton<T> button  =
        buttonList.stream()
            .filter( b -> b.isSelected() )
            .findFirst().orElse( null );
    return button;
}

public T getSelectedProperty()
{
    PRadioButton<T> selected    = getSelectedButton();
    T               property    = null;
    if ( selected != null )
        property = selected.get();
    return property;
}
Let’s also make it capable of changing the selected button to the one with some given value (selectButton( T value )) or at a given index (selectIndex( int index )). The selectButton method will return true if it succeeds in finding the given value; it throws an exception if the given value is null. Method selectIndex will throw an exception if the given index is out of bounds:
public boolean selectButton( T value )
{
    final String    mayNotBeNull    = "value may not be null";
    if ( value == null )
        throw new IllegalArgumentException( mayNotBeNull );
    JRadioButton    toSelect    = buttonList.stream()
        .filter( p -> value.equals( p ) )
        .findFirst().orElse( null );

    boolean rval    = false;
    if ( toSelect != null )
    {
        toSelect.doClick();
        rval = true;
    }

    return rval;
}

public void selectIndex( int index )
{
    buttonList.get( index ).doClick();
}
Finally, PButtonGroup will, on request, return an unmodifiable list of all the PRadioButtons in the group.
public List<PRadioButton<T>> getButtons()
{
    List<PRadioButton<T>>   list    =
        Collections.unmodifiableList( buttonList );
    return list;
}
Application PRadioButtonDemo1 from the project sandbox revises RadioButtonDemo3 to use PRadioButtons and PButtonGroups. In addition, it uses the selectIndex method to select the middle button of each group during initialization; and includes a button which, when pushed, interrogates each group and prints the currently selected values. The instance variables and the code for interrogating the radio buttons looks like this:
public class PRadioButtonDemo1
{
    private JLabel              demoLabel;
    private JPanel              demoPanel;
    private PButtonGroup<Font>  fontButtonGroup;
    private PButtonGroup<Color> fgColorButtonGroup;
    private PButtonGroup<Color> bgColorButtonGroup;
    private ActivityLog         activityLog;
    ...
    private JPanel getShowPropertiesPanel()
    {
        JPanel  panel   = new JPanel();
        JButton show    = new JButton( "Show Selected Properties" );
        show.addActionListener( e -> {
            Font    font    = fontButtonGroup.getSelectedProperty();
            int     size    = font.getSize();
            Color   fgColor = fgColorButtonGroup.getSelectedProperty();
            String  fgHex   = Integer.toHexString( fgColor.getRGB() );
            Color   bgColor = bgColorButtonGroup.getSelectedProperty();
            String  bgHex   = Integer.toHexString( bgColor.getRGB() );
            activityLog.append( "Selected font size: " + size );
            activityLog.append( "Selected foreground color: " + fgHex );
            activityLog.append( "Selected background color: " + bgHex );
            activityLog.append( "------------" );
        });
        panel.add( show );
        return panel;
    }
...
And the code that makes the Font button group is as follows:
private JPanel getFontButtonPanel()
{
    JPanel      buttonPanel = new JPanel( new GridLayout( 1, 5 ) );
    Font        origFont    = demoLabel.getFont();
    float       origSize    = origFont.getSize();
    fontButtonGroup = new PButtonGroup<Font>();
    DoubleStream.of( .5, .75, 1, 1.5, 2 )
        .map( d -> d * origSize )
        .mapToObj( s -> origFont.deriveFont( (float)s ) )
        .map( PRadioButton<Font>::new )
        .peek( fontButtonGroup::add )
        .peek( rb -> rb.addActionListener( this::fontSelected ) )
        .forEach( buttonPanel::add );
    int         selected    = fontButtonGroup.getButtonCount() / 2;
    fontButtonGroup.selectIndex( selected );
    ...
}
private void fontSelected( ActionEvent evt )
{
    Object  source  = evt.getSource();
    if ( source instanceof PRadioButton )
    {
        @SuppressWarnings("unchecked")
        PRadioButton<Font>  button  = (PRadioButton<Font>)source;
        demoLabel.setFont( button.get() );
    }
}
The code for making the foreground color and background color groups is similar, and can be found in the GitHub repository.
Testing PRadioButton and PButtonGroup
There’s not a whole lot we need to do to test PRadioButton; all we have is two constructors and a get method. Here’s the complete test class:
1 2 3 4 5 6 7 8 9 10 11 12 13 14 15 16 17 18 19 20 | class PRadioButtonTest { @Test void testPRadiobuttonTestT() { String prop = "Property"; PRadioButton<String> button = new PRadioButton<>( prop ); assertEquals( prop, button.get() ); } @Test void testPRadiobuttonTestTString() { String prop = "Property"; String text = "Label"; PRadioButton<String> button = new PRadioButton<>( prop, text ); assertEquals( prop, button.get() ); assertEquals( text, button.getText() ); } } |
Given our previous experience with GUI testing, the test for PButtonGroup is not very difficult, either. To summarize the things we need to test:
- The add method:
Verify that this method adds a PRadioButton to the list maintained by our subclass, and also adds the button to the superclass for general management. - The getSelectedButton method:
- Does this method return null when no button is selected?
- Does it return the correct button when one is selected?
- To go a little further: when a button is selected is it the only one in the group that is set? Does a previously set button get reset?
- The getSelectedProperty method:
The test for this method is basically the same as the test for getSelectedButton; we’re just verifying the correct property is returned, instead of the correct button. - The selectButton( T property ) method:
When we pass a valid property, is the correct button selected, and does the method return true? If we pass an unrecognized property, does the method return false? If we pass a null value does the method throw an exception? - The selectIndex method:
Is the correct button selected? - General behavior:
Does the group behave properly? When a button is selected, is the previously selected button deselected? Is the selected button’s action listener invoked?
To facilitate the testing, we’ll declare three PRadioButtons, a property for each button and a PButtonGroup as class and instance variables. There will be an additional instance variable to record, via an action listener, the most recent button selected. We’ll have a before-each method that fully initializes the instance variables:
1 2 3 4 5 6 7 8 9 10 11 12 13 14 15 16 17 18 19 20 21 22 23 24 25 26 27 28 29 30 | class PButtonGroupTest { private static final String prop1 = "Property 1"; private static final String prop2 = "Property 2"; private static final String prop3 = "Property 3"; private PRadioButton<String> button1; private PRadioButton<String> button2; private PRadioButton<String> button3; private PButtonGroup<String> buttonGroup; private Object selectedButton; @BeforeEach void setUp() throws Exception { button1 = new PRadioButton<>( prop1 ); button2 = new PRadioButton<>( prop2 ); button3 = new PRadioButton<>( prop3 ); button1.addActionListener( this::actionPerformed ); button2.addActionListener( this::actionPerformed ); button3.addActionListener( this::actionPerformed ); buttonGroup = new PButtonGroup<>(); buttonGroup.add( button1 ); buttonGroup.add( button2 ); buttonGroup.add( button3 ); } ... } |
To facilitate component manipulation on the EDT, we’ll break most of the tests into two pieces; the first piece will schedule the second to execute on the EDT, and the second will do all the rest of the work, for example:
    @Test
    public void testAddPRadioButtonOfT()
    {
        GUIUtils.schedEDTAndWait( this::testAddPRadioButtonOfTEDT );
    }

    private void testAddPRadioButtonOfTEDT()
    {
        String               propNew   = "Property new";
        PRadioButton<String> buttonNew = new PRadioButton( propNew );
        ...
    }
The exception to the two-part unit tests will be the negative test for making sure that a null value passed to selectButton( T value ) fails:
    @Test
    public void selectButtonTNeg()
    {
        Class<IllegalArgumentException> clazz   =
            IllegalArgumentException.class;
        assertThrows( clazz, () -> buttonGroup.selectButton( null ) );
    }
I can’t believe it makes a difference if the above code is executed on the EDT or not. Plus, if selectButton( null ) throws an exception while executing on the EDT, SwingUtilities.invokeAndWait will catch it and turn it into an InvocationTargetException, which will prevent the assertThrows from working the way we want it to.
I really don’t think it’s necessary to go into the complete details of these tests; it’s all pretty straightforward. Let’s just have a quick look at one of the tests; if you’re curious about the others you can find all the code in the GitHub repository.
1 2 3 4 5 6 7 8 9 10 11 12 13 14 15 16 17 18 19 20 21 22 23 24 25 26 27 28 29 30 31 32 33 34 | @Test public void testGetSelectedButton() { GUIUtils.schedEDTAndWait( this::testGetSelectedButtonEDT ); } private void testGetSelectedButtonEDT() { assertFalse( button1.isSelected() ); assertFalse( button2.isSelected() ); assertFalse( button3.isSelected() ); assertNull( buttonGroup.getSelectedButton() ); button1.doClick(); assertTrue( button1.isSelected() ); assertFalse( button2.isSelected() ); assertFalse( button3.isSelected() ); assertEquals( button1, buttonGroup.getSelectedButton() ); assertEquals( button1, selectedButton ); button2.doClick(); assertFalse( button1.isSelected() ); assertTrue( button2.isSelected() ); assertFalse( button3.isSelected() ); assertEquals( button2, buttonGroup.getSelectedButton() ); assertEquals( button2, selectedButton ); button3.doClick(); assertFalse( button1.isSelected() ); assertFalse( button2.isSelected() ); assertTrue( button3.isSelected() ); assertEquals( button3, buttonGroup.getSelectedButton() ); assertEquals( button3, selectedButton ); } |
Summary
On this page we discussed the characteristics of Java’s JRadioButton and ButtonGroup classes, then we developed subclasses of each:
- PRadioButton<T> extends JRadioButton
a subclass that allows us to easily associate a specific property with a radio button, and - PButtonGroup<T> extends ButtonGroup
which is convenient for managing sets of radio buttons in general, and sets of radio buttons associated with a property in particular.
Later in the lesson we’ll utilize these classes to create dialogs to manage some of the properties of our Cartesian plane.