On this page we’ll see how to create a menu for a frame or dialog. We’ll be looking at the following Swing components:
- JMenuBar
- JMenuItem
- JMenu
- JMenuItem
- JCheckboxMenuItem
- JRadioButtonMenuItem
- JSeparator
See also:
- How to Use Menus in the Oracle Java Tutorial
- SWING – Menu Classes on the TutorialsPoint web page
GitHub repository: Cartesian Plane Part 16
Previous lesson: Cartesian Plane Lesson 16 Page 2
Menus
+ …
+ JComponent
+ JMenuBar
+ JSeparator
+ JMenuItem
+ JMenu
+ JCheckBoxMenuItem
+ JRadioButtonMenuItem
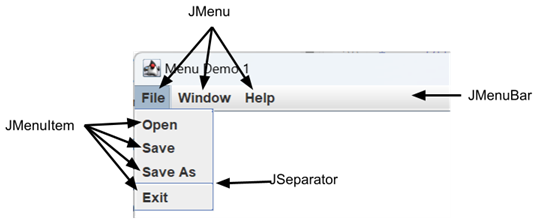
We’ve all seen menus. Typically they’re represented by a long, thin rectangular strip at the top of a top-level window. If an application has a menu at all, there is usually only one. In Java a menu is constructed of 3 pieces:
- A JMenuBar which comprises the rectangular area at the top of a window;
- The JMenuBar contains one or more JMenus. The label attached to a JMenu is typically visible any time the JMenuBar is visible.
- Each JMenu contains one or more menu items as encapsulated by JMenuItems or JSeparators. JMenus spend most of their time closed, in which case the JMenuItems cannot be seen. To see the menu items a menu must be opened, typically by clicking on it with a mouse.
The figure below shows the high level logic of building a menu, as Illustrated by MenuDemo1 from the project sandbox. It’s followed by some notes.
1 2 3 4 5 6 7 8 9 10 11 12 13 14 15 16 17 18 19 20 21 22 23 24 25 26 | public class MenuDemo1 { private static final String newLine = System.lineSeparator(); private JTextArea textArea; private void log( String message ) { textArea.append( message + newLine ); } private void build() { JFrame frame = new JFrame( "Menu Demo 1" ); frame.setDefaultCloseOperation( JFrame.EXIT_ON_CLOSE ); textArea = new JTextArea( 24, 80 ); textArea.setEditable( false ); JScrollPane scrollPane = new JScrollPane( textArea ); JPanel contentPane = new JPanel( new BorderLayout() ); contentPane.add( scrollPane, BorderLayout.CENTER ); contentPane.add( getMenu(), BorderLayout.NORTH ); frame.setContentPane( contentPane ); frame.setLocation( 200, 200 ); frame.pack(); frame.setVisible( true ); } ... } |
- Lines 3-8: Represents a simple logging facility. The text area goes in the middle of our GUI, and the log method is utilized later, as a feedback mechanism, to indicate the selection of a menu item. For example, looking ahead a bit:
    JMenuItem openItem = new JMenuItem( "Open" );
openItem.addActionListener( e -> log( "Open selected" ) ); - Lines 11,12: Creates the frame and gives it a default-close action.
- Lines 13-15: Creates the text area, makes it non-editable, and embeds it in a scroll pane.
- Line 17: Creates the content pane with a border layout.
- Line 18: Adds the text area scroll pane (the feedback log) to the center of the content pane.
- Line 19: Obtains a menu bar (getMenu()) and places it at the top of the content pane. This is one of the most common methods for positioning a menu; in the top (North) area of a border layout.
- Line 20: Sets the frame’s content pane.
- Line 21-23: Completes and displays the GUI.
The getMenu method creates the JMenuBar and adds to it a JMenu for each of the file, edit, and help menus. There’s a separate helper method to build each JMenu.
private JMenuBar getMenu()
{
    JMenuBar    menuBar = new JMenuBar();
    menuBar.add( getFileMenu() );
    menuBar.add( getEditMenu() );
    menuBar.add( getHelpMenu() );

    return menuBar;
}
Each helper method creates a JMenu and adds to it a JMenuItem for each of the menu items that it incorporates. Menu items can be organized into groups through the addition of a JSeparator. Note that JMenuItem is a subclass of AbstractButton, so all the things you can do with an AbstractButton you can do with a JMenuItem. In particular, you can add an ActionListener to a JMenuItem which will be invoked each time you select the menu item. In the File menu of MenuDemo1, selecting the open, save or save as button just prints a message to a log; if this was a real application, of course, they would execute the code necessary to open or save something. The action listener on the exit button causes the demo to terminate. Here’s the code for building the file menu; the code for building the other menus is similar, and can be found in the GitHub repository.
1 2 3 4 5 6 7 8 9 10 11 12 13 14 15 16 17 18 19 20 21 22 | private JMenu getFileMenu() { JMenu menu = new JMenu( "File" ); JMenuItem openItem = new JMenuItem( "Open" ); JMenuItem saveItem = new JMenuItem( "Save" ); JMenuItem saveAsItem = new JMenuItem( "Save As" ); JSeparator separator = new JSeparator(); JMenuItem exitItem = new JMenuItem( "Exit" ); openItem.addActionListener( e -> log( "Open selected" ) ); saveItem.addActionListener( e -> log( "Save selected" ) ); saveAsItem.addActionListener( e -> log( "Save As selected" ) ); exitItem.addActionListener( e -> System.exit( 0 ) ); menu.add( openItem ); menu.add( saveItem ); menu.add( saveAsItem ); menu.add( separator ); menu.add( exitItem ); return menu; } |
Digression: ComponentListener and ComponentAdapter
In the next section we are going to use a ComponentListener to detect changes in the visibility of a dialog. It’s pretty straightforward, but we haven’t seen ComponentListeners before, and we’re going to implement one using a traditional anonymous class which we haven’t seen in a while. Depending on your comfort level you may be able to skip this section.
                       java.lang.Object
                             |
                       java.awt.Component
                             |
                       java.awt.Container
                             |
                     +-------------------+
                     |                   |
         javax.swing.JComponent      java.awt.Window
                  |                          |
   +------+-------+--------...        +----------------+
   |      |       |                   |                |
JButton  JLabel  JSpinner...          |                |
                               java.awt.Dialog    java.awt.Frame
                                      |                |
                                   JDialog           JFrame
Recall that JFrames, JDialogs and all JComponents are subclasses of Component. Any Component can have a ComponentListener, an interface that requires four methods:
void componentHidden( ComponentEvent evt )
invoked when a Component loses visibilityvoid componentShown( ComponentEvent evt )
invoked when a Component becomes visiblevoid componentMoved( ComponentEvent evt )
invoked when a Component is repositionedvoid componentResized( ComponentEvent evt )
invoked when a Component’s size changes
If you implement a ComponentListener you must write all four of these methods, even if you only care about one or two of them. In our case, for example, we want to know when a component’s visibility changes; we don’t care about its size or position. To facilitate implementation, Java provides ComponentAdapter. This is a concrete class that implements ComponentListener; it has all the methods required by ComponentListener, but they don’t do anything: public void componentShown( ComponentEvent evt )
{
}
When we need a ComponentListener, instead of writing all four methods we can subclass ComponentAdapter and override just those methods we’re interested in. ComponentListenerDemo1 from the project sandbox does just that; it utilizes a nested class that extends ComponentAdapter and overrides componentHidden and componentShown. It adds an instance of the nested class to a dialog as a ComponentListener; when the dialog changes visibility the listener prints a diagnostic message to standard out. To generate visibility changes the application has a button which, when pushed, will make the dialog visible. To make the dialog lose visibility just close it by clicking the close button in the dialog’s title bar. Here’s the relevant code from the application.
1 2 3 4 5 6 7 8 9 10 11 12 13 14 15 16 17 18 19 20 21 22 23 24 25 26 27 28 29 30 31 32 33 34 35 36 37 38 | public class ComponentListenerDemo1 { private static JDialog dialog; // ... private static void build() { JFrame frame = new JFrame(); frame.setDefaultCloseOperation( JFrame.EXIT_ON_CLOSE ); makeDialog(); dialog.addComponentListener( new VListener() ); JButton button = new JButton( "Show" ); button.addActionListener( e -> dialog.setVisible( true ) ); frame.getContentPane().add( button ); frame.pack(); frame.setLocation( 300, 300 ); frame.setVisible( true ); } // ... private static class VListener extends ComponentAdapter { @Override public void componentHidden( ComponentEvent evt ) { String message = "Hidden: " + dialog.getTitle() + ", " + dialog.isVisible(); System.out.println( message ); } @Override public void componentShown( ComponentEvent evt ) { String message = "Shown: " + dialog.getTitle() + ", " + dialog.isVisible(); System.out.println( message ); } } } |
Many modern Java programmers wouldn’t use a traditional nested class as I have done, above. They would use an anonymous class, entered directly as an argument to addComponentListener; this is what we will do when we get to the examples in the next section. Application ComponentListenerDemo2 revises ComponentListenerDemo1 to use this technique. It removes class VListener, and replaces dialog.addComponentListener( new VListener() ) with the following:
1 2 3 4 5 6 7 8 9 10 11 12 13 14 15 16 | dialog.addComponentListener( new ComponentAdapter() { @Override public void componentHidden( ComponentEvent evt ) { String message = "Hidden: " + dialog.getTitle() + ", " + dialog.isVisible(); System.out.println( message ); } @Override public void componentShown( ComponentEvent evt ) { String message = "Shown: " + dialog.getTitle() + ", " + dialog.isVisible(); System.out.println( message ); } }); |
JCheckBoxMenuItems
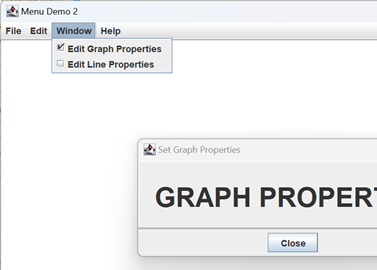
A JCheckBoxMenuItem can be used in a menu to represent a Boolean property or condition. The menu bar for out Cartesian plane GUI will have a Window menu with JCheckBoxMenuItems for displaying the graph properties and line properties dialogs. Selecting one of these buttons will cause the associated dialog to pop up; deselecting it will cause the dialog to pop down. These menu items will use ItemListeners to effect the popping. Note that it’s possible for one of these dialogs to be displayed or closed by some means other than the Window menu so it will be necessary to make sure the state of a JCheckBoxMenuItem is synchronized with the state of the dialog that it controls; we’ll use ComponentListeners on the dialogs to accomplish the synchronization. This logic is illustrated by MenuDemo2 in the project sandbox. Here’s the relevant code from the application; I’ve omitted the code for the getDialog method because it’s longish, and not directly related to menu construction. All it does it create a dialog with an initial state of not visible. The code is followed by some notes.
1 2 3 4 5 6 7 8 9 10 11 12 13 14 15 16 17 18 19 20 21 22 23 24 25 26 27 28 29 30 31 32 33 34 35 36 37 38 39 40 41 42 43 44 45 46 47 48 49 50 51 52 53 54 55 56 57 58 59 60 61 62 63 64 65 66 67 68 69 70 71 72 73 74 75 76 77 78 | public class MenuDemo2 { private static final String newLine = System.lineSeparator(); private JTextArea textArea; private JDialog graphDialog; private JDialog lineDialog; // ... private void build() { JFrame frame = new JFrame( "Menu Demo 2" ); frame.setDefaultCloseOperation( JFrame.EXIT_ON_CLOSE ); textArea = new JTextArea( 24, 80 ); textArea.setEditable( false ); JScrollPane scrollPane = new JScrollPane( textArea ); graphDialog = getDialog( frame, "Set Graph Properties", "GRAPH PROPERTIES" ); graphDialog.setLocation( 100, 100 ); lineDialog = getDialog( frame, "Set Line Properties", "LINE PROPERTIES" ); lineDialog.setLocation( 300, 100 ); JPanel contentPane = new JPanel( new BorderLayout() ); contentPane.add( scrollPane, BorderLayout.CENTER ); contentPane.add( getMenu(), BorderLayout.NORTH ); frame.setContentPane( contentPane ); frame.setLocation( 200, 200 ); frame.pack(); frame.setVisible( true ); } // ... private JMenu getWindowMenu() { JMenu menu = new JMenu( "Window" ); JCheckBoxMenuItem graphItem = new JCheckBoxMenuItem( "Edit Graph Properties", false ); JCheckBoxMenuItem lineItem = new JCheckBoxMenuItem( "Edit Line Properties", false ); graphItem.addItemListener( e -> graphDialog.setVisible( graphItem.isSelected() ) ); lineItem.addItemListener( e -> lineDialog.setVisible( lineItem.isSelected() ) ); menu.add( graphItem ); menu.add( lineItem ); addVisibilityListener( graphDialog, graphItem ); addVisibilityListener( lineDialog, lineItem ); return menu; } // ... private static void addVisibilityListener( Window window, JMenuItem item ) { window.addComponentListener( new ComponentAdapter() { @Override public void componentHidden( ComponentEvent evt ) { item.setSelected( false ); } @Override public void componentShown( ComponentEvent evt ) { item.setSelected( true ); } }); } // ... } |
- Lines 16-27: Creates two sample dialog objects, saving them in instance variables.
- Lines 43-46: Creates two JCheckBoxMenuItems, one for controlling each dialog.
- Lines 47-52: Adds ItemListeners to the two menu items. Recall that ItemListeners are notified every time the state of a check box changes, and the code at line 48, for example, will set the visibility of the dialog to whatever the state the check box is in.
- Lines 56,57: Calls a convenience method to add ComponentListeners to the two check box menu items. The code to do this is placed in a helper method, because the listener is 12 lines long, and nearly identical for each menu item.
- Lines 61-76: Helper method to add a ComponentListener to the given window.
- Lines 66-69: When the given Window (actually a JDialog) is hidden, the given JMenuItem (actually a JCheckBoxMenuItem) is deselected.
- Lines 71-74: When the given Window is made visible, the given JMenuItem is selected.
Mnemonics and Accelerators
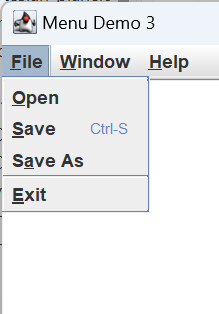
In the context of menus, a mnemonic is a character, usually a letter, assigned to a menu or menu item that allows it be selected using the keyboard instead of the mouse. In application MenuDemo3 from the project sandbox, on the File menu O is the mnemonic assigned to the Open menu item, S is assigned to Save, A is assigned to Save As and E is assigned to exit. The File menu itself is assigned the mnemonic F. Note that Java helpfully underlines the mnemonic in the menu item’s text. To open a menu using its mnemonic, type the indicated key while holding down the appropriate modifier key (examples of modifier keys include, shift, control and, on the Apple Macintosh, Command (⌘)). Which modifier key to use is platform-dependent; most commonly it’s Command on Mac and Alt every place else. Once a menu is open you can select a menu item using its mnemonic without a modifier key.
To see mnemonics in action, execute MenuDemo3. Hold down the Alt key (or the Command key on Mac) and type F. The File menu will open. Now, without holding down any other keys, type A; you will get a message saying Save As has been selected.
To designate a mnemonic when building a menu, use one of the virtual key constants from the KeyEvent class; for example, F corresponds to VK_F, A to VK_A and S to VK_S. To set a mnemonic for a JMenu, first create the JMenu object, than apply the setMnemonic method to it, for example: JMenu menu = new JMenu( "File" );
menu.setMnemonic( KeyEvent.VK_F );
To set a mnemonic for a JMenuItem you can follow the same procedure, or you can use a convenient constructor: JMenuItem openItem = new JMenuItem( "Open", KeyEvent.VK_O );
In the context of a menu, an accelerator is a key combination that will select a menu item even when the item’s menu isn’t open. My personal favorite is Ctrl-S which, in most editors on Windows, means quick save, or save my work right now. The corresponding accelerator on Mac is Command-S. Other common accelerators are Ctrl-C for copy (Command-C on Mac) and Ctrl-V for paste (Command-V on Mac). You can see this working in MenuDemo3. Run the application then type Control-S (without opening a menu) and you will see a save selected message in the log.
To set an accelerator on a menu item you need a Keystroke object. Such an object indicates the key and modifiers necessary to activate the accelerator. For example: KeyStroke ctrlS =
KeyStroke.getKeyStroke( KeyEvent.VK_S, ActionEvent.CTRL_MASK );
saveItem.setAccelerator( ctrlS );
When you set an accelerator on a menu item Java adds a representation of the accelerator to the item’s text: ![]()
The modifiers you can use in an accelerator are declared as constants in the ActionEvent class:
- ALT_MASK: ALT key
- CTRL_MASK: Control key
- META_MASK: Meta key (typically the Windows key on Windows-friendly keyboards, and the Command key on Mac-friendly keyboards)
- SHIFT_MASK: Shift key
The modifier constants can be combined using the bitwise-or operator:
- ALT_MASK | SHIFT_MASK: hold down the Alt and Shift keys at the same time.
- CTRL_MASK | SHIFT_MASK: hold down the Control and Shift keys at the same time.
To create a KeyStroke, use the KeyStroke.getKeystroke( int key, int modifiers ) method. There’s also an overload for that method that recognizes some logical strings, such as getKeystroke( “control X” ) and getKeystroke( “shift control S” ); see the Java documentation for details.
Here’s the code from MenuDemo3 that puts mnemonics and accelerators on the items in the File menu.
1 2 3 4 5 6 7 8 9 10 11 12 13 14 15 16 17 18 19 20 21 22 23 24 25 26 27 | private JMenu getFileMenu() { JMenu menu = new JMenu( "File" ); menu.setMnemonic( KeyEvent.VK_F ); JMenuItem openItem = new JMenuItem( "Open", KeyEvent.VK_O ); JMenuItem saveItem = new JMenuItem( "Save", KeyEvent.VK_S ); JMenuItem saveAsItem = new JMenuItem( "Save As", KeyEvent.VK_A ); JSeparator separator = new JSeparator(); JMenuItem exitItem = new JMenuItem( "Exit", KeyEvent.VK_E ); KeyStroke ctrlS = KeyStroke.getKeyStroke( KeyEvent.VK_S, ActionEvent.CTRL_MASK ); saveItem.setAccelerator( ctrlS ); openItem.addActionListener( e -> log( "Open selected" ) ); saveItem.addActionListener( e -> log( "Save selected" ) ); saveAsItem.addActionListener( e -> log( "Save As selected" ) ); exitItem.addActionListener( e -> System.exit( 0 ) ); menu.add( openItem ); menu.add( saveItem ); menu.add( saveAsItem ); menu.add( separator ); menu.add( exitItem ); return menu; } |

Submenus; Containment Hierarchy vs. Inheritance Hierarchy
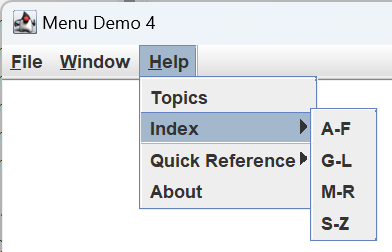
In the menu hierarchy, JMenuItems are contained in JMenus. However JMenu is a subclass of JMenuItem. This may seem a bit odd, at first, but it’s not an uncommon strategy in object oriented programming. In fact in this case it’s convenient, because that means a JMenu can contain another JMenu which is how we get submenus. MenuDemo4 in the project sandbox provides an example of how to do this; Menu items are added to a JMenu, then the JMenu is added to another JMenu. Here is the code to create the Help menu in MenuDemo4.
1 2 3 4 5 6 7 8 9 10 11 12 13 14 15 16 17 18 19 20 21 22 23 24 25 26 27 28 29 30 31 32 33 34 35 36 37 38 39 40 41 42 43 44 45 46 47 48 49 50 51 52 53 54 55 56 57 58 59 60 61 62 63 64 65 66 67 68 | private JMenu getHelpMenu() { JMenuItem topicsItem = new JMenuItem( "Topics" ); JMenuItem aboutItem = new JMenuItem( "About" ); topicsItem.addActionListener( e -> log( "Showing help topics" ) ); String about = "Menu Demo 2, Version 1.0.0" + newLine + "Copyright \u00a9 2026 " + "by Solomon Mining Associates, Ltd."; aboutItem.addActionListener( e -> JOptionPane.showMessageDialog( null, about, "About This Product", JOptionPane.INFORMATION_MESSAGE ) ); // Create the index submenu JMenu indexMenu = new JMenu( "Index" ); JMenuItem indexItemA = new JMenuItem( "A-F" ); JMenuItem indexItemG = new JMenuItem( "G-L" ); JMenuItem indexItemM = new JMenuItem( "M-R" ); JMenuItem indexItemS = new JMenuItem( "S-Z" ); indexItemA.addActionListener( this::actionPerformed ); indexItemG.addActionListener( this::actionPerformed ); indexItemM.addActionListener( this::actionPerformed ); indexItemS.addActionListener( this::actionPerformed ); indexMenu.add( indexItemA ); indexMenu.add( indexItemG ); indexMenu.add( indexItemM ); indexMenu.add( indexItemS ); // Create the quick-reference submenu JMenu quickRefMenu = new JMenu( "Quick Reference" ); JMenuItem quickRefItem1 = new JMenuItem( "World Domination, How To" ); JMenuItem quickRefItem2 = new JMenuItem( "Thermonuclear Annihilation, Avoiding" ); JMenuItem quickRefItem3 = new JMenuItem( "Natural Resources, Plundering" ); quickRefItem1.addActionListener( this::actionPerformed ); quickRefItem2.addActionListener( this::actionPerformed ); quickRefItem3.addActionListener( this::actionPerformed ); quickRefMenu.add( quickRefItem1 ); quickRefMenu.add( quickRefItem2 ); quickRefMenu.add( quickRefItem3 ); // Create the principal help menu JMenu menu = new JMenu( "Help" ); menu.setMnemonic( KeyEvent.VK_H ); menu.add( topicsItem ); menu.add( indexMenu ); menu.add( quickRefMenu ); menu.add( aboutItem ); return menu; } private void actionPerformed( ActionEvent evt ) { Object source = evt.getSource(); if ( source instanceof AbstractButton ) { String text = ((AbstractButton)source).getText(); log( "Selected \"" + text + "\"" ); } } |
JRadioButtonMenuItem
JRadioButtonMenuItems work pretty much like JRadioButtons; make several buttons to control the same property or feature, add them all to the same ButtonGroup, and the ButtonGroup makes sure that at most one can be selected at any time. We will not be using radio button menu items in our Cartesian plane project, but, for the sake of completeness, MenuDemo5 in the project sandbox provides an example of how to use them. Here’s the relevant code and some notes.
1 2 3 4 5 6 7 8 9 10 11 12 13 14 15 16 17 18 19 20 21 22 23 24 25 26 27 28 29 30 31 32 33 34 35 36 37 38 39 40 41 42 43 44 45 46 47 48 49 50 51 52 53 54 55 56 57 58 59 60 61 62 63 64 65 66 67 68 69 70 71 72 73 74 75 76 | public class MenuDemo5 { private JTextArea textArea; //... private JMenu getPropertiesMenu() { JMenu menu = new JMenu( "Properties" ); menu.setMnemonic( KeyEvent.VK_P ); int medium = textArea.getFont().getSize(); int small = medium / 2; int large = medium * 2; ButtonGroup sizeGroup = new ButtonGroup(); JRadioButtonMenuItem smallFont = new JRadioButtonMenuItem( "Small Font", false ); JRadioButtonMenuItem mediumFont = new JRadioButtonMenuItem( "Medium Font", true ); JRadioButtonMenuItem largeFont = new JRadioButtonMenuItem( "Large Font", false ); sizeGroup.add( smallFont ); sizeGroup.add( mediumFont ); sizeGroup.add( largeFont ); smallFont.addActionListener( e -> changeSize( small ) ); mediumFont.addActionListener( e -> changeSize( medium ) ); largeFont.addActionListener( e -> changeSize( large ) ); ButtonGroup familyGroup = new ButtonGroup(); JRadioButtonMenuItem dialog = new JRadioButtonMenuItem( "Dialog", true ); changeFamily( Font.DIALOG ); JRadioButtonMenuItem monospaced = new JRadioButtonMenuItem( "Monospaced", false ); JRadioButtonMenuItem serif = new JRadioButtonMenuItem( "Serif", false ); JRadioButtonMenuItem sansSerif = new JRadioButtonMenuItem( "Sans Serif", false ); familyGroup.add( dialog ); familyGroup.add( monospaced ); familyGroup.add( serif ); familyGroup.add( sansSerif ); dialog.addActionListener( e -> changeFamily( Font.DIALOG ) ); monospaced.addActionListener( e -> changeFamily( Font.MONOSPACED ) ); serif.addActionListener( e -> changeFamily( Font.SERIF ) ); sansSerif.addActionListener( e -> changeFamily( Font.SANS_SERIF ) ); menu.add( smallFont ); menu.add( mediumFont ); menu.add( largeFont ); menu.add( new JSeparator() ); menu.add( dialog ); menu.add( monospaced ); menu.add( serif ); menu.add( sansSerif ); return menu; } private void changeSize( float size ) { Font newFont = textArea.getFont().deriveFont( size ); textArea.setFont( newFont ); } private void changeFamily( String family ) { Font font = textArea.getFont(); int size = font.getSize(); int style = font.getStyle(); Font newFont = new Font( family, style, size ); textArea.setFont( newFont ); } // ... } |
- Lines 7,8: Creates the Properties menu, and gives it the mnemonic P.
- Lines 10-13: Establishes three different sizes for a font; medium is the default size for the text area font, small is half the default size and large is twice the default size.
- Line 14: Creates a ButtonGroup which will contain the menu items that control font size.
- Lines 15-20: Creates the three JRadioButtonMenuItems that will control font size. Note that the menu item associated with medium is created in the selected state.
- Lines 21-23: Adds the three size-related menu items to a common button group.
- Lines 25-27: Adds ActionListeners to the size-related buttons that will change the size of the font in the text area. (Note: we want ActionListeners here, not ItemListeners; we only care when an item is selected, not when it is deselected).
- Line 29: Creates a button group to manage the menu items that control the font family.
- Lines 30,31: Creates a menu item associated with the Dialog font family, and gives it an initial state of selected.
- Line 32: Sets the family of the text area font to Dialog; this synchronizes with the initially selected Dialog menu item.
- Lines 33-38: Creates menu items to be associated with other font families.
- Lines 39-42: Adds the family-related menu items to the button group that manages family-related buttons.
- Lines 44-47: Adds ActionListeners to the menu items that control the selected font family.
- Lines 49-56: Adds all the menu items (plus a separator at line 52) to the Properties menu.
- Lines 61-65: ActionListener method that will change the size of the text area’s font when an associated menu item is selected.
- Lines 67-74: ActionListener method that will change the family of the text area’s font when an associated menu item is selected.
Summary
On this page we discussed how to build menus in Swing. JMenuItems are added to JMenus, and JMenus are added to a JMenuBar. Menu items are AbstractButtons, and you can monitor activity on them using ItemListeners and ActionListeners. Use ItemListeners to monitor state changes in JCheckBoxMenuItems, and ActionListeners to monitor activity in JMenuItems and JRadioButtonMenuItems.
In the next lesson we’ll begin the final tools we’ll need to construct the LinePropertiesPanel and GraphPropertiesPanel GUIs.