On the previous page we designed and implement some custom components: LengthFeedback, StrokeFeedback and SpacingFeedback. On the next page we will test them, and to do so, we will look at a new GUI testing technique: saving an image of a correctly drawn component, then verifying that the same image is produced during unit testing. On this page we’ll have a look at the tools we need accomplish this, including serialization, a technique for saving and restoring entire objects, and the specifics of how to generate and store test data.
We’ll start our exploration informally, working in the project sandbox to demonstrate the tools and techniques we’ll need later. We have a separate package in the sandbox for demonstration code: com.acmemail.judah.cartesian_plane.sandbox.fbc_test_demo. This will include applications for generating and reviewing test data. When we’re ready, we’ll put our “official” applications under the test source tree, in a special utilities package, com.acmemail.judah.cartesian_plane.test_utils.fb_comp. Then we’ll write the actual JUnit tests for the components, which will go in the usual package under the test source tree, com.acmemail.judah.cartesian_plane.components.
About abbreviations: abbreviations of names used in the section include:
- FB for feedback
- Comp for component
- FBComp for feedback component
- TA for testing assistant
We’ll start with a quick discussion of some features of JLabel components that we have not yet encountered.
See also:
- Serializable Objects, in the Oracle Java Tutorial
- Serialization and Deserialization in Java, from W3schools
- Java Serialization, on the IONOS Web Site
- How to Use Icons, in the Oracle Java Tutorial
GitHub repository: Cartesian Plane Part 16
Previous lesson: Cartesian Plane Lesson 16 Page 4
Digression: JLabels and Images
So far our experience with JLabels has been limited to components that display text. But JLabels are also capable of displaying images. Optionally a JLabel can contain both an image and text. To create a JLabel that displays an image, use one of these facilities from the JLabel class.
- JLabel(Icon image) constructor; creates a JLabel that displays the given image.
- JLabel(String text, Icon icon, int horizontalAlignment) constructor; creates a JLabel with the given text, image and horizontal alignment.
- JLabel(Icon image, int horizontalAlignment) constructor; creates a JLabel with the given image and horizontal alignment.
- setIcon(Icon icon) instance method that sets the image to be displayed by a JLabel.
What is an Icon?
An Icon is an interface that represents a picture. Java provides several concrete classes that implement Icon, the most useful of which (for our purposes) is ImageIcon. An ImageIcon can be created several ways, including from an Image object. In this lesson we’ll be working a lot with the BufferedImage class which, fortunately for us, is a subclass of Image.
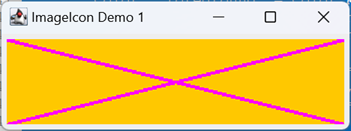
Application ImageIconDemo1 from the project sandbox illustrates one way to display an image in a label. The application consists of two parts. The first part, implemented in the constructor, draws the figure at left on a buffered image. It’s a very simple figure, consisting of two diagonal lines. The annotated code follows.
1 2 3 4 5 6 7 8 9 10 11 12 13 14 15 16 17 18 19 20 21 22 23 24 25 26 27 28 29 | public class ImageIconDemo1 { private final Image testImage; // ... public ImageIconDemo1() { int type = BufferedImage.TYPE_INT_ARGB; int width = 300; int height = 75; Stroke stroke = new BasicStroke( 3 ); Color background = Color.ORANGE; Color foreground = Color.MAGENTA; Line2D line1 = new Line2D.Double( 0, 0, width, height ); Line2D line2 = new Line2D.Double( width, 0, 0, height ); BufferedImage bufImage = new BufferedImage( width, height, type ); Graphics2D gtx = bufImage.createGraphics(); gtx.setColor( background ); gtx.fillRect( 0, 0, width, height ); gtx.setColor( foreground ); gtx.setStroke( stroke ); gtx.draw( line1 ); gtx.draw( line2 ); testImage = bufImage; } // ... } |
- Lines 7-9: Establishes the width and height of the BufferedImage, and its type (color model). We’re using the type most common in Java, the ARGB color model.
- Lines 10-12: Establishes the weight of the diagonal lines, and the foreground and background colors of the image.
- Line 13: Establishes the first diagonal line, to be drawn from the upper left corner of the image (0,0) to the lower right (width, height).
- Line 14: Establishes the second diagonal line, to be drawn from the upper right corner of the image (width,0) to the lower left (0, height).
- Lines 16-18: Creates the buffered image, and obtains a graphics context that can be used to draw on the image.
- Lines 19,20: Fills the image with the background color.
- Lines 21-24: Draws the diagonal lines using the foreground color, and the given weight.
- Line 26: Saves the image in an instance variable, where it can be accessed by the GUI.
The second part of the application, makeGUI, creates the GUI that displays the image in a JLabel. The two lines of code most relevant to our demo are:
    // Convert the BufferedImage to an icon
    Icon    icon    = new ImageIcon( testImage );
    // Create a JLabel to display the icon
    JLabel  label   = new JLabel( icon );
The complete code for this method follows.
1 2 3 4 5 6 7 8 9 10 11 12 13 14 15 16 17 18 19 | public class ImageIconDemo1 { private final Image testImage; // ... private void makeGUI() { JFrame frame = new JFrame( "ImageIcon Demo 1" ); frame.setDefaultCloseOperation( JFrame.EXIT_ON_CLOSE ); JPanel pane = new JPanel(); Icon icon = new ImageIcon( testImage ); JLabel label = new JLabel( icon ); pane.add( label ); frame.setContentPane( pane ); frame.setLocation( 300, 300 ); frame.pack(); frame.setVisible( true ); } } |
Test Data Generation
Test Data Encapsulation, class FBCompTADetail
Eventually we are going to take a picture of a component in a given state, then during testing we’ll reproduce that state and make sure we generate an identical picture. So we have to save the picture, and the data we need to reproduce the picture. The data for our feedback components is pretty simple, we just need the property value (i.e. the length for the LengthFeedback component, the spacing for the SpacingFeedback component, etc.) and the weight of the lines in the component that provide the feedback. Our picture is going to be represented as a BufferedImage, which we’ve already met, however…
Jumping ahead just a bit, as noted, our data is going to be serialized, and BufferedImages can’t be serialized.
… we can’t store a BufferedImage directly. But this is an easy problem to overcome. To encapsulate the BufferedImage we just need to know its type and constituent data, which can be represented as a two-dimensional array of integers known as a raster. So here’s the initial declaration of a class to encapsulate the property value, weight and BufferedImage:
1 2 3 4 5 6 7 8 9 10 11 12 | public class FBCompTADetail { /** The encapsulated property value. */ private final double propertyValue; /** The encapsulated weight. */ private final double weight; /** The type of the encapsulated BufferedImage. */ private final int imageType; /** The content of the encapsulated BufferedImage. */ private final int[][] raster; ... } |
A Brief Introduction to Serialization
Serialization refers to saving (or persisting) the data encapsulated in an object, typically in a file1. Later the data can be deserialized, reproducing the original object. This leads to some potentially difficult issues. Consider, for example:
¹Data can be serialized/deserialized via any I/O stream, including files, network connections, Strings and arrays.
- You implement a class with two fields.
- You serialize a bunch of objects of this class.
- Then you add a third field to your class.
- How do you handle all those serialized objects with only two fields?
- How does Java even detect a mismatch between a serialized object, and the current version of the class?
The issue how do you handle mismatches is a more advanced topic than we’re interested in, and, for the purpose of this lesson, can be swept under the rug. The issue of detecting mismatches is simpler, and can be resolved by adding a field to your class, the serialVersionUID which identifies a version of your class. When you declare a class with two fields you give it one serialVersionUID, then when you add a third field you change the serialVersionUID; the IDs need not be sequential. There are two ways to obtain a unique serial version UID for a class:
- Pick one. It’s just a long integer.
- Use the Java tool to generate one, serialver.
Note that serialver is a command line tool; it generates a long integer based on the fields contained in your class. If you add a field, or change the type of a field, serialver will generate a different number. This is not in anyway automatic; if you add or change a field in your class declaration you have to either pick a new value for your serial version UID, or rerun serialver.
Which brings up yet another topic: what if you don’t want to deal with all these issues? Well, by default, Java assumes that you are not prepared to deal with them. If you want your class to be eligible for serialization you have to declare that it implements the Serializable interface. This is a so-called marker interface. It has no requirement to implement any logic, it just says that it’s OK to serialize your class.
By the way: Eclipse has adopted serialver internally. If you declared your class to be Serializable, but have not declared a serial version UID, Eclipse will give you a warning. If you hover your mouse over the warning, Eclipse will ask if you want it to generate a UID for you.
For complete details on serialization, see:
- Serializable Objects, in the Oracle Java Tutorial
- Discover the secrets of the Java Serialization API, on the Oracle website
- Serialization and Deserialization in Java, from the W3Schools blog
The Complete Declaration of class FBCompTADetail
To complete our declaration of FBCompDetail we have to make it Serializable, and give it serialVersionUID:
public class FBCompTADetail implements Serializable
{
    /** Generated Serial Version UID */
    private static final long serialVersionUID = 8492161342492933010L;

    /** The encapsulated property value. */
    private final double    propertyValue;
    /** The encapsulated weight. */
    private final double    weight;
    /** The type of the encapsulated BufferedImage. */
    private final int       imageType;
    /** The content of the encapsulated BufferedImage. */
    private final int[][]   raster;
    ...
The constructor for our class will have parameters for propertyValue, weight and a BufferedImage; the BufferedImage, as we discussed, has to be converted to a type and a raster. Here’s the complete code for the constructor.
1 2 3 4 5 6 7 8 9 10 11 12 13 14 15 16 17 18 | public FBCompTADetail( double propertyValue, double weight, BufferedImage image ) { super(); this.propertyValue = propertyValue; this.weight = weight; this.imageType = image.getType(); int cols = image.getWidth(); int rows = image.getHeight(); this.raster = new int[rows][cols]; for ( int row = 0 ; row < rows ; ++row ) for ( int col = 0 ; col < cols ; ++col ) raster[row][col] = image.getRGB( col, row ); } |
Digression: Row or Column? X or Y?
When we layout an array
we typically layout it out
in rows and columns,
listing the row first
and then the column;
given int[][] intArr,
and intArr[10][25]
we’re referring to
row 10
and column 25
of intArr.
If we envision an array
as a rectangle,
rows are the horizontal components
and columns are the vertical components.
But when we talk about the Cartesian plane
we write coordinates as (x,y)
where x is the horizontal component
and y is the vertical component.
The getRGB(int x, int y) method
of the BufferedImage class
uses Cartesian coordinates,
which is why we write:
raster[row][col] = image.getRGB( col, row );
Perhaps it would help
to clarify things
if we wrote:
    for ( int row = 0 ; row < rows ; ++row )
        for ( int col = 0 ; col < cols ; ++col )
        {
            int xco = col;
            int yco = row;
            raster[row][col] = image.getRGB( xco, yco );
        }
Our class will have getters for the weight and propertyValue, which are trivial. The getter for the BufferedImage has to recreate the BufferedImage from the type and raster:
1 2 3 4 5 6 7 8 9 10 11 12 13 14 | public BufferedImage getBufferedImage() { int cols = raster[0].length; int rows = raster.length; BufferedImage image = new BufferedImage( cols, rows, imageType ); for ( int yco = 0 ; yco < rows ; ++yco ) for ( int xco = 0 ; xco < cols ; ++xco ) { int rgb = raster[yco][xco]; image.setRGB( xco, yco, rgb ); } return image; } |
Serialization Demo 1
Let’s have a look at SerializationDemo1 in the project sandbox. The main point of this demo is to illustrate:
- Identifying a location for a serialized file.
- Instantiating a FBCompTADetail object, and serializing it to a file.
- Deserializing the file, obtaining a new (but equivalent) FBCompTADetail object.
These are the most important bits of the demo; however there are a couple of other bits that may cause a distraction, so let’s get them out of the way, starting with drawImage (see also ImageIconDemo1):
public class SerializationDemo1
{
    private static final int    imageType   =
        BufferedImage.TYPE_INT_ARGB;
    private static final int    width       = 100;
    private static final int    height      = 75;
    private static final double length      = width * .75;
    private static final double weight      = height * .1;
    private static final Color  bgColor     = Color.ORANGE;
    private static final Color  fgColor     = Color.MAGENTA;
    ...
    private BufferedImage drawImage()
    {
        double  centerXco   = width / 2.0;
        double  centerYco   = height / 2.0;
        double  xco1    = centerXco - length / 2.0;
        double  xco2    = xco1 + length;
        Line2D  line    =
            new Line2D.Double( xco1, centerYco, xco2, centerYco );
        Stroke  stroke  = new BasicStroke( (float)weight );

        BufferedImage   image   =
            new BufferedImage( width, height, imageType );
        Graphics2D      gtx     = image.createGraphics();

        gtx.setColor( bgColor );
        gtx.fillRect( 0, 0, width, height );
        gtx.setColor( fgColor );
        gtx.setStroke( stroke );
        gtx.draw( line );

        return image;
    }
}
This method creates a buffered image and draws a line centered within it. It fills the image with a background color, and draws the line in a foreground color. This is nothing we haven’t seen before.
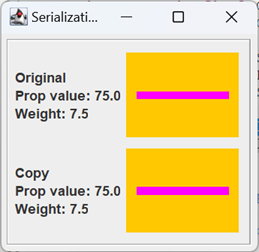
The other distracting bit is the code that displays the GUI. After the original FBCompTADetail is serialized, and a copy of it is deserialized, the GUI just displays the encapsulated images, producing the figure on the right. Creating the GUI is accomplished using the following helper methods:
- makeGUI(): this method creates a frame, populates it using the other helper methods and makes it visible.
- getDetailPanel( String ident, FBCompTADetail detail ) this method is used twice, once to display the original image (the one on top) and again to display the copy. The ident parameter is either “Original” or “Copy”. All the other data comes from the detail object. The code that gets the BufferedImage from the detail object and adds it to the GUI looks like this:
    JPanel  imagePanel  = new JPanel();
    Icon    icon        =
        new ImageIcon( detail.getBufferedImage() );
    JLabel  imageLabel  = new JLabel( icon );
imagePanel.add( imageLabel );- getMainPanel(): this method creates a JPanel with a GridLayout( 2, 1 ) and gives and calls getDetailPanel twice, giving the main panel two child components:
    JPanel panel = new JPanel( new GridLayout( 2, 1 ) );
    panel.add( getDetailPanel( "Original", detailOrig ) );
    panel.add( getDetailPanel( "Copy", detailCopy ) );
The method expends most of its energy making a border for the panel.
I don’t see the point in going over the GUI management code in detail; if you’re curious you can find it in the GitHub repository.
Establishing the Data File Location
Any test data that we wish to save for our project will be stored in the project root under the test_data subdirectory. This directory should not have any data files itself; instead it will have other subdirectories that will have either data files, or yet more subdirectories for organizing subcategories of test data. The data for our serialization demos will be organized like this:
    test_data
        SerialDemo1
            Demo1.ser
        SerialDemo2
           TestFile0000.ser
           TestFile0001.ser
           TestFile0002.ser
Once we’re done playing with our demos, the data for testing the feedback components will be organized like this:
    test_data
        Feedback
            Length
               TestData0001.ser
               TestData0002.ser
               ...
            Spacing
               TestData0001.ser
               TestData0002.ser
               ...
            Stroke
               TestData0001.ser
               TestData0002.ser
               ...
The first step in saving a test data file is to establish the path to the desired data directory and make sure it exists. In SerializationDemo1 this is the job of the constructor. The code and notes follow, below.
1 2 3 4 5 6 7 8 9 10 11 12 13 14 15 16 17 18 19 20 21 22 | public class SerializationDemo1 { // ... private static final String strTestDir = "test_data/SerialDemo1"; private static final File testDir = new File( strTestDir ); private static final String fileName = "Demo1.ser"; // ... public SerializationDemo1() { if ( !testDir.exists() ) { if ( !testDir.mkdirs() ) { String msg = "Unable to create " + testDir.getName(); System.err.println( msg ); System.exit( 1 ); } } writeDetail(); readDetail(); } } |
- Line 4: In this string test_data refers to the root for all project test data; SerialDemo1 refers to the child of the root where data for this demo will be stored.
- Line 5: SerialDemo1 creates one data file; this is its name.
- Line 6: This File object virtually encapsulates the path to our test data directory. I say virtually because its value refers to a path that may or may not exist,
- Line 10: Asks whether the subdirectory encapsulated in testDir exists; if not it must be created.
- Line 12: Utilizes the mkDirs method in the File class to create the target subdirectory. If necessary all parents of the subdirectory will also be created; so if test_dir doesn’t already exist, mkdirs will create the directories test_data and SerialDemo1. (Compare this to File method mkdir, which creates the target subdirectory only if its parent already exists.) Method mkDirs returns false if it fails, or if the target directory already exists; i.e., if the method returns false it doesn’t necessarily mean that anything is wrong.
- Lines 14-16: In the event that mkdirs fails, prints an error message and terminates the application.
- Line 19: Creates the sample graphic and serializes it to a file (see below).
- Line 20: Deserializes the file created on line 19, creating a copy of the encapsulated graphic (see below).
Create and Serialize a FBCompTADetail Object
The method writeDetail is responsible for creating a graphic, encapsulating it in a FBCompTADetail object, and writing the detail object to a file. The code, and notes, follow.
1 2 3 4 5 6 7 8 9 10 11 12 13 14 15 16 17 18 19 20 21 22 23 24 25 26 27 28 29 30 31 32 | public class SerializationDemo1 { // ... private static final double length = width * .75; private static final double weight = height * .1; // ... private FBCompTADetail detailOrig; private FBCompTADetail detailCopy; // ... private void writeDetail() { BufferedImage image = drawImage(); detailOrig = new FBCompTADetail( length, weight, image ); File file = new File( testDir, fileName ); System.out.println( "Writing: " + file.getName() ); try ( FileOutputStream fileStr = new FileOutputStream( file ); ObjectOutputStream objStr = new ObjectOutputStream( fileStr ); ) { objStr.writeObject( detailOrig ); } catch ( IOException exc ) { exc.printStackTrace(); System.exit( 1 ); } } // ... } |
- Line 12: Creates a graphic (see drawImage, above).
- Line 13: Incorporates the graphic into a FBCompTADetail object (see FBCompTADetail, above).
- Line 15: Creates a reference to our target file destination. The constructor File( File parent, String child ) will refer to file Demo1.ser in the test_data/SerialDemo1 directory. Note that at this point Demo1.ser may or may not exist.
- Line 16: Records the name of the file we are about to write to.
- Lines 17-20: Try-with-resources statement; recall that any resource declared within the parentheses will be automatically closed after the try/catch blocks are executed.
- Line 18: Creates an output stream that identifies our destination. For us this is a file, but it need not be. Another common destination for object serialization is the internet; see, for example, Using Serialization with Sockets on the Oracle website. Note that if the file doesn’t exist it will be created; if it does exist it will be overwritten.
- Lines 19,20: Creates an output stream that knows how to serialize objects; the destination of the stream is determined by the file stream identified on line 18.
- Line 23: Writes the object to the file.
- Lines 25-29: If an IOException occurs, catches it, writes a diagnostic to stderr and exits from the application.
Deserialize a FBCompTADetail Object
Method readDetail deserializes the object serialized by writeDetail. Once it finishes its job, we will have a copy of the object stored in field detailOrig. Here’s the code and a discussion of it.
1 2 3 4 5 6 7 8 9 10 11 12 13 14 15 16 17 18 19 20 21 22 23 24 25 26 27 28 29 | public class SerializationDemo1 { // ... private FBCompTADetail detailOrig; private FBCompTADetail detailCopy; // ... private void readDetail() { File file = new File( testDir, fileName ); System.out.println( "Reading: " + file.getName() ); try ( FileInputStream fileStr = new FileInputStream( file ); ObjectInputStream objStr = new ObjectInputStream( fileStr ); ) { detailCopy = (FBCompTADetail)objStr.readObject(); } catch ( IOException | ClassNotFoundException | ClassCastException exc ) { exc.printStackTrace(); System.exit( 1 ); } } // ... } |
- Lines 9,10: Creates a File object that’s linked to our data file; records the name of the file.
- Lines 11-14: Try-with-resources block.
- Line 12: Creates an input stream with our data file as its source. If the file doesn’t exist an IOException will be thrown.
- Line 13: Links our FileInputStream to a stream that knows how to deserialize an object.
- Line 16: Deserializes the file, creating a new FBCompTADetail object; assigns a reference to the object to the detailCopy field. Note that the readObject method returns type Object; assigning it to detailCopy requires a cast.
- Lines 18-26: Catch block. If the target file doesn’t exist, or an error occurs while reading it an IOExeption is thrown; if, after reading the file, its associated Class class can’t be found, a ClassNotFound exception is thrown; if the input object is successfully deserialized, but its type is not FBCompTADetail, a ClassCastException is thrown.
- Lines 24,25: If deserializing the object results in an exception, the exception is recorded and the application is terminated.
One more thing about SerializationDemo1: note that all data are gathered before the GUI is created, so when it is created there is no question about the size or position of any GUI component. In our next demo, first the GUI is created, then the operator is offered a choice of data files to deserialize. After deserialization, one or more GUI components can change their size and/or position, forcing us to reconfigure the GUI. The strategy used by SerializationDemo1, gathering all data before creating the GUI, is preferred; unfortunately it’s not always realistic.
Creating and Examining Test Data
Our next demo illustrates the process of working with multiple files. It is implemented in two parts, both of which can be found int the fbc_test_demo package located in the project sandbox.
SerializationDemo2a has no GUI. It creates three images, incorporates them into FBCompTADetail objects, then serializes the objects to files in the test_data/SerialDemo2 directory.
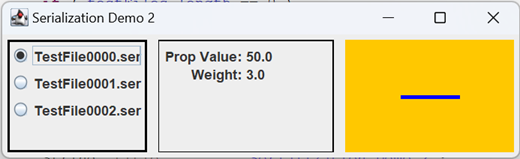
SerializationDemo2b locates all test files and creates a GUI giving the operator the choice of examining them one at a time. Upon selection, the given file is deserialized, creating a FBCompTADetail object. The data in the object are then displayed in the GUI.
Application SerializationDemo2a is driven by its constructor:
1 2 3 4 5 6 7 8 9 10 11 12 13 14 15 16 17 18 19 20 21 22 23 24 25 26 27 28 29 | public class SerializationDemo2a { /** The directory in which all test data is stored. */ private static final String testBase = "test_data"; /** The subdirectory containing data generated by this application. */ private static final String subdir = "SerialDemo2"; /** Path to subdirectory data used by this application.*/ private static final File testDir = new File( testBase, subdir ); // ... public SerializationDemo2a() { if ( !testDir.exists() ) { if ( !testDir.mkdirs() ) { String msg = "Unable to create " + testDir.getName(); System.err.println( msg ); System.exit( 1 ); } } makeLine( 50, 3, Color.ORANGE, Color.BLUE ); makeLine( 25, 5, Color.RED, Color.GREEN ); makeLine( 15, 13, Color.PINK, Color.BLACK ); System.out.println( "Done." ); } // ... } |
The testDir field locates the subdirectory that will contain our test files in test_data/SerialDemo2. The first few lines of the constructor, virtually identical to the corresponding lines in the SerialDemo1 constructor, create the target directory if necessary. It then calls makeLine three times; each time a graphic will be created, encapsulated in a FBCompTADetail object and serialized to a file. The main method looks like this:
public static void main(String[] args)
{
    new SerializationDemo2a();
}
After the constructor exits the application terminates.
A test file name consists of three parts:
- The prefix TestFile;
- A sequence number which is incremented after each file is created; and
- A .ser file extension.
For example, TestFile0001.ser. Formulating the file name is the job of the writeDetail method (complete details below):
private static final    String  testBase    = "test_data";
private static final    String  subdir      = "SerialDemo2";
private static final    File    testDir     =
    new File( testBase, subdir );
private static final    String  fileName    = "TestFile";
private static final    String  fileNameFmt = "%s%04d.ser";

private int     fileSeqNumber   = 0;
// ...
private void writeDetail( FBCompTADetail detail )
{
    String  fileSpec    =
        String.format( fileNameFmt, fileName, fileSeqNumber++ );
    File    file        = new File( testDir, fileSpec );
    // ...
Here is part of the makeLine method; I’ve eliminated the bits that do the actual drawing. If you’re curious, you can find the complete code in the GitHub repository. (See also ImageIconDemo1, above.)
private void makeLine(
    double length,
    double weight,
    Color bgColor,
    Color fgColor
)
{
    final   int     width       = 150;
    final   int     height      = 100;
    final   double  centerXco   = width / 2.0;
    final   double  centerYco   = height / 2.0;
    final   int     imageType   = BufferedImage.TYPE_INT_ARGB;

    BufferedImage   image       =
        new BufferedImage( width, height, imageType );
    Graphics2D      gtx         = image.createGraphics();
    // ...
    FBCompTADetail  detail  =
        new FBCompTADetail( length, weight, image );
    writeDetail( detail );
}
Here is the annotated code for writeDetail:
1 2 3 4 5 6 7 8 9 10 11 12 13 14 15 16 17 18 19 20 | private void writeDetail( FBCompTADetail detail ) { String fileSpec = String.format( fileNameFmt, fileName, fileSeqNumber++ ); File file = new File( testDir, fileSpec ); System.out.println( "Writing: " + file.getName() ); try ( FileOutputStream fileStr = new FileOutputStream( file ); ObjectOutputStream objStr = new ObjectOutputStream( fileStr ); ) { objStr.writeObject( detail ); } catch ( IOException exc ) { exc.printStackTrace(); System.exit( 1 ); } } |
- Lines 3-6: Encapsulates the path to the target file in a File object; records the name of the file.
- Line 9: Creates an output stream that points to our target file.
- Line 10: Incorporates the FileOutputStream into an ObjectOutputStream, which performs the serialization.
- Line 13: Performs the serialization.
- Lines 15-19: If an IOException is thrown, catches it; prints a diagnostic and terminates the application.
Application SerializationDemo2b allows us to examine the serialized data. In describing it, I will include only those details of the GUI that apply to the deserialization logic. These are the GUI-related fields that interest us, accompanied by some notes; refer to the figure at the top of this section.
1 2 3 4 5 | private final JFrame frame = new JFrame(); private final JLabel propLabel = new JLabel( "XX.XX" ); private final JLabel weightLabel = new JLabel( " XX.XX" ); private final JLabel imageLabel = new JLabel(); private final PButtonGroup<File> group = new PButtonGroup<>(); |
Method makeGUIPanel creates a PRadioButton<File> object for each file found in the test directory. Each button is added to the PButtonGroup<File> object, group, and gets an ActionListener that refers to the showFile method:
1 2 3 4 5 6 7 8 9 10 11 12 | private JPanel getRadioButtonPanel() { JPanel panel = new JPanel(); // ... Stream.of( testFiles ) .map( f -> new PRadioButton<File>( f, f.getName() ) ) .peek( group::add ) .peek( panel::add ) .forEach( b -> b.addActionListener( this::showFile ) ); return panel; } |
The showFile method interrogates the PButtonGroup<File> object to obtain a reference to the file associated with the selected radio button. It deserializes the file, obtaining a new FBCompTADetail object, and passes the object to the updateGUI method:
1 2 3 4 5 6 7 8 9 10 11 12 13 14 15 16 17 18 19 20 21 22 | private void showFile( ActionEvent evt ) { File file = group.getSelectedProperty(); try ( FileInputStream fileStr = new FileInputStream( file ); ObjectInputStream objStr = new ObjectInputStream( fileStr ); ) { FBCompTADetail detail = (FBCompTADetail)objStr.readObject(); updateGUI( detail ); } catch ( IOException | ClassNotFoundException | ClassCastException exc ) { exc.printStackTrace(); System.exit( 1 ); } } |
The updateGUI method:
- Updates the propLabel object with the property value from the detail object;
- Updates the weightLabel object with the weight from the detail object; and
- Converts the BufferedImage from the detail object to an ImageIcon, and uses the icon to update the imageLabel object.
Important: after updating the JLabel objects per the above, the JLabels may have updated their sizes and/or positions. Recast the GUI’s JFrame to accommodate the updates by calling its pack method.
1 2 3 4 5 6 7 8 9 10 11 12 13 14 | private void updateGUI( FBCompTADetail detail ) { final String numFmt = "%3.1f"; double prop = detail.getPropertyValue(); String strProp = String.format( numFmt, prop ); double weight = detail.getWeight(); String strWeight = String.format( numFmt, weight ); Icon icon = new ImageIcon( detail.getBufferedImage() ); propLabel.setText( strProp ); weightLabel.setText( strWeight ); imageLabel.setIcon( icon ); frame.pack(); } |
Generating Test Data for the LengthFeedback Component
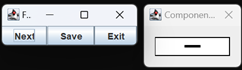
Getting closer to our goal of generating and utilizing test data for the Feedback components, FBCompTA, from the fbc_test_demo package of the project sandbox, allows you to configure the property value of a LengthFeedback component, then save it to a file. The GUI for this application isn’t very flexible, but it serves to provide a simple illustration of the process of configuring a GUI, and saving the result as test data. The main application frame includes next and save buttons. A sample LengthFeedback component is displayed in a separate dialog. Let’s have a look at some of the initialization code.
1 2 3 4 5 6 7 8 9 10 11 12 13 14 15 16 17 18 19 20 21 22 23 24 25 26 27 28 | public class FBCompTA { private static final String dataPath = "test_data/Feedback/Length"; private static final String dataFile = "LengthData.ser"; private final File filePath = makeFilePath(); private final Dimension compSize = new Dimension( 100, 25 ); private double currVal = 1; private final Feedback feedback = new LengthFeedback( () -> currVal ); // ... private File makeFilePath() { File data = new File( dataPath ); File path = new File( dataPath, dataFile ); if ( !data.exists() ) { if ( !data.mkdirs() ) System.out.println( "make " + dataPath + " failed" ); else System.out.println( "path: " + path.getAbsolutePath() ); } return path; } // ... } |
- Class variable dataPath is the path to the directory to use for storing our data. Like any test data that we generate for this project, the root is test_dir. Subdirectory Feedback is where the test data for all the feedback components will be organized, and Length is specifically dedicated to storing data related to the LengthFeedback component.
- Class variable dataFile contains the name of the data file we will use to store the data generated by this demo application.
- Instance variable filePath is the path to dataFile encapsulated in a File object. Method makeFile constructs it by first encapsulating the parent directory, then connecting the data file to it:
    File data = new File( dataPath );
File path = new File( dataPath, dataFile ); - The compSize instance field contains the preferred size of the LengthFeedback component. It’s stored in a field because it’s used in two places: the constructor, to set the preferred size of the component, and the getBufferedImage method which uses it to set the size of the BufferedImage that will reflect the state of the feedback component.
- Instance variable currVal supplies the property value of the feedback component:
Feedback feedback = new LengthFeedback( () -> currVal );
It is incremented every time the next button is pushed (see getButtonPanel, below).
The getBufferedImage method creates a BufferedImage, derives a graphics context from it, and passes the graphics context to the LengthFeedback component’s paintComponent method, causing an image of the component to be drawn to the buffered image:
1 2 3 4 5 6 7 8 9 | private BufferedImage getBufferedImage() { int type = BufferedImage.TYPE_INT_ARGB; BufferedImage image = new BufferedImage( compSize.width, compSize.height, type ); Graphics graphics = image.createGraphics(); feedback.paintComponent( graphics ); return image; } |
Method getButtonPanel is responsible for setting up the ActionListeners on the three buttons.
1 2 3 4 5 6 7 8 9 10 11 12 13 14 15 16 17 18 19 20 21 22 23 24 25 26 27 28 29 30 31 32 33 34 35 36 37 38 39 40 41 42 43 44 45 46 47 48 49 | private JPanel getButtonPanel() { JButton next = new JButton( "Next" ); JButton save = new JButton( "Save" ); JButton exit = new JButton( "Exit" ); next.addActionListener( this::nextActionPerformed ); save.addActionListener( this::saveActionPerformed ); exit.addActionListener( e -> System.exit( 0 ) ); JPanel panel = new JPanel(); BoxLayout layout = new BoxLayout( panel, BoxLayout.X_AXIS ); panel.setLayout( layout ); panel.add( next ); panel.add( save ); panel.add( exit ); return panel; } private void nextActionPerformed( ActionEvent evt ) { ++currVal; feedback.repaint(); } private void saveActionPerformed( ActionEvent evt ) { BufferedImage image = getBufferedImage(); FBCompTADetail detail = new FBCompTADetail( currVal, -1, image ); try ( FileOutputStream fileStream = new FileOutputStream( filePath ); ObjectOutputStream outStream = new ObjectOutputStream( fileStream ); ) { outStream.writeObject( detail ); String dest = filePath.getAbsolutePath(); System.out.println( "Wrote object " + dest ); } catch ( IOException exc ) { exc.printStackTrace(); System.exit( 1 ); } } |
When the next button is pushed (see method nextActionPerformed at line 21 int the preceding figure) the currVal field is incremented, and the LengthFeedback component is repainted. When the save button is pushed (see method saveActionPerformed at line 27):
- An image of the feedback component is created (via method getBufferedImage);
- A FBCompTADetail object is created (note that it uses -1 for the weight, because we are always using the default weight in this demo); and
- The detail object is serialized to the destination file.
So far we’ve covered everything in the demo except the constructor, and makeComponentDialog, the method that instantiates the dialog that displays the LengthFeedback component. The constructor creates the GUI frame, and initializes the GUI (not a particularly difficult task in this application). The only thing in the constructor that bears pointing out is the first line of code, which gives the feedback component a preferred size; as an experiment, you might try deleting this line of code and seeing what the resultant GUI looks like. The constructor looks like this:
1 2 3 4 5 6 7 8 9 10 11 12 13 14 15 16 17 | public FBCompTA() { feedback.setPreferredSize( compSize ); String title = "Feedback Component Test Assistant"; JFrame frame = new JFrame( title ); frame.setDefaultCloseOperation( JFrame.EXIT_ON_CLOSE ); JPanel contentPane = new JPanel( new BorderLayout() ); contentPane.add( getButtonPanel(), BorderLayout.SOUTH ); frame.setContentPane( contentPane ); frame.pack(); frame.setLocation( 100, 100 );; frame.setVisible( true ); makeComponentDialog( feedback ); } |
There’s nothing special about the method that creates the dialog that displays the feedback component. If you’d like to see it, you can find it in the GitHub repository.
Generating Test Data for the SpacingFeedback Component
There are two more applications in the project sandbox that demonstrate the mechanics of data gathering, FBCompTA2, which generates data for the SpacingFeedback component, and FBCompTA3 which generates data for the StrokeFeedback component. We will look at just FBCompTA2. In order to write this application I made a copy of FBCompTA, and changed four lines of code:
- The declaration of class variable dataPath
from:dataPath = "test_data/Feedback/Length"
to:dataPath = "test_data/Feedback/Spacing" - The declaration of class variable dataFile
from:dataFile = "LengthData.ser"
to:dataFile = "SpacingData.ser" - The declaration of the feedback instance variable
from:feedback = new LengthFeedback( () -> currVal )
to:feedback = new SpacingFeedback( () -> currVal ) - The declaration of the frame title
from:title = "Length Feedback Component Test Assistant"
to:title = "Spacing Feedback Component Test Assistant"
You can conclude from this that, in the final version of our data gathering applications, there will be an abstract class that does virtually all the work, and subclasses for LengthFeedback, SpacingFeedback and StrokeFeedback that do nothing more than provide the subdirectory destinations for test data, and a feedback component for displaying the test configuration.
Examining Test Data
There are three applications in the project sandbox that show how to examine generated test data, one for each species of feedback component. We only need to look at one, FBCompTADemo, which examines the LengthFeedback test data. As part of this, I went back to FBCompTA and added a public class method to return the path to the test data file:
public static File getDataFile()
{
    String  path    = dataPath + "/" + dataFile;
    File    file    = new File( path );
    return file;
}
Eventually we need to be able to compare the BufferedImages from a test data file and from a component under test. To do this I created, in the sandbox fbc_test_demo package, a utilities class that contains a method for comparing two BufferedImages, FBCompTAUtils.equals( BufferedImage image1, BufferedImage image2 ). Two BufferedImages are equal if they have the same width and height, the same type, and the integer values at corresponding (x, y) coordinates are all equal. It looks like this:
1 2 3 4 5 6 7 8 9 10 11 12 13 14 15 16 17 18 19 20 21 22 23 24 25 26 27 28 29 30 31 32 | public static boolean equals( BufferedImage image1, BufferedImage image2 ) { boolean result = image1 == image2; if ( result ) ; else if ( image1 == null || image2 == null ) result = false; else { int rows = image1.getHeight(); int cols = image1.getWidth(); if ( rows != image2.getHeight() ) result = false; else if ( cols != image2.getWidth() ) result = false; else if ( image1.getType() != image2.getType() ) result = false; else { result = true; for ( int yco = 0 ; yco < rows && result ; ++yco ) for ( int xco = 0 ; xco < cols && result ; ++xco ) { int rgb1 = image1.getRGB( xco, yco ); int rgb2 = image2.getRGB( xco, yco ); result = rgb1 == rgb2; } } } return result; } |
In the next part of the lesson we’ll move this method to com.acmemail.judah.cartesian_plane.test_utils.Utils under the test source tree.
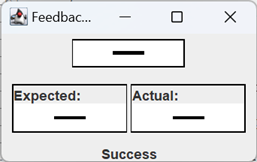
Application FBCompTADemo deserializes a test data file, and uses it to create a GUI with three lines:
- Line 1 is an actual feedback component, instantiated using the parameters stored in the deserialized file.
- Line 2/left displays a BufferedImage created from the component displayed on line 1.
- Line 2/right is the BufferedImage that was stored in the deserialized data file.
- Line 3 displays either Success or Fail depending on whether the images on line 2 are equal, as determined by FBCompTAUtils.equals.
Here is the initialization of the class and instance variables for this application.
1 2 3 4 5 6 7 8 9 10 11 12 13 14 15 16 17 18 19 20 21 22 23 24 25 26 27 28 29 30 31 32 33 34 35 36 37 38 39 40 41 42 43 44 45 46 47 | public class FBCompTADemo { private static final File dataFile = FBCompTA.getDataFile(); private final FBCompTADetail detail = getDetail(); private final BufferedImage expImage = detail.getBufferedImage(); private final LengthFeedback feedback = getFeedback(); private final JLabel result = new JLabel( "", SwingConstants.CENTER ); // ... private LengthFeedback getFeedback() { LengthFeedback feedback = new LengthFeedback( () -> detail.getPropertyValue() ); int width = expImage.getWidth(); int height = expImage.getHeight(); Dimension dim = new Dimension( width, height ); feedback.setPreferredSize( dim ); return feedback; } private FBCompTADetail getDetail() { FBCompTADetail detail = null; try ( FileInputStream fileStream = new FileInputStream( dataFile ); ObjectInputStream inStream = new ObjectInputStream( fileStream ); ) { Object obj = inStream.readObject(); detail = (FBCompTADetail)obj; } catch ( IOException | ClassNotFoundException | ClassCastException exc ) { exc.printStackTrace(); System.exit( 1 ); } return detail; } } |
- Class variable dataFile is the path to the test data file generated by FBCompTA. It works out to test_data/Feedback/LengthData.ser.
- Instance variable detail is the object deserialized from the data file. Initialization is performed by method getDetail. The logic in this method should be familiar by now:
- Get a FileInputStream object that points to the data file.
- Wrap the FileInputStream in an ObjectInputStream, an object that understands serialization.
- Use the ObjectInputStream to read the file and deserialize the object. Be prepared for the usual things that can go wrong: IOExeption, ClassNotFoundException and ClassCastException.
- The expected image variable, expImage, is initialized from the BufferedImage stored in the detail object.
- Use the parameters stored in the detail object to instantiate and configure a LengthFeedback component. This is done by the getFeedback method:
- Instantiate a feedback component using the propertyValue of the detail object as a supplier.
- Give the feedback component the same dimensions as the BufferedImage stored in the detail object.
- The result field is the JLabel that will display either Success or Fail. Its initial value is the empty string because we don’t know yet whether the expected and actual images are the same. The text of the label is centered within the label.
The constructor for the application assembles the GUI. For a content pane, it uses a JPanel with a border layout. The first row of the GUI (refer to figure, above) consists of the feedback component. The feedback component is assigned to JPanel which is assigned to the North territory of the content pane; the second line comprises a JPanel which is assigned to the Center territory of the content pane; and the result label lives in the content pane’s South territory:
    JPanel  cPane   = new JPanel( new BorderLayout() );
    cPane.add( getComponentPanel(), BorderLayout.NORTH );
    cPane.add( getMainPanel(), BorderLayout.CENTER );
    cPane.add( result, BorderLayout.SOUTH );
There’s one wrinkle that needs to be addressed at this point. Let’s look at the getMainPanel method and its helpers:
1 2 3 4 5 6 7 8 9 10 11 12 13 14 15 16 17 18 19 20 21 22 23 24 25 26 27 28 29 30 31 32 | private JPanel getMainPanel() { JPanel panel = new JPanel(); // ... panel.add( getExpectedPanel() ); panel.add( Box.createRigidArea( new Dimension( 3, 0 ) ) ); panel.add( getActualPanel() ); return panel; } private JPanel getActualPanel() { JPanel panel = new JPanel(); // ... panel.add( new JLabel( "Actual:" ) ); ImageIcon icon = new ImageIcon( getActualImage() ); panel.add( new JLabel( icon ) ); return panel; } private BufferedImage getActualImage() { int width = feedback.getWidth(); int height = feedback.getHeight(); int type = expImage.getType(); BufferedImage actImage = new BufferedImage( width, height, type ); Graphics graphics = actImage.createGraphics(); feedback.paintComponent( graphics ); return actImage; } |
- At line 7, getMainPanel calls getActualPanel, which…
- At line 16 calls getActualImage.
- At lines 26-29, getActualImage creates a BufferedImage, gets a graphics context for it, and feeds it to the feedback component’s paintComponent method.
In order to create the BufferedImage the feedback component must be fully realized (have a definite position and size). But the feedback component isn’t realized until the frame that contains it is packed. So, going back to the constructor, before calling getMainPanel the frame has to be packed; then, after we’re finished adding components to the frame, the frame has to be packed a second time. That’s what’s occurring at lines 9 and 14 of the constructor, as shown in the following:
1 2 3 4 5 6 7 8 9 10 11 12 13 14 15 16 17 | public FBCompTADemo() { String title = "FeedbackCompTA Demo"; JFrame frame = new JFrame( title ); frame.setDefaultCloseOperation( JFrame.EXIT_ON_CLOSE ); JPanel cPane = new JPanel( new BorderLayout() ); cPane.add( getComponentPanel(), BorderLayout.NORTH ); frame.setContentPane( cPane ); frame.pack(); cPane.add( getMainPanel(), BorderLayout.CENTER ); cPane.add( result, BorderLayout.SOUTH ); compare(); frame.pack(); frame.setLocation( 300, 300 ); frame.setVisible( true ); } |
Summary
On this page we looked at the tools we’ll need to develop tests for the feedback components, including construction and examination of file directories, and serialization of objects to files. On the next page we will develop actual tests and test facilities, including:
- An application for generating test data;
- An application for examining test data; and
- The actual JUnit tests for the feedback components.