This page will examine using JTables to organize and validate data. We will also discuss many related topics, including cell editors, cell renderers, table models, table column models, and list selection models.
See also:
- How to Use Tables in the Oracle Java Tutorial
- ListSelectionModel Modes on the java2s website
GitHub repository: Cartesian Plane Part 17
Previous lesson: Cartesian Plane Lesson 17 Page 10: Data Organization, ParameterPanel JUnit Test
JTables
A JTable is a collection of cells laid out in rows and columns. The first row, called the header row, contains a header for each column. Rows below the header row are indexed beginning with 0 and contain data, potentially in several different types. By default, data in a cell can be edited by the operator. Usually, every cell in a column has the same type. In many ways, a JTable is directly analogous to a spreadsheet.

Important: JTable uses other AWT and Swing components to display and edit data but also reuses them. Note that only one cell can be edited at a time. If you were to examine the GUI represented at right, you would likely find one JFormattedTextField that is used to edit all the cells in the table.
JTables are very powerful and flexible (and, consequently, sometimes challenging to work with). They excel at serving as an interface to a relational database. We’ll use them as an interface to a simple, non-relational database. The most straightforward tables are configured from two arrays: a one-dimension Object array to configure the column headers and a two-dimension Object array for the data. The data array’s first dimension corresponds to the table’s rows, and the second corresponds to the columns; row 0 refers to the first row of data. The data array must have the same number of columns as the header array. JTableDemo1, from the project’s …sandbox.jtable package, shows how to create a simple table consisting of five rows of three columns each. Note that, in the demo, the JTable becomes the viewport view of a JScrollPane, and the JScrollPane is added to the content pane of the application’s main frame.
public class JTableDemo1
{
    private final String[]      headers =
    { "First", "Last", "ID" };
    private final Object[][]    data    =
    {
        { "Jill", "Biden", 131157 },
        { "Melania", "Trump", 171129 },
        { "Michelle", "Obama", 200231 },
        { "Laura", "Bush", 100719 },
        { "Hillary", "Clinton", 131157 },
    };
    private final JTable        table   = new JTable( data, headers );

    private JTableDemo1()
    {
        JFrame      frame       = new JFrame( "JTable Demo 1" );
        frame.setDefaultCloseOperation( JFrame.EXIT_ON_CLOSE );

        JPanel      contentPane = new JPanel( new BorderLayout() );
        JScrollPane scrollPane  = new JScrollPane( table );
        contentPane.add( scrollPane, BorderLayout.CENTER );

        JPanel      buttonPanel = new JPanel();
        JButton     exit        = new JButton( "Exit" );
        exit.addActionListener( e -> System.exit( 0 ) );
        buttonPanel.add( exit );
        contentPane.add( buttonPanel, BorderLayout.SOUTH );

        frame.setContentPane( contentPane );
        frame.setLocation( 200, 200 );
        frame.pack();
        frame.setVisible( true );
    }
}
The JTableDemo1A program in the project sandbox builds on JTableDemo1 by adding traversal logic. It uses nested loops to examine each cell in the table as if it were a two-dimensional array. The relevant code follows.
public class JTableDemo1A
{
    // ...
    private JTableDemo1A()
    {
        // ...
        JButton     print       = new JButton( "Print" );
        print.addActionListener( this::printAction );
        buttonPanel.add( print );
        // ...
    }
    private void printAction( ActionEvent evt )
    {
        int     rowCount    = table.getRowCount();
        int     colCount    = table.getColumnCount();
        for ( int row = 0 ; row < rowCount ; ++row )
        {
            for ( int col = 0 ; col < colCount ; ++col )
            {
                Object  value   = table.getValueAt( row, col );
                System.out.print( value + ", " );
            }
            System.out.println();
        }
    }
}
⏹ The JTable Ecosystem
Getting the most out of a JTable requires knowledge of a number of utility classes (spoiler alert: for our project, we will not be taking advantage of the class’s full power and flexibility). I’ll list some of them below.
🟦 class DefaultTableModel
This class is used to access and manipulate the data in a table. It provides several alternative means for configuring a table, for example, by building your table from the ground up, one row at a time. It can dynamically insert and remove rows and columns (see TableModelDemo1B below). It plays a role in determining the type and appearance of a cell (see Setting the Type of a Column below).
🟦 class DefaultTableColumnModel
An instance of this class can be used to tune the width and margins of your columns. You can add and remove columns and change the order of columns without rebuilding your data model. In conjunction with the ListSelectionModel, it controls whether or not columns can be selected and how they are selected.
🟦 class TableColumn
In conjunction with the table column model, instances of this class control the size and appearance of the individual columns in your table; think of DefaultTableColumnModel as an array of TableColumns. It can be used to customize the appearance of the cells in a column.
🟦 class DefaultCellEditor
🟦 class DefaultCellRenderer
These classes control how the cells in your table are edited and displayed. They also configure how a cell’s value is validated.
🟦 class DefaultListSelectionModel
This class determines the behavior of row and column selection within a JTable. It also monitors the selection state, reporting when rows are selected or deselected and exactly which row or column has been selected/deselected.
⏹ Scrolling
JTables are often associated with scrolling, which is accomplished by making it the viewport view of a JScrollPane. You can set several properties that control how the table interacts with the scroll pane:
🟦 setAutoResize( int mode )
This property controls how a table attempts to size itself; for example:
- AUTO_RESIZE_OFF: don’t attempt to change column widths. If necessary, use the horizontal scroll bar (if this mode is not set, the table will make every effort to avoid using the horizontal scroll bar).
- AUTO_RESIZE_LAST_COLUMN: if there is extra horizontal space, adjust the width of the last column only.
- AUTO_RESIZE_ALL_COLUMNS: extra horizontal space should be distributed to all columns.
- See also: AUTO_RESIZE_NEXT_COLUMN, AUTO_RESIZE_NEXT_COLUMN.
🟦 setFillsViewportHeight( boolean )
Controls whether or not to stretch the table if its height is smaller than the scroll pane’s viewport.
⏹ Class StateParser
This class is only relevant to the demos in our project sandbox. We wrote it ourselves. It is nothing more than a convenient way to obtain sample table data. It organizes data from a comma-separated values (CSV) file in the primary resources directory. Each line in the file refers to a US state with columns state (the state name), abbreviation, capital, population, zip start (starting zip code), zip end (ending zip code), latitude, and longitude. It has one class method that we care about, getDataSet(String… headers). The headers parameter is a list of column names. For example: { "population", "state", "latitude", "longitude" }
It returns a two-dimensional array of Objects consisting of a row for each state containing, in the given order, the values of the given columns. There’s no need to go into the implementation details; if you’re curious, you can find it in the GitHub repository.
Digression: About Vectors: This discussion is present because the JTable makes frequent reference to the Vector class. We are going to make limited use of Vectors in our project, always in conjuction with traversing the rows of a JTable. So if you already know what a vector is, or if you don’t care, you can skip the following paragraphs.
For our purposes a Vector is functionally equivalent to an ArrayList. In fact, Vector, introduced in Java 1.0, is a direct ancestor of ArrayList, which was introduced in Java 1.2. The main advantage of a Vector over an ArrayList is that Vectors are thread-safe. In the context of the JTable API Vector is a substutute for Object[] in the same way that an ArrayList can be substituted for an Object[]. As a an alternative to a two-dimensional Object array Object[][], we can typically use a Vector of Vectors, as in the overloaded constructors:
JTable(Object[][] rowData, Object[] columnNames)
JTable(Vector<? extends Vector<?>> rowData, Vector<?> columnNames)
A final note about Vectors: there are still places in the JTable API that use pre-generic declarations of Vector, such as the declaration of getDataVector() in the DefaultTableModel class:
Vector<Vector> getDataVector()
This can be very annoying when it comes to trying to resolve compiler warnings such as “Vector is a raw type. References to generic type Vector<E> should be parameterized”.
⏹ Table Models
I am going to gloss over some details here. In the JTable API, any references to table models will be to the interface type TableModel. For example: TableModel getModel()
void setModel(TableModel dataModel)
Within the JDK, the AbstractModel class provides most of the default implementation of TableModel. Unless you tell the JTable otherwise, by default, it will use DefaultTableModel, which extends AbstractTableModel. Usually, when we want to substitute non-default behavior, we extend DefaultTableModel. From this point, any reference to “table model” will be a reference to DefaultTableModel or a subclass of DefaultTableModel that we write ourselves.
🟦 class DefaultTableModel
An instance of this class provides direct access to the data stored in a table. There are overloaded constructors for JTable that take a TableModel as an argument and methods that allow us to set or modify the table model after construction, such as: JTable(TableModel dm) void setModel(TableModel dataModel)
This gives us very fine control over the data configuration. Some examples from the package …sandbox.jtable are:
⬛ TableModelDemo1A: Organize the data any way you like, then pass it to a generic class that will incorporate it into a GUI for you.
    String[]    headers = { "State", "Capital", "Population" };
    Object[][]  data    =
        State.getDataSet( "state", "capital", "population" );
    TableModel  model   = new DefaultTableModel( data, headers );
    SwingUtilities.invokeLater( () -> new TableModelDemo1( model ) );
⬛ TableModelDemo1B: Create the table model dynamically. This example starts with a model with a header row and 0 data rows (new DefaultTableModel( headers, 0 )). Then, we dynamically add rows one at a time; the number of rows increases by one every time we add a row (model.addRow( r ) ).
    String[]    headers = { "State", "Capital", "Population" };
    Object[][]  data    =
        State.getDataSet( "state", "capital", "population" );
    DefaultTableModel  model   = new DefaultTableModel( headers, 0 );
    Stream.of( data ).forEach( r -> model.addRow( r ) );
    SwingUtilities.invokeLater( () -> new TableModelDemo1( model ) );
⬛ TableModelDemo1C: Create the table model, adding a column of dynamically generated data (a sequence number) to the left of the table; see annotated listing below.
1 2 3 4 5 6 7 8 9 10 11 12 13 14 15 16 17 18 | String[] headers = { "Seq No.", "State", "Capital", "Population" }; Object[][] data = State.getDataSet( "state", "capital", "population" ); int numCols = headers.length; int numRows = data.length; DefaultTableModel model = new DefaultTableModel( numRows, numCols ); model.setColumnIdentifiers( headers ); IntStream.range( 0, numRows ) .forEach( inx -> { model.setValueAt( inx + 1000, inx, 0 ); model.setValueAt( data[inx][0], inx, 1 ); model.setValueAt( data[inx][1], inx, 2 ); model.setValueAt( data[inx][2], inx, 3 ); }); SwingUtilities.invokeLater( () -> new TableModelDemo1( model ) ); |
- Lines 1,2: Declare the table’s column headers. We saw three columns in previous examples but added a new one for column 0 (Seq No.).
- Lines 3,4: Obtain the state, capital, and population data columns from our sample data set.
- Lines 5-8: Create the table model with fifty rows and four columns.
- Lines 10-17: For each row in the data array:
- Set the first column of the data model to a dynamically generated sequence number;
- Set the second column of the data model to the state value of the data array;
- Set the third column of the data model to the capital value of the data array;
- Set the data model’s fourth column to the data array’s population value.
- Line 18: Create the GUI. Note that the TableModelDemo1C class does not know the table’s size, content, or data type.
🟦 Setting the Type of a Column
The program TableModelDemo2A in the project sandbox displays a table with three columns. The third column displays the population. This is an integer value, but in the table, it doesn’t look or work like an integer should; the value is left-justified (numbers are usually right-justified), and we can set it to a non-numeric value. We can change this behavior by setting the column’s type, which the DefaultTableModel controls. In addition to the Object type, which is treated as a string, table models readily support Boolean, integer, floating point, and Icon values.
To set a column’s type, we must override the getColumnClass(int col) in our own subclass of DefaultTableModel. This method takes a column index and returns a Class<?> value. Here’s an example of doing so, taken from TableModelDemo2B in the project sandbox:
public TableModelDemo2B()
{
    // ...
    LocalTableModel     model       =
        new LocalTableModel( data, headers );
    JTable              table       = new JTable( model );
    // ...
}
private static class LocalTableModel extends DefaultTableModel
{
    public LocalTableModel( Object[][] data, Object[] headers )
    {
        super( data, headers );
    }

    @Override
    public Class<?> getColumnClass( int col )
    {
        Class<?>    clazz   =
            col == 2 ? Integer.class : super.getColumnClass( col );
        return clazz;
    }
}
If you execute TableModelDemo2B, you will see that the population data in the third column is now right-justified.
Note 1: You can edit the cell so that it displays a non-numeric string, but if you do so, the actual cell data will remain unchanged. You can see this in TableModelDemo2B: change the cell in the third column of one of the first five rows to a non-integer value, then press enter. The first thing you’ll see is the cell will be outlined in red, indicating an error. Next, you’ll notice you can’t move the keyboard focus out of the cell. Finally, pushing the Test button at the bottom of the GUI will print out the population values of the first five rows, and you can see that the underlying data has not been modified.
Note 2: Some programmers will prefer to override getColumnClass with an anonymous class rather than a nested class. TableModelDemo2C in the project sandbox provides an example:
public TableModelDemo2C()
{
    // ...
    @SuppressWarnings("serial")
    DefaultTableModel   model       =
        new DefaultTableModel( data, headers ) {
            public Class<?> getColumnClass( int col )
            {
                Class<?>    clazz   = col == 2 ?
                    Integer.class : super.getColumnClass( col );
                return clazz;
            }
    };
    JTable              table       = new JTable( model );
    // ...
}
🟦 Types of editors
So far, all the editors we have used for our sample tables have been implemented via JFormattedTextField components, the default for JTables. Two other built-in editors support JCheckBoxes and JComboBoxes; see below. Note that the methods for implementing a checkbox editor and a combo box editor are very different.
∎ JCheckBox Editors
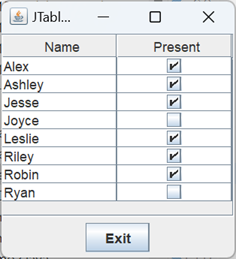
To install a JCheckBox editor in a column, set the column type to Boolean (and, of course, put only Boolean data in your column). You do this just like we set the column type to Integer in the previous example: by overriding getColumnClass in a subclass of DefaultTableModel. CheckBoxDemo1 in the project’s …sandbox.jtable package provides an example. The important bits of code from the demo are shown below; the entire program can be found in the GitHub repository.
public class CheckBoxDemo1
{
    /** Array of headers (column names). */
    private final String[]      headers =
    { "Name", "Present" };
    /** Data array. */
    private final Object[][]    data    =
    {
        { "Alex", true },
        { "Ashley", true },
        { "Jesse", true },
        { "Joyce", false },
        { "Leslie", true },
        { "Riley", true },
        { "Robin", true },
        { "Ryan", false },
    };
    // ...
    private CheckBoxDemo1()
    {
        // ...
        TableModel  model       = new LocalTableModel( data, headers );
        JTable      table       = new JTable( model );
        // ...
    }
    private static class LocalTableModel extends DefaultTableModel
    {
        // ...
        public Class<?> getColumnClass( int col )
        {
            Class<?>    clazz   =
                col == 1 ? Boolean.class : super.getColumnClass( col );
            return clazz;
        }
    }
}
∎ JComboBox Editors
To install a JComboBox editor for a column, you have to:
- Make the JComboBox;
- Use the combo box to construct a DefaultCellEditor; and
- Set the editor in the TableColumn object for the target column.

The TableColumn object can be obtained from the table’s TableColumnModel object. The ComboBoxDemo1 program in the project’s …sandbox.jtable package demonstrates how to do this. It adds a column to the table produced by CheckBoxDemo1 and installs a combo box editor in it; to see the editor in action, run the program and click on one of the cells in the second column. For clarity, the specific code used to install the combo box editor has been moved to its own helper method. The relevant parts of the demo are listed below, followed by a few comments.
Note: since the column with the Boolean data is now column number 2, we had to tweak the logic in the getColumnClass method of the nested class LocalTableModel: Class<?> clazz = col == 2 ? Boolean.class : super.getColumnClass( col );
1 2 3 4 5 6 7 8 9 10 11 12 13 14 15 16 17 18 19 20 21 22 23 24 25 26 27 28 29 30 31 32 33 34 35 36 37 38 39 40 41 42 43 44 45 46 | public class ComboBoxDemo1 { private final String[] headers = { "Name", "Teacher", "Present" }; private final Object[][] data = { { "Alex", "Archimedes, Burton", true }, { "Ashley", "Lamarr, Hedy", true }, { "Jesse", "Tesla, Nikola", true }, { "Joyce", "Gilbreth, Lillian", false }, { "Leslie", "Watt, James", true }, { "Riley", "Roebling, Emily", true }, { "Robin", "Jemison, Mae", true }, { "Ryan", "Gutenberg, Johannes", false }, }; private final String[] teachers = { "Archimedes, Burton", "Gilbreth, Lillian", "Gutenberg, Johannes", "Jemison, Mae", "Lamarr, Hedy", "Roebling, Emily", "Tesla, Nikola", "Watt, James", }; private ComboBoxDemo1() { // ... TableModel model = new LocalTableModel( data, headers ); JTable table = new JTable( model ); installComboBox( table ); // ... } private void installComboBox( JTable table ) { JComboBox<String> comboBox = new JComboBox<>( teachers ); TableCellEditor comboEditor = new DefaultCellEditor( comboBox ); TableColumnModel columnModel = table.getColumnModel(); TableColumn teacherCol = columnModel.getColumn( 1 ); teacherCol.setCellEditor( comboEditor ); } // ... } |
- Lines 3,4: The array of column headers for the JTable.
- Lines 5-15: The array of data rows for the JTable.
- Lines 16-26: The array used to construct the column with the JComboBox editor.
- Lines 31-33: This creates a TableModel and a JTable, and invokes the helper method that installs the JComboBox editor in column 1.
- Line 38: Instantiates the JComboBox.
- Lines 39,40: Instantiates the TableCellEditor by passing the JComboBox to the DefaultCellEditor constructor.
- Line 41: Gets the TableColumnModel from the JTable.
- Line 42: Gets the TableColumn that controls column number 1.
- Line 42: Sets the TableCellEditor in the TableColumn.
∎ Using other components in a JTable
Other types of components can be used in a JTable, but you have to do all the work yourself. It’s a lot of work, and the results aren’t always particularly aesthetic. For myself, I’ve decided that it’s not worth the trouble. To learn how to do this, see How to Use Tables in the Oracle Java tutorial.

🟦 Types of renderers
Out of the box, the JTable facility supports rendering basic types, including numeric, Boolean, Date, Image, and Object. That’s fairly complete, but sometimes you want to introduce your own customizations. Consider, for example, the GUI produced by RenderingDemo1A in the project’s …sandbox.jtable package. If you run this application, you’ll see that it produces a table with four columns, one displaying integer data and two displaying floating point data. The data look OK, but there are no commas in the integer data, and the number of decimals in the floating point data is inconsistent. It would look much better if we customized the display a bit. We can do that by introducing our own renderers.
The default renderers for numeric data are pretty simple; they only produce labels with right-justified text. By default, the JTable facility uses the DefaultTableCellRenderer class, and the last stop on the way to displaying the formatted data is the method setValue(Object value). To format our data the way we want, we can extend this class and override setValue. But before we go on, let’s emphasize a couple of things:
- To edit data, the JTable facility uses several different kinds of components, notably JFormattedTextFields, JComboBoxes, and JCheckBoxes. But to display data (i.e., to render the data), it uses JLabels almost exclusively. Even if you’re using a JComboBox as an editor, the result is displayed via a JLabel after you are done editing.
- DefaultTableCellRenderer is a subclass of JLabel.
For our next example, we will use static nested classes that extend DefaultTableCellRenderer to format the population data (6,731,484, for example) and the latitude and longitude (-86.163). Here are our two nested classes, followed by a couple of notes.
1 2 3 4 5 6 7 8 9 10 11 12 13 14 15 16 17 18 19 20 21 22 23 24 25 26 27 28 29 30 31 | private static class IntRenderer extends DefaultTableCellRenderer { @Override public void setValue( Object value ) { if ( value != null ) { String fmtValue = String.format( "%,d", value ); setText( fmtValue ); setHorizontalAlignment(SwingConstants.RIGHT); } else setText( "" ); } } private static class CoordRenderer extends DefaultTableCellRenderer { @Override public void setValue( Object value ) { if ( value != null ) { String fmtValue = String.format( "%.3f", value ); setText( fmtValue ); setHorizontalAlignment(SwingConstants.RIGHT); } else setText( "" ); } } |
- Line 1: This subclass of DefaultTableCellRenderer will add commas to integer data.
- Line 6: The setValue method must be prepared to process null values. If the value is null, the formatting should result in an empty string (lines 13 and 29).
- Line 8: Generate the formatted text (remember that this is the renderer for the population column, and all data in the population column are type Integer, so the value parameter is type Integer).
- Line 9: Set the label’s text (recall that DefaultTableCellRenderer is a subclass of JLabel).
- Line 10: Right-justify the label’s text.
- Line 17: This class is for formatting the latitude and longitude data.
- Line 20: Recall that the latitude and longitude columns’ type is Double.
- Line 24: Formats the Double value, rounded to three positions to the right of the decimal point, zero-filling if necessary.
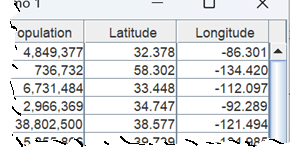
RenderingDemo1B demonstrates how to do this. The application uses a slightly modified version of the LocalTableModel nested class that we’ve seen before. The getColumnClass method has been changed to treat column one as type Integer and columns two and three as type Double. Here’s the modified nested class:
private static class LocalTableModel extends DefaultTableModel
{
    public LocalTableModel( Object[][] data, Object[] headers )
    {
        super( data, headers );
    }

    @Override
    public Class<?> getColumnClass( int col )
    {
        Class<?>    clazz   = null;
        if ( col == 1 )
            clazz = Integer.class;
        else if ( col == 2 || col == 3)
            clazz = Double.class;
        else
            clazz = super.getColumnClass( col );
        return clazz;
    }
}
The code to install the renderers is listed below, along with a few notes. For clarity, the code that does most of the installation work has been moved to a helper method.
1 2 3 4 5 6 7 8 9 10 11 12 13 14 15 16 17 18 19 20 21 | public RenderingDemo1B() { // ... LocalTableModel model = new LocalTableModel( data, headers ); JTable table = new JTable( model ); CoordRenderer coordRenderer = new CoordRenderer(); IntRenderer intRenderer = new IntRenderer(); setCellRenderer( table, 1, intRenderer ); setCellRenderer( table, 2, coordRenderer ); setCellRenderer( table, 3, coordRenderer ); // ... } private void setCellRenderer( JTable table, int col, TableCellRenderer renderer ) { TableColumnModel colModel = table.getColumnModel(); TableColumn column = colModel.getColumn( col ); column.setCellRenderer( renderer ); } |
- Lines 4-8: Instantiate the table mode, the table, and the two renderers.
- Lines 9-11: Install the renderers in the table columns.
- Lines 15,16: Helper method to install renderers. The table parameter identifies the table containing the target column, col is the index number of the destination column, and the renderer parameter is the renderer to install.
- Line 18: Gets the TableColumnModel from the table.
- Line 19: Gets the target column from the column model
- Line 20: Installs the renderer in the target column.
⏹ Inserting a Column
In TableModelDemo1C, we generated a new column by adjusting our header and data arrays before creating our data model. This section will dynamically add a column after creating the table/data model. In JTableDemo2 in the project sandbox, we start by instantiating a table using three columns from the State data set, then we add a fourth column by calling the helper method addSelectColumn(JTable table) as shown below:
public class JTableDemo2
{
    private final String[]      headers =
        { "State", "Abbreviation", "Population" };
    private final Object[][]    data    =
        State.getDataSet( "state", "abbreviation", "population" );
    // ...
    private JTableDemo2()
    {
        // ...
        JPanel      contentPane = new JPanel( new BorderLayout() );
        TableModel  model       = new LocalTableModel( data, headers );
        JTable      table       = new JTable( model );
        addSelectColumn( table );
        // ...
    }
}
The addSelectColumn(JTable table) helper method adds a fourth column of Boolean values, each initialized to false, to the data model. Here’s the annotated listing for addSelectColumn(JTable table).
1 2 3 4 5 6 7 8 9 10 11 | private void addSelectColumn( JTable table ) { TableModel temp = table.getModel(); if ( !(temp instanceof DefaultTableModel) ) throw new ComponentException( "wrong table model type" ); DefaultTableModel model = (DefaultTableModel)temp; int rowCount = model.getRowCount(); Object[] colData = new Object[rowCount]; Arrays.fill( colData, false ); model.addColumn( "Select", colData ); } |
- Line 3: Get the table model from the given JTable.
- Note: The method table.getModel() returns the interface type, TableModel, but the interface does not declare a method for adding a column; we need at least a DefaultTableModel to do this. Unless you specify a custom-made table model, JTable will automatically use a DefaultTableModel; if you use your own model, it will probably be a subclass of DefaultTableModel.
- Lines 4-6: Verify that our table model is a DefaultTableModel and cast it to the DefaultTableModel type. The if statement isn’t necessary, but we get a compiler warning without it.
- Line 7: Get the number of rows in the data model.
- Lines 8,9: Create and initialize an array of Boolean values, the size of which is the number of rows in the table model.
- Line 10: Add the new column to the table model; its header will be Select.
This demo has a Print button. If you check some of the boxes in the last column and push the button, it will print out the data in every row that is checked. Here’s the code to do that:
private void printAction( JTable table )
{
    int     rowCount    = table.getRowCount();
    for ( int row = 0 ; row < rowCount ; ++row )
    {
        Object  value   = table.getValueAt( row, 3 );
        if ( value instanceof Boolean && (Boolean)value )
        {
            StringBuilder   bldr    = new StringBuilder();
            bldr.append( table.getValueAt( row, 0 ) ).append( ", " )
                .append( table.getValueAt( row, 1 ) ).append( ", " )
                .append( table.getValueAt( row, 2 ) );
            System.out.println( bldr );
        }
    }
}
Note that the addColumn method only adds a column at the last position. To insert a column at a different position, first call addColumn, then call JTable.moveColumn(int column, int targetColumn).
Note: The addColumn method only adds a column at the last position. To insert a column at a different position, first call addColumn, then call JTable.moveColumn(int column, int targetPosition).
⏹ Inserting a Row
JTableDemo3 in the project sandbox shows how we can dynamically add a row to a table. The GUI for the demo is based on JTableDemo2, with a column of checkboxes on the right of the table. Add and Insert buttons are added to the bottom of the GUI. Pushing one of these buttons will prompt the operator to enter comma-separated fields for a state name, abbreviation, and population. An Add operation will use the data to add a new row to the bottom of the table. An Insert operation will add a new row before the first row with a selected checkbox; if no boxes are checked, the new row will be added at position 0.
For convenience, the JTable object and its encapsulated TableModel object have been moved to instance variables, and we have a class variable containing the operator prompt:
    private static final String prompt      =
        "Enter name, abbreviation and population, separated by commas.";
    private final DefaultTableModel model   =
        new LocalTableModel( data, headers );
    private final JTable            table   = new JTable( model );
The following private methods handle the data collection process:
∎ Object[] parseInput( String input )
The given input string is assumed to consist of three fields separated by commas: state name, abbreviation, and population. Excess white space is trimmed from the first two fields, and the population data is converted to an integer. The data is returned in an Object[4] array, with the last element of the array explicitly set to false (this value corresponds to the data stored in the fourth column of the table). If an error is detected, a message dialog is posted, and null is returned. The general strategy of the method is shown below; the complete code can be found in the GitHub repository.
Object[] parseInput( String input )
    Object[]        row     = null;
    StringTokenizer tizer   = new StringTokenizer( input, "," )
    try
        if tizer.countTokens() != 3
            throw exception
        parse fields into:
            String name,
            String abbr
            int    pop
        row = new Object[]{ name, abbr, pop, false }
    catch
        post error dialog
    return row
∎ Object[] getNewRow()
This method obtains an input string from the operator. If the operator cancels the operation, null is returned. Otherwise, parseInput is invoked, and the row formulated by that method is returned. The code for this method follows.
private Object[] getNewRow()
{
    String      input   = JOptionPane.showInputDialog( prompt );
    Object[]    row     = null;
    if ( input != null )
        row = parseInput( input );
    return row;
}
∎ void insertRow( int position )
This method calls getNewRow to obtain a row for insertion at the given position. If getNewRow returns a non-null value, it is added to the JTable at the given position using the insertRow(int position, Object[] row) method of the DefaultTableModel class. The code is listed below.
private void insertRow( int position )
{
    Object[]    row = getNewRow();
    if ( row != null )
        model.insertRow( position, row );
}
∎ void insertAction( ActionEvent evt )
This method is invoked when the GUI’s Insert button is pushed. It finds the position of the first selected row and passes the position to insertRow. If no row is selected, it substitutes position 0. The annotated code follows.
1 2 3 4 5 6 7 8 | private void insertAction( ActionEvent evt ) { int position = IntStream.range( 0, model.getRowCount() ) .filter( r -> (Boolean)model.getValueAt( r, 3 ) ) .findFirst().orElse( 0 ); insertRow( position ); } |
- Line 4: Begin traversing the data from row 0 to the number of rows in the table.
- Line 5: Given r is the index of a row, filters for only those rows whose last column (column index 3) is true:
- model.getValueAt( r, 3 ) returns the Object in the last column of the row.
- (Boolean) converts the Object to type Boolean
- Line 6: Stops the traversal as soon as a row, r, passes the filter and assigns r to position (line 3). If no row passes the filter, the orElse method is executed, and 0 is assigned to position.
- Line 7: Invokes insertRow( int position ).
∎ addAction( ActionEvent evt )
This method is invoked when the GUI’s Add button is pushed. It calls insertRow(int position), passing the number of rows in the table for the position. Here’s the code.
private void addAction( ActionEvent evt )
{
    insertRow( model.getRowCount() );
}
⏹ Deleting Rows
JTableDemo4 in the project sandbox shows one way to delete rows from a table. If you want to delete a single row, you can use DefaultTableModel.removeRow(int row). But removing multiple rows is a little problematic, not because there’s anything special about JTables, but because of a classic problem of deleting rows from a list. Consider the following faulty logic:
    // DON'T TRY THIS AT HOME; it doesn't work
    String[]        oArr    = { "Manny", "Moe", "Jack", "Cuthbert" };
    List<String>    list    =
        new ArrayList<>( Arrays.asList( oArr ) );
    IntStream.range( 0,  list.size() )
        .forEach( i -> {
            String  str = list.get( i );
            if ( str.contains( "Moe" ) )
                list.remove( i );
        });
The code above has two problems:
- We start with items in the order 0) Manny, 1) Moe, 2) Jack, and 3) Cuthbert. Then, in our loop, when i=1, we delete Moe, leaving Jack at index 1 and Cuthbert at index 2. So the next time through the loop, when i=2, we skip processing for Jack.
- When we started the loop list.size() was 4, so eventually, we will try to process i=3, resulting in an index out-of-bounds exception.
One solution to the problem is to use an Iterator that supports the optional remove operation. As we iterate through a list that supports remove (remove is supported by both ArrayList and Vector) we can safely invoke it to remove from the list the item being iterated, for example:
    String[]        oArr    = { "Manny", "Moe", "Jack" };
    List<String>    list    =
        new ArrayList<>( Arrays.asList( oArr ) );
    Iterator<String>    iter    = list.iterator();
    while ( iter.hasNext() )
    {
        String  item    = iter.next();
        if ( item.contains( "Moe" ) )
            iter.remove();
    }
So this will be our approach when deleting selected items from our JTable in JTableDemo4: 1) add a Delete button to the bottom of the GUI; 2) get the data from the table as a Vector; 3) iterate over the Vector, deleting each selected item; 4) change the table data to reflect the modified Vector. Here’s the annotated code.
1 2 3 4 5 6 7 8 9 10 11 12 13 14 15 16 17 18 19 20 21 22 23 24 25 26 27 | public class JTableDemo4 { // ... private static final String selectHeader = "Select"; private final Object[] headers = { "State", "Abbrev", "Population" }; // ... private void deleteAction( ActionEvent evt ) { Vector<Vector> data = model.getDataVector(); Iterator<Vector> iter = data.iterator(); while ( iter.hasNext() ) { Vector vec = iter.next(); Object obj = vec.get( 3 ); if ( !(obj instanceof Boolean) ) throw new ComponentException( "Malfunction" ); if ( (Boolean)obj ) iter.remove(); } List<Object> cHeaders = Arrays.asList( headers ); Vector<Object> vHeaders = new Vector<>( cHeaders ); vHeaders.add( selectHeader ); model.setDataVector( data, vHeaders ); } // ... } |
- Line 8: The action method for the new Delete button:
    JButton delete = new JButton( "Delete" );
delete.addActionListener( this::deleteAction ); - Line 10: Get the data from the TableModel as a Vector.
- Line 11: Get an Iterator from the Vector.
- Line 12: Traverse the Vector.
- Line 14: Get the next row from the Vector.
- Line 15: Get the data from the fourth column of the row (the column containing the checkboxes).
- Lines 16,17: Verify that the value type is Boolean (eliminates compiler warnings).
- Lines 18,19: If the value is true, remove the row being traversed from the Vector.
- Lines 21-24: DefaultTableModel does not have a method that allows us to set just the data in the model; our only options require that we set both data and headers in the same call. We will use the setDataVector overload, which requires us to provide the data and headers as Vectors.
- Line 21: Convert our array of headers (lines 4,5) to a Collection.
- Line 22: Convert the Collection to a Vector.
- Line 23: Add a new column to the header vector (the headers field contains only the first three headers for our table, and we dynamically added a fourth during initialization).
- Line 24: Put the modified data back into the table.
⏹ Data Validation with JTable
Recall that display and editing are discrete processes in a JTable. Data are almost always displayed in a JLabel. Editing (and, consequently, validation) is internally supported for JTextFields, JCheckBoxes, and JComboBoxes (this might be a good time to point out that JFormattedTextField is a subclass of JTextField). Specifically, the component used for editing and validation is provided by a column’s TableCellEditor. The best way to customize the validation logic is by providing a subclass of DefaultCellEditor.
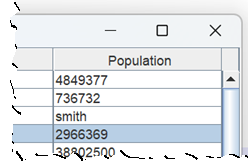
The customized cell editor has two important components: the constructor, which creates the JComponent to do the editing, and the stopCellEditing() method. The stopCellEditing() method returns true if the value contained in the component is valid. The application JTableDemo5A uses a static nested class, NameEditor, to implement validation for a column containing identifiers (i.e., variable names). The listing for this class is shown below. Line 5 is where we create the editor component and pass it to the DefaultCellEditor constructor. In line 11, we get the value contained in our editor component; the getCellEditorValue method in DefaultCellEditor returns the value as an Object, but we know it’s really a String because that’s how values are stored in JFormattedTextFields. At lines 13 and 14, we test the value to determine if it’s a valid identifier, and if it is, we determine our final status by calling stopCellEditing in the superclass.
1 2 3 4 5 6 7 8 9 10 11 12 13 14 15 16 17 | private static class NameEditor extends DefaultCellEditor { public NameEditor() { super( new JFormattedTextField() ); } @Override public boolean stopCellEditing() { Object oValue = getCellEditorValue(); boolean status = false; if ( NameValidator.isIdentifier( (String)oValue ) ) status = super.stopCellEditing(); return status; } } |
If you run this application and enter an invalid value for a name, you will see that you can’t commit the invalid value or move focus out of the cell with the invalid value.
⏹ ListSelectionModel
⏹ DefaultListSelectionModel
Rows and columns in a JTable may be selected. Whether and how this is allowed is configurable by the programmer. ListSelectionModel is an interface, and DefaultListSelectionModel is the concrete implementation of the interface used, by default, in JTables. Row and column selection is under the control of the ListSelectionModel. However, for convenience, many of the list access facilities are implemented directly in JTable, for example, getSelectedRow() and getSelectedRows(). The following facilities control some of the selection model configuration parameters:
- JTable.setRowSelectionAllowed(boolean rowSelectionAllowed)
Allow/disallow row selection. - JTable.setColumnSelectionAllowed(boolean columnSelectionAllowed)
Allow/disallow column selection. - DefaultListSelectionModel.setSelectionMode(int selectionMode)
(also JTable.setSelectionMode(int selectionMode)):- selectionMode=ListSelectionModel.SINGLE_SELECTION
Allow one row or column to be selected at any time. - selectionMode=ListSelectionModel.SINGLE_INTERVAL_SELECTION
Allow one interval of sequential rows or columns to be selected at any time. For example, selection of (4,5,6) is allowed, but not (4,5,6,8) - selectionMode=ListSelectionModel.MULTIPLE_INTERVAL_SELECTION
Allow many intervals of sequential rows or columns to be selected at any time—for example, (4,5,6), (10,11,12), (15), (17,18,19,20).
- selectionMode=ListSelectionModel.SINGLE_SELECTION
If you run the application SelectionModelDemo1 in the project’s ….sandbox.jtable package, you can experiment with different configurations of the above options.
Some of the list-related facilities implemented directly in JTable are described below.
- void clear selection()
Deselect all rows and columns. - void addRowSelectionInterval(int index0, int index1)
Select the sequential rows in the given interval. - void addColumnSelectionInterval(int index0, int index1)
Select the sequential columns in the given interval. - int getSelectedRow(), int getSelectedColumn()
Returns the index of the selected row or column. If more than one is selected, returns the index of the first. If none are selected, returns -1. - int[] getSelectedRows(), int[] getSelectedColumns()
Returns an array of indices identifying all selected rows or columns. Returns an empty array if none are selected. - int getSelectedRowCount(), int getSelectedColumnCount()
Returns the number of selected rows or columns.
🟦 Processing Selected Rows
The application SelectionModelDemo2 in the project sandbox is a revision of JTableDemo4. The earlier application adds a column of checkboxes to the end of a table. Then, based on the checkbox column’s state, the operator can print selected rows, delete selected rows, or insert a new row before the first selected row. SelectionModelDemo2 offers the same functionality; however, it eliminates the column of checkboxes and determines the first selected row using the table’s ListSelectionModel. Below are listings of those methods in SelectionModelDemo2 that need to be modified. The complete code can be found in the GitHub repository.
∎ Object[] parseInput( String input )
This method only needed one line to be changed. The original demo returns an array of four objects, but the new one returns three objects.
private Object[] parseInput( String input )
{
    Object[]        row     = null;
    StringTokenizer tizer   = new StringTokenizer( input, "," );
    try
    {
        // ...
        String  name    = tizer.nextToken().trim();
        String  abbr    = tizer.nextToken().trim();
        String  sPop    = tizer.nextToken().trim();
        Integer iPop    = Integer.valueOf( sPop );
        row = new Object[]{ name, abbr, iPop };
    }
    // ...
    return row;
}
∎ void printAction( ActionEvent evt )
The revised method determines what to print based on the array returned by getSelectedRows.
private void printAction( ActionEvent evt )
{
    int[]   selected    = table.getSelectedRows();
    IntStream.of( selected ).forEach( row -> {
        StringBuilder   bldr    = new StringBuilder();
        bldr.append( table.getValueAt( row, 0 ) ).append( ", " )
            .append( table.getValueAt( row, 1 ) ).append( ", " )
            .append( table.getValueAt( row, 2 ) );
        System.out.println( bldr );
    });
}
∎ void insertAction( ActionEvent evt )
The revised method determines the insertion point based on the value returned by getSelectedRow.
private void insertAction( ActionEvent evt )
{
    int position    = table.getSelectedRow();
    if ( position < 0 )
        position = 0;
    insertRow( position );
}
∎ void deleteAction( ActionEvent evt )
This method is the most interesting revision. It bases its logic on iterating over the Vector of Vectors obtained from the data model. It also gets the array of selected indices. It keeps track of the index of the Vector that it is traversing and removes the Vector if its index is present in the array of indices.
private void deleteAction( ActionEvent evt )
{
    int[]               selected    = table.getSelectedRows();
    int                 currInx     = 0;
    Vector<Vector>      data        = model.getDataVector();
    Iterator<Vector>    iter        = data.iterator();
    while ( iter.hasNext() )
    {
        iter.next();
        if ( Arrays.binarySearch( selected, currInx++ ) >= 0 )
            iter.remove();
    }
    List<Object>    cHeaders    = Arrays.asList( headers );
    Vector<Object>  vHeaders    = new Vector<>( cHeaders );
    model.setDataVector( data, vHeaders );
}
🟦 Selecting Rows Programmatically
Using the ListSelectionModel, you can programmatically select one or more rows. The method setSelectionInterval(int from, int to) clears the current selection and selects all the rows between from and to inclusive. To select a single row, use the same index for from and to: // Select the fourth row (row index 3)
listModel.setSelectionInterval(3,3)
As mentioned, setSelectionInterval clears the current selection before making the new selection. To select multiple, noncontiguous rows, use addSelectionInterval(int from, int to), which selects the given rows without clearing the current selection. The application SelectionModelDemo3 in the project sandbox shows how to do this. Given that the method int[] getSelectionArray() returns an array of indices of rows in a table, the following method selects each row in the list:
private void selectAction( ActionEvent evt )
{
    ListSelectionModel  selModel    = table.getSelectionModel();
    Stream.of( getSelectionArray() )
        .forEach( n -> selModel.addSelectionInterval( n, n ) );
}
If you run this application and push the Select button, you will be prompted to enter a list of indices separated by commas, e.g., 1,3,7,11. The rows in the table corresponding to these indices will then be selected. To clear the selection, press the Clear Selection button. Pressing the Print button will print a list of all selected rows.
⏹ Events, Listeners
The JTable ecosystem provides several event listeners that allow you to monitor and control your application dynamically. The two that most concern us are the TableModelListener, which listens for changes to the data model, and the ListSelectionListener, which listens for changes to the table’s selection state. These two listeners are discussed below.
🟦 TableModelListener
This listener listens for changes to the table model. It monitors three types of changes:
- TableModelEvent.DELETE
Issued when rows or columns are deleted. - TableModelEvent.INSERT
Issued when a row or column is inserted. - TableModelEvent.UPDATE
Issued when a cell has been modified.
The event object dispatched to a listener, type TableModelEvent, includes the following facilities:
- int getColumn()
The column that was changed. Returns -1 if inapplicable. - int getFirst()
The first of a range of rows that changed. Returns -1 if inapplicable. - int getLast()
The last of a range of rows that changed. Returns -1 if inapplicable. - int getType()
The type of change: DELETE, INSERT, or UPDATE.
TableModelListenerDemo1 in the project’s …sandbox.jtable package provides an example of a TableModelListener that monitors and logs changes to the data model. The important bits of the code are listed below; the complete code can be found in the GitHub repository.
public class TableModelListenerDemo1
{
    // ...
    private final DefaultTableModel model   =
        new LocalTableModel( data, headers );
    private final JTable            table   = new JTable( model );
    // ...

    private TableModelListenerDemo1()
    {
        table.setSelectionMode( ListSelectionModel.SINGLE_SELECTION );
        model.addTableModelListener( this::tableChanged );
        // ...
    }

    private void tableChanged( TableModelEvent evt )
    {
        int     type        = evt.getType();
        String  strType     = "";
        int     firstRow    = evt.getFirstRow();
        int     lastRow     = evt.getLastRow();
        int     col         = evt.getColumn();
        Object  val         = "[n/a]";
        if ( firstRow >= 0 && col >= 0 )
            val = model.getValueAt( firstRow, col );
        switch ( type )
        {
        case TableModelEvent.DELETE:
            strType = "DELETE";
            break;
        case TableModelEvent.INSERT:
            strType = "INSERT";
            break;
        case TableModelEvent.UPDATE:
            strType = "UPDATE";
            break;
        default:
            strType = "ERROR";
        }

        StringBuilder   bldr    = new StringBuilder();
        bldr.append( strType ).append( ": " )
            .append("first row=").append( firstRow ).append( "," )
            .append("last row=").append( lastRow ).append( "," )
            .append("col=").append( col ).append( "," )
            .append( "value=").append( val );
        log.append( bldr.toString() );
    }
    // ...
}
If you execute the above program, you’ll notice that you can edit a cell, but no changes are recorded until the edited value is committed, i.e., until you press enter or redirect the keyboard focus. In particular, try changing a value, and before committing it, type the escape key. You’ll notice that your edits are discarded, and no change events are propagated.
🟦 ListSelectionListener
This listener is placed on a JTable’s ListSelectionModel. It reports changes to the table’s selection state. Note that a change in the selection may result in multiple events being propagated. The event object passed to the listener includes the following data:
- int getFirstIndex()
Returns the index of the first row in a range of rows for which the selection state has changed. - int getLastIndex()
Returns the index of the last row in a range of rows for which the state of selection has changed. - boolean getValueIsAdjusting()
Returns true if there are still more events in a series to be reported.
Some caveats about selection events:
- Caveat 1: The event object can report at most one selection interval. If in a list you have selected intervals (5,6,7) and (10,11,12) it will report only one interval (I don’t know which).
- Caveat 2: If you select one row and then select another row, causing the first row to be deselected, the event object will report both rows as selected.
- Caveat 3: If no rows are selected, the selection data reported by the event object should be disregarded.
I generally use a selection event to detect when the selection state changes, but to determine the specifics of the event, I use the JTable API, for example, JTable.getSelectedRowCount and JTable.getSelectedRows().
ListSelectionListenerDemo1 in the project’s …sandbox.jtable package demonstrates how to add a ListSelectionListener to a JTable’s ListSelectionModel. It logs all changes to the selection state of a JTable. In addition, it enables or disables the Delete button depending on whether or not there is a row selected that can be deleted. A summary of the code to initialize the GUI is shown immediately below. An annotated listing of the valueChanged method that processes the list selection event follows. The complete code can be found in the GitHub repository.
public class ListSelectionListenerDemo1
{
    // ...
    private final DefaultTableModel model   =
        new LocalTableModel( data, headers );
    private final JTable            table   = new JTable( model );
    // ...
    private ListSelectionListenerDemo1()
    {
        table.setSelectionMode( ListSelectionModel.SINGLE_SELECTION );
        ListSelectionModel  selectionModel  = table.getSelectionModel();
        selectionModel.addListSelectionListener( this::valueChanged );
        // ...
        JPanel      buttonPanel = new JPanel();
        JButton     clear       = new JButton( "Clear Selection" );
        clear.addActionListener( e -> table.clearSelection() );
        delete.addActionListener( this::deleteAction );
        delete.setEnabled( false );
        buttonPanel.add( delete );
        buttonPanel.add( clear );
        // ..
    }

    private void valueChanged( ListSelectionEvent evt )
    {
        //... see below
    }
    // ...
}
1 2 3 4 5 6 7 8 9 10 11 12 13 14 15 16 17 18 19 20 21 22 23 24 25 26 27 28 29 | private void valueChanged( ListSelectionEvent evt ) { int firstIndex = evt.getFirstIndex(); int lastIndex = evt.getLastIndex(); boolean isAdjusting = evt.getValueIsAdjusting(); StringBuilder bldr = new StringBuilder() .append( "Selection event: " ) .append( "First index=" ).append( firstIndex ).append( "," ) .append( "Last index=" ).append( lastIndex ).append( "," ) .append( "Adjusting=" ).append( isAdjusting ); log.append( bldr.toString() ); bldr.setLength( 0 ); bldr.append( "<span style=background:yellow;>" ) .append( " " ) .append( "table.getSelectedRowCount(): ") .append( table.getSelectedRowCount() ) .append( "</span>" ); log.append( bldr.toString() ); if ( !isAdjusting ) { int selectedRow = table.getSelectedRow(); boolean hasSelection = selectedRow >= 0; delete.setEnabled( hasSelection ); log.append( "*********************" ); } } |
- Lines 3-5: Get the index of the first selected item, the last selected item, and the isAdjusting value.
- Recall that a selection in a list may result in a series of events being issued. If the isAdjusting value is true, this event is part of a series, and there are more events in the series to be reported.
- Lines 7-12: Log the event properties obtained above.
- Lines 14-20: Log the selected row count.
- Line 22: If there are no pending events:
- Line 24: Get the currently selected row. This method returns -1 if no rows are selected.
- Lines 25,26: Set the Delete button’s enabled property to true if a row is selected, false otherwise.
Summary
On this page, we examined the JTable class and several auxiliary classes that can be used to support the formatting and validation of data within the JTable. On the next page, we’ll put what we learned to work, implementing a table of variable names and values to use in formulating equations, which will be plotted in our Cartesian plane application.