To complete the set of test tools for validating the GraphManager, we will develop a class to assist in identifying lines drawn on a grid and validating their position, color, length, and width (stroke). This will entail capturing an image of a window in a BufferedImage and then analyzing the BufferedImage.
GitHub repository: Cartesian Plane Lesson 18
Previous page: Cartesian Plane Lesson 18 Page 9: Optical Character Recognition
The LineSegment Class
This class will be used to assist in the validation of lines drawn by the GraphManager during testing. It can perform the following tasks for us:
- Given a line’s expected location and properties (length, width, color), create an object that encapsulates its expected color and bounds.
- Given a point in a BufferedImage, characterize the actual bounds of a line that contains it (if any).
- Compare the expected characterization of a line and its actual characterization for equality.
- Within an area of an image, find the smallest rectangle that encloses all text with the area.
For an object of this class to be used effectively, we must carefully choose the test parameters. For example, we don’t want overlapping lines. To prevent this, we will:
- Only draw the category of line that we are testing. If we are trying to verify that major tics are drawn in the correct location with the correct properties, the test should generate a grid that contains only major tics, not minor tics or gridlines.
- For a line category, choose a grid unit and line weight to ensure that the vertical tics don’t overlap with each other or with horizontal tics (or vice versa).
- When validating labels, choose a grid unit and font size to ensure that the length of the label on a vertical tic mark does not exceed one unit or that the height of a label on a horizontal tic mark does not exceed one unit.
- For a line category, choose a grid unit, spacing properties, and grid dimensions to ensure that at least two target lines appear on the grid.
- When searching for the bounds of a line containing a point within a BufferedImage, do not choose a point on the x- or y-axis (unless we’re validating the properties of the axes).

As long as we choose our parameters carefully, we can easily determine the properties of a line that contains a point in BufferedImage. For example, suppose we select a point in a BufferedImage where we expect to find a line. We can determine the bounds of the line by examining the point’s locale for other points with the same color.
The LineSeg Nested Class
When I first started developing this class, I knew that there were two persistent properties that an object had to keep track of: a rectangle describing the bounds of a line and its color. However, I realized there might be additional transient data we might store to simplify internal processing. For example, consider the pseudocode for the method LineSegment of(Point2D origin, BufferedImage image). This method starts with the color of the given point. Then, assuming that the point is contained in a line, it discovers the bounds of the line by traversing left, right, up, and down as long as it continues to find neighboring points of the same color:
Get line segment given: Point2D origin, BufferedImage image
    int left   = getLeft()   // search image to the left; do not exceed
                             // the bounds of the image
    int right  = getRight()  // search image to the right; do not exceed
                             // the bounds of the image
    int top    = getTop()    // search image upwards; do not exceed
                             // the bounds of the image
    int bottom = getBottom() // search image downwards; do not exceed
                             // the bounds of the image
    int width  = right - left + 1
    int height = bottom - top + 1
    rect = new Rectangle( left, top, width, height )
Now let’s look at the pseudocode for getRight; the others will be similar:
Get rightmost point given: Point2D origin, BufferedImage image
    // Data needed
    int originXco = (int)origin.getX()
    int originYco = (int)origin.getY()
    int imageWidth = image.getWidth()
    int rgb        = image.getRGB( originXco, originYco )

    //Calculate rightmost point
    int xco     = originXco;
    int testRGB = image.getRGB( xco + 1, yco );
    while ( xco + 1 < imageWidth AND
            the color of the image at (xco + 1, originYco ) == rgb
     )
        ++xco
    return xco;
To implement the code, we could choose one of the following alternatives:
- From the principal method, call all four helper methods passing the origin and the image:
getRight( origin, image )
Then, each method must perform almost exactly the same calculations to find the origin’s x- and y-coordinates, the image’s width and height, and the integer value of the color at the origin. Of course, I don’t like this option because of all the duplicate code. - Calculate all the necessary values in the principal method and pass them as arguments to the four helper methods:
getRight( image, xco, yco, width, height, rgb )
This option is unsatisfying because of all the parameters that must be declared for each method and the verbosity of the invocations. - Eliminate the four helper methods and include all the necessary code directly in the principal method. This is my least favorite option. The simplicity of “get-left, get-right, get-top, get-bottom, make-the-rectangle” is far superior to adding four while loops to the method.
- Calculate all the necessary values in the principal method and store them in instance variables. This way, we only have to do the calculations once, and we don’t have to pass anything to the helper methods:
getRight()
The last option is the most convenient and was originally my first choice for implementation. But it, too, has its drawbacks. After object construction, all those extra instance variables are not needed. For example, we don’t use them in the equals and hashCode methods, which might confuse the maintenance programmer and complicate serialization should we ever implement it. There’s another option that eliminates the disadvantages of all of the above:
- Write a private, static nested class to encapsulate all the transient calculations. As necessary, instantiate an object of the nested class, extract only the pertinent information (the color and rectangular bounds), and let everything else be garbage-collected once it is no longer needed.
I ultimately chose the above option. We’ll discuss it before proceeding with the remainder of the LineSegment class implementation.
⬛ LineSeg Infrastructure
Following is an annotated list of this class’s instance variables.
1 2 3 4 5 6 7 8 9 10 11 12 | private static class LineSeg { public final int rgb; public final Rectangle rect; private final BufferedImage image; private final int imageWidth; private final int imageHeight; private final int originXco; private final int originYco; // ... } |
- Lines 3,4: The data that define the encapsulated line:
- Line 3: The integer value of the encapsulated color with alpha bits stripped.
- Line 4: The rectangular bounds of the encapsulated line.
- Lines 5-9: Transient data is declared here for the convenience of helper methods. Typically calculated in a constructor, they are not used in every operation.
- Line 5: The image provided by the user.
- Lines 6,7: The width and height of the given image.
- Lines 8,9: The x- and y-coordinates of a point used to determine the bounding rectangle (line 4).
⬛ LineSeg Private Methods
The following sections discuss the LineSeg class’s private methods.
🟦 private int getRGB( int xco, int yco )
This method returns the integer color of the pixel at the given coordinates of the BufferedImage referenced by the instance variable image. The alpha bits are stripped. Before accessing the image, it tests the given coordinates against its bounds so the caller can safely pass out-of-bounds coordinates. If the coordinates are out-of-bounds, -1 is returned. Here’s the code.
private int getRGB( int xco, int yco )
{
    int rgb = -1;
    if (
        xco >= 0
        && xco < imageWidth
        && yco >= 0
        && yco < imageHeight
    )
        rgb = image.getRGB( xco, yco ) & 0xFFFFFF;
    return rgb;
}
🟦 private int limitYco( int testLimit )
🟦 private int limitXco( int testLimit )
These methods test the given value against the bounds of the encapsulated image. The limitXco method returns min(testLimit, imageWidth), and limitYco returns min(testLimit, imageHeight). Listings for these methods are in the GitHub repository.

🟦 private int getLeft()
🟦 private int getRight()
🟦 private int getTop()
🟦 private int getBottom()
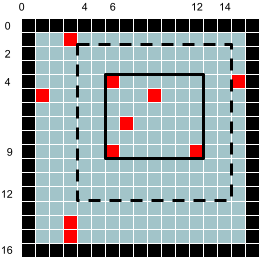
Given a starting point, these methods determine the smallest rectangle that contains the given point and all neighboring points of the same color. We generally expect all points within the computed rectangle to be the same color, but that is not guaranteed. “Neighboring points” consist of those with the same x-coordinate and those with the same y-coordinate as the starting point. Consider the raster shown at right. Starting from point (3,5), we would compute the bounding rectangle as x=1, y=1, width=10, and height=15. Following is a listing for getLeft. Implementing the other three methods is an exercise for the student; the solution can be found in the GitHub repository.
private int getLeft()
{
    int     xco     = originXco;
    int     yco     = originYco;
    int     testRGB = getRGB( xco - 1, yco );
    while ( xco > 0 && testRGB == rgb )
    {
        --xco;
        testRGB = getRGB( xco - 1, yco );
    }
    return xco;
}
⬛ LineSeg Constructors
As discussed below, the LineSeg class has two constructors.
🟦 public LineSeg( Point2D origin, BufferedImage image )
This constructor samples the color of the given image at the given coordinates. It calculates the bounding rectangle that contains consecutive points of the same color in horizontal and vertical directions. See also the comments at getLeft et al. above. Here’s the listing for this constructor.
public LineSeg( Point2D origin, BufferedImage image )
{
    this.image = image;
    this.originXco = (int)origin.getX();
    this.originYco = (int)origin.getY();
    imageWidth = image.getWidth();
    imageHeight = image.getHeight();
    rgb = image.getRGB( originXco, originYco ) & 0xffffff;

    int     left      = getLeft();
    int     right     = getRight();
    int     top       = getTop();
    int     bottom    = getBottom();
    int     width   = right - left + 1;
    int     height  = bottom - top + 1;
    rect = new Rectangle( left, top, width, height );
}
🟦 public LineSeg(BufferedImage image, int rgb, int leftLimit, int rightLimit, int topLimit, int bottomLimit)
Refer to the figure at right. Within the given limits of the given image (the rectangle with the dashed border), calculate the smallest rectangle (the one with the solid border) that encloses all pixels of the given color (rgb). For example, given the raster at right and the limits left=4, right=14, top=2, bottom=12, and rgb=0xFF0000, we would calculate the smallest bounding rectangle to be x=6, y=4, width=7, and height=6.
This constructor can be used to find the bounding rectangle for a label on the x- or y-axis. Suppose we have an x-axis at y=250 and a y-axis at x=325. If we choose our parameters carefully so that labels and lines don’t overlap, say:
- Grid unit: 100
- Major tic spacing: 1
- Major tic length: 20
- Grid lines: off (not drawn)
- Minor tics: off (not drawn)
- Grid background: white
- Text color: black

We know that there will be a vertical label centered horizontally at x=425 (y-axis + grid unit). The top of the label’s bounding rectangle will be greater than or equal to y=260 (x-axis + one-half the major tic length). The bottom of the bounding rectangle will be less than y=280 (the top of the rectangle + two times the font size). The left of the bounding rectangle will be greater than x=275, and the right will be less than x=475 (the x-coordinate of the tic mark plus/minus one-half the grid unit). Using this constructor with the raster at right and the above limits, we will get a bounding rectangle that exactly encloses the text of our label. The following is an annotated listing of this constructor.
1 2 3 4 5 6 7 8 9 10 11 12 13 14 15 16 17 18 19 20 21 22 23 24 25 26 27 28 29 30 31 32 33 34 35 36 37 38 39 40 41 42 43 44 45 46 47 48 49 50 51 | public LineSeg( BufferedImage image, int rgb, int leftLimit, int rightLimit, int topLimit, int bottomLimit ) { this.image = image; imageWidth = image.getWidth(); imageHeight = image.getHeight(); originXco = limitXco( leftLimit ); originYco = limitYco( topLimit ); this.rgb = rgb; int xEnd = limitXco( rightLimit ); int yEnd = limitYco( bottomLimit ); // These four variables will ultimately // describe the enclosing rectangle. int leftXco = Integer.MAX_VALUE; int rightXco = -1; int topYco = Integer.MAX_VALUE; int bottomYco = -1; for ( int xco = originXco ; xco <= xEnd ; ++xco ) for ( int yco = originYco ; yco <= yEnd ; ++yco ) { int testRGB = getRGB( xco, yco ); if ( testRGB == rgb ) { if ( xco < leftXco ) leftXco = xco; if ( xco > rightXco ) rightXco = xco; if ( yco < topYco ) topYco = yco; if ( yco > bottomYco ) bottomYco = yco; } } if ( leftXco >= 0 ) { int width = rightXco - leftXco + 1; int height = bottomYco - topYco + 1; rect = new Rectangle( leftXco, topYco, width, height ); } else rect = null; } |
- Line 2: The image to search.
- Line 3: The text color.
- Lines 4-7: The limits within the image to restrict the search.
- Lines 10-15: Initialize instance variables.
- Lines 13,14: Make sure the left and top limits of the search fall within the bounds of the image.
- Lines 17,18: Make sure the search’s right and bottom limits fall within the image’s bounds.
- Lines 22-25: Initialize search variables. When the following loops are complete (lines 27-42), these variables will hold the left, right, top, and bottom coordinates of the desired bounding rectangle.
- Lines 27-42: Traverse the search area from left to right and top to bottom.
- Line 30: Get the color of the pixel being traversed.
- Lines 31-41: If the pixel’s color is the same as the color of the text, determine if it is the leftmost, rightmost, topmost, or bottommost pixel found so far.
- Lines 43-50: If at least one pixel was found, construct the bounding rectangle; otherwise, set the bounding rectangle to null.
LineSegment Class Implementation
Next, we will discuss the details of implementing the LineSegment class.
⬛ LineSegment Class Infrastructure
As shown below, the LineSegment class has two instance variables and a private constructor. It has no helper methods.
🟦 Instance Variables
As shown below, the LineSegment class has two instance variables. The rectangle describes the bounds of the encapsulated line (upper-left corner, length, and width), and the integer describes its color.
public class LineSegment
{
    private final int           rgb;
    private final Rectangle2D   rect;
    // ...
🟦 Constructor: private LineSegment(Rectangle2D rect, int rgb)
We have one constructor for this class. It’s private and primarily for convenience. Also, because our instance variables can’t be initialized in their declarations, we need a constructor if we want them to be final, giving us immutable objects. (As previously discussed, final fields and immutable objects have many advantages. See 5 Benefits of Immutable Objects Worth Considering for Your Next Project on the HackerNoon website for some examples). The constructor looks like this:
private LineSegment( Rectangle2D rect, int rgb )
{
    this.rect = rect;
    this.rgb = rgb;
}
⏹ Public Methods
Following is a discussion of the LineSegment class’s public methods.
🟦 public static LineSegment of( Point2D origin, BufferedImage image )
This method creates an object that describes the line in an image that contains the given point. See also LineSeg(Point2D, BufferedImage) in the LineSeg class. The code for this method follows.
public static LineSegment of( Point2D origin, BufferedImage image )
{
    LineSeg     seg     = new LineSeg( origin, image );
    LineSegment segment = new LineSegment( seg.rect, seg.rgb );
    return segment;
}
🟦 public static LineSegment of( Rectangle2D rect, int rgb )
This method instantiates an object that encapsulates the given rectangle and color. It looks like this:
public static LineSegment of( Rectangle2D rect, int rgb )
{
    LineSegment segment = new LineSegment( rect, rgb );
    return segment;
}
🟦 public static LineSegment ofRect( Rectangle2D rect, BufferedImage image, int rgb )
Within the given rectangular area of the given image, find the smallest rectangle that encloses all points of the given color. See also LineSeg(BufferedImage, int, int , int, int, int) in the LineSeg class. The code follows.
public static LineSegment
ofRect( Rectangle2D rect, BufferedImage image, int rgb )
{
    LineSeg seg =
        new LineSeg(
            image,
            rgb,
            (int)rect.getMinX(),
            (int)rect.getMaxX(),
            (int)rect.getMinY(),
            (int)rect.getMaxY()
        );
    LineSegment lineSegment = new LineSegment( seg.rect, seg.rgb );
    return lineSegment;
}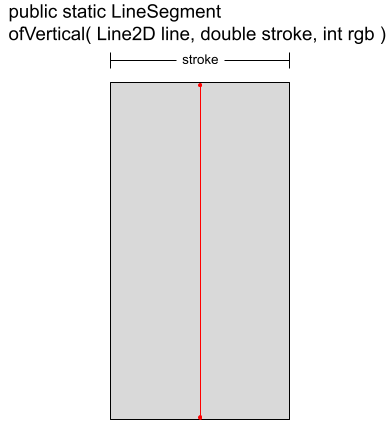
🟦 public static LineSegment ofVertical( Line2D line, double stroke, int rgb )
Creates a LineSegment object from the given data. If the given line has coordinates (lx, ly) and length len, the bounding rectangle will have coordinates (lx – stroke/2, ly), width stroke, and height len. This method can characterize a vertical line of a particular type we expect to find at a given location. Then, we can determine the actual LineSegment at the physical location in the image under test and compare it for equality with the expected data. For example:
Verify that major tic marks on the x-axis are drawn correctly.
Given:
    image = BufferedImage drawn using GraphManager
    line = (20, 30) to (20, 40)
    A major tic mark is expected to coincide with line
    Major tic marks have a stroke of 4
    Major tic marks have a color of red

LineSegment expSeg = LineSegment.ofVertical( line, 4, 0xff0000 );
LineSegment actSeg = LineSegment.of( line.getP1(), image );
assertEquals( expSeg, actSeg );
Here is a listing of the code for ofVertical.
public static
LineSegment ofVertical( Line2D line, double stroke, int rgb )
{
    double      lineXco     = line.getX1();
    double      lineYco     = line.getY1();
    double      length      = line.getY2() - lineYco;
    double      halfStroke  = stroke / 2;
    double      rectXco     = lineXco - halfStroke;
    double      rectYco     = lineYco;
    Rectangle2D rect        =
        new Rectangle2D.Double( rectXco, rectYco, stroke, length );
    LineSegment seg         = new LineSegment( rect, rgb );
    return seg;
}
🟦 public static LineSegment ofHorizontal( Line2D line, double stroke, int rgb )
This method is directly analogous to ofVertical. It creates a LineSegment object from the given data. If the given line has coordinates (lx, ly) and length len, the bounding rectangle will have coordinates (lx, ly – stroke/2), width len, and height stroke. The implementation is an exercise for the student. The solution can be found in the GitHub repository.
🟦 public Rectangle2D getBounds()
🟦 public int getColor()
As shown below, these are getters for the bounding rectangle and color of the LineSegment.
public Rectangle2D getBounds()
{
    return rect;
}
public int getColor()
{
    return rgb;
}
🟦 public boolean equivalentTo( Rectangle rect, int rgb )
The equivalentTo method returns true if this LineSegment encapsulates a bounding rectangle and color equal to the given values. It looks like this.
public boolean equivalentTo( Rectangle rect, int rgb )
{
    boolean result  = this.rect.equals( rect ) && this.rgb == rgb;
    return result;
}
🟦 public String toString()
The toString override produces a string representation of a LineSegment object formatted like this: x=0.0, y=487.0, width=450.0, height=6.0, xcolor=0x000ff0
This method exists for diagnostic purposes. The implementation follows.
@Override
public String toString()
{
    String          strColor    =
        String.format( "0x%06x", rgb );
    StringBuilder   bldr        = new StringBuilder();
    bldr.append( "x=" ).append( rect.getX() ).append( ", " );
    bldr.append( "y=" ).append( rect.getY() ).append( ", " );
    bldr.append( "width=" ).append( rect.getWidth() ).append( ", " );
    bldr.append( "height=" ).append( rect.getHeight() ).append( ", " );
    bldr.append( "xcolor=" ).append( strColor );
    return bldr.toString();
}
🟦 public boolean equals( Object other )
🟦 public int hashCode()
The equals method compares this LineSegment object to other for equality. This object and other are equal if other is a non-null LineSegment object with a bounding rectangle and color equal to this object’s. The hashCode method is overridden as required when overriding equals; it performs a simple hash of the two instance variables. Here’s the code for the equals and hashCode methods.
@Override
public int hashCode()
{
    int hash    = Objects.hash( rgb, rect );
    return hash;
}

@Override
public boolean equals( Object other )
{
    boolean result  = false;
    if ( other == null )
        ;
    else if ( this == other )
        result = true;
    else if ( !(other instanceof LineSegment) )
        ;
    else
    {
        LineSegment that    = (LineSegment)other;
        if ( !this.rect.equals( that.rect ) )
            ;
        else if ( this.rgb != that.rgb )
            ;
        else
            result = true;
    }
    return result;
}
Summary
On this page, we discussed the implementation of the LineSegment class, which will be used to support testing of the GridManager class. It encapsulates a line’s length, stroke, and color. It can look at a point inside a BufferedImage and tell us the dimensions and color of the line it is a part of (if any). It can also determine the rectangular bounds of text drawn inside a BufferedImage, which will help verify that the GraphManager correctly draws labels on a grid’s x- and y-axes. Next, we will, with the assistance of the LineSegment class and Tess4J, write the unit test for the GraphManager class.