This page will discuss the GraphManagerTest class, a JUnit test class for validating the GraphManager. As with many of our recent GUI-centric tests, we need a GUI support facility to assist us in managing the GUI and ensuring that tasks are executed on the EDT when necessary. We’ll start our discussion with the GraphManagerTestGUI. After that, we’ll talk about the inner class TestData, which will be used to manage data for our test class before going to GraphManagerTest.
Previous page: Cartesian Plane Lesson 18 Page 10: The LineSegment Class
GitHub repository: Cartesian Plane Lesson 18
Class GraphManagerTestGUI
Like the other test GUIs, this class will reside in the …cartesian_plane.test_utils package under the test source tree. Its main job is to ensure that GUI-related operations are executed on the EDT. It does all its drawing to a BufferedImage. The BufferedImage itself is displayed on the screen, principally for the benefit of a test observer. We’ll start by discussing the test GUI infrastructure before moving on to its public features.
GraphManagerTestGUI Infrastructure
Below, find a discussion of the private features of the GraphManagerTestGUI.
⬛ private class FBPanel extends JPanel
This nested class is a simple implementation of a JPanel to display the BufferedImage being drawn by the GraphManager under test. This JPanel doesn’t play a significant role in test validation. Its principal role is to provide feedback to a test observer, if any. Following is a listing of the nested class; the image, imageWidth, and imageHeight fields are declared in the outer class. See GraphManagerTestGUI Fields.
private class FBPanel extends JPanel
{
    public FBPanel()
    {
        Dimension   size    = new Dimension( imageWidth, imageHeight );
        setPreferredSize( size );
    }

    @Override
    public void paintComponent( Graphics graphics )
    {
        super.paintComponent( graphics );
        Graphics2D  gtx = (Graphics2D) graphics.create();
        graphics.setColor( Color.WHITE );
        graphics.fillRect( 0, 0, getWidth(), getHeight() );
        graphics.drawImage( image, 0, 0, this );

        gtx.dispose();
    }
}
⬛ GraphManagerTestGUI Fields
Following is an annotated discussion of the test GUI’s fields.
1 2 3 4 5 6 7 8 9 10 11 12 13 14 15 16 17 18 | public class GraphManagerTestGUI { private static final String title = "GraphManager Test GUI"; private final JFrame frame = new JFrame( title ); private final Profile profile; private final int imageWidth = 650; private final int imageHeight = 600; private final int imageType = BufferedImage.TYPE_INT_RGB; private BufferedImage image = new BufferedImage( imageWidth, imageHeight, imageType ); private final Rectangle2D imageRect = new Rectangle2D.Double( 0, 0, imageWidth, imageHeight ); private final GraphManager graphMgr; private final JPanel canvas = new FBPanel(); // ... } |
- Line 3: The title in the application frame that displays the feedback window (line 16).
- Line 5: The application frame that displays the feedback window for the benefit of test observers.
- Line 6: The Profile the test GUI shares with the GraphManager under test. It is supplied by the client when invoking this class’s constructor.
- Lines 8,9: The width and height of the BufferedImage managed by the GraphManager under test.
- Line 10: The type of the BufferedImage managed by the GraphManager under test; declared here for convenience.
- Lines 11,12: The BufferedImage managed by the GraphManager under test.
- Lines 13,14: The rectangle that bounds the working area within the BufferedImage managed by the GraphManager under test (see Constructor).
- Line 15: The GraphManager under test.
- Line 16: The feedback window that displays the BufferedImage for the benefit of test observers; see also private class FBPanel above.
⬛ Private Methods
Following is a discussion of the GraphManagerTestGUI’s helper methods.
🟦 private void executeGridProc( Runnable runner )
This method initiates a GraphManager task in the context of the EDT. First, it calls refresh on the GraphManager under test, then executes the given task. After the task is finished, it repaints the feedback object. The code looks like this.
private void executeGridProc( Runnable runner )
{
    GUIUtils.schedEDTAndWait( () -> {
        Graphics2D  gtx     = (Graphics2D)image.getGraphics();
        graphMgr.refresh( gtx, imageRect );
        runner.run();
        canvas.repaint();
    });
}
🟦 private void setProperty( Consumer<Object> consumer, Object prop )
🟦 private Object getProperty( Supplier<Object> supplier )
These methods work in the context of the EDT. The setProperty method sets the given property via the given consumer, and getProperty obtains a property via the given supplier. The listings for these methods follow.
private void setProperty( Consumer<Object> consumer, Object prop )
{
    GUIUtils.schedEDTAndWait( () -> consumer.accept( prop ) );
}
private Object getProperty( Supplier<Object> supplier )
{
    Object[]    obj     = new Object[1];
    GUIUtils.schedEDTAndWait(() -> obj[0] = supplier.get() );
    assertNotNull( obj[0] );
    return obj[0];
}
⬛ Constructor, Public Methods
The following section discusses the GraphManagerTestGUI’s public elements.
🟦 Constructor
The constructor is invoked with the main test class’s working profile and then shared with the GraphManager under test. It initializes the GraphManager under test and the feedback window. The constructor must be invoked in the context of the EDT. Here’s the code.
public GraphManagerTestGUI( Profile profile )
{
    this.profile = profile;
    graphMgr =  new GraphManager( imageRect, profile );
    frame.setDefaultCloseOperation( JFrame.EXIT_ON_CLOSE );

    JPanel  contentPane = new JPanel( new BorderLayout() );
    contentPane.add( canvas, BorderLayout.CENTER );

    frame.setContentPane( contentPane );
    frame.pack();
    frame.setVisible( true );
}
🟦 public BufferedImage drawBackground()
🟦 public BufferedImage drawAxes()
🟦 public BufferedImage drawMajorTics()
🟦 public BufferedImage drawMinorTics()
🟦 public BufferedImage drawGridLines()
🟦 public BufferedImage drawHorizontalLabels()
🟦 public BufferedImage drawVerticalLabels()
🟦 public BufferedImage drawText()
🟦 public BufferedImage drawAll()
These methods initiate a GraphManager task in the context of the EDT and return the resulting BufferedImage. The code for drawBackground follows. The remaining methods are analogous and can be found in the GitHub repository.
public BufferedImage drawBackground()
{
    executeGridProc( () -> graphMgr.drawBackground() );
    return image;
}
🟦 public void setGridUnit( float gridUnit )
🟦 public void setGridColor( Color color )
🟦 public void setGridFontSize( float size )
🟦 public void setGridFontName( String name )
🟦 public void setGridFontRGB( int rgb )
🟦 public void setGridDrawLabels( boolean draw )
All the above methods work in the context of the EDT. The setGridUnit method sets the grid unit property in the shared profile, while the others set a property in the shared profile’s GraphPropertySetMW. Note that the font color is set using an integer value, not a Color value (see setGridFontRGB in the listing below). The code for setGridUnit, setGridFontRGB, and setGridFontSize follows. The remaining methods are analogous and can be found in the GitHub repository.
public void setGridUnit( float gridUnit )
{
    setProperty( a -> profile.setGridUnit( (Float)a ), gridUnit );
}
public void setGridFontRGB( int rgb )
{
    GraphPropertySet    win     = profile.getMainWindow();
    Color               fgColor = new Color( rgb );
    setProperty( a -> win.setFGColor( (Color)a ), fgColor );
}
public void setGridFontSize( float size )
{
    GraphPropertySet    win = profile.getMainWindow();
    setProperty( a -> win.setFontSize( (float)a ), size );
}
🟦 public boolean getLineHasLength( String propSet )
Working in the context of the EDT, this method gets the has-length property for the named line property set. It looks like this:
public boolean getLineHasLength( String propSet )
{
    LinePropertySet set     = profile.getLinePropertySet( propSet );
    Object          val     = getProperty( () -> set.hasLength() );
    assertTrue( val instanceof Boolean );
    boolean         draw    = (boolean)val;
    return draw;
}
🟦 public void setLineDraw( String propSet, boolean draw )
🟦 public void setLineStroke( String propSet, float stroke )
🟦 public void setLineLength( String propSet, float length )
🟦 public void setLineSpacing( String propSet, float spacing )
🟦 public void setLineColor( String propSet, Color color )
In the context of the EDT, each method sets the property of a line in the named LinePropertySet. The code for setLineDraw follows. The remaining methods are analogous and can be found in the GitHub repository.
public void setLineDraw( String propSet, boolean draw )
{
    LinePropertySet set = profile.getLinePropertySet( propSet );
    assertNotNull( set );
    setProperty( a -> set.setDraw( (Boolean)a ), draw );
}
🟦 public void invokeResetProfile()
Working in the context of the EDT, this method calls the resetProfile method in the GraphManager under test. It looks like this.
public void invokeResetProfile()
{
    GUIUtils.schedEDTAndWait( graphMgr::resetProfile );
}
Class TestData
TestData is a static nested class in GraphManagerTest that organizes test data. It has instance variables for the graph and line properties listed below; since only one type of line will be tested at a time, there are instance variables for only one LinePropertySet.
- The grid unit from the Profile.
- The font color from the Profile’s main window property set.
- The grid color from the Profile’s main window property set.
- The name of a LinePropertySet.
- The spacing (lines per unit) associated with the named LinePropertySet.
- The length associated with the named LinePropertySet.
- The stroke associated with the named LinePropertySet.
- The color associated with the named LinePropertySet.
Each property in the class can be initialized to one of two distinct values. Values for any two properties of the same type (for example, grid color and line color) are chosen, as much as possible, to be distinct. Property values are selected to be “reasonable” (see below). Property test values are determined by calling this class’s initTestData(int) method; its initProfile(String) method transfers test data to the working profile.
⬛ Class TestData Fields
The following is an annotated list of this class’s fields. While looking at the numbers, remember that the drawing area is 650×600 (see GraphManagerTestGUI Fields). The figure (below, right) shows an example of what lines look like when drawn in our test environment using the two sets of test data; the axes are not displayed.
1 2 3 4 5 6 7 8 9 10 11 12 13 14 15 16 17 18 19 20 | private static class TestData { private static final float GPU = 100; private static final int FONT_RGB = 0x000008; private static final int GRID_RGB = 0xEEEEEE; private static final float LPU = 2; private static final float LENGTH = 20; private static final float STROKE = 4; private static final int LINE_RGB = 0x00000F; public String lineSet; public float gpu; public int fontRGB; public int gridRGB; public Color gridColor; public float lpu; public float length; public float stroke; public int lineRGB; public Color lineColor; |
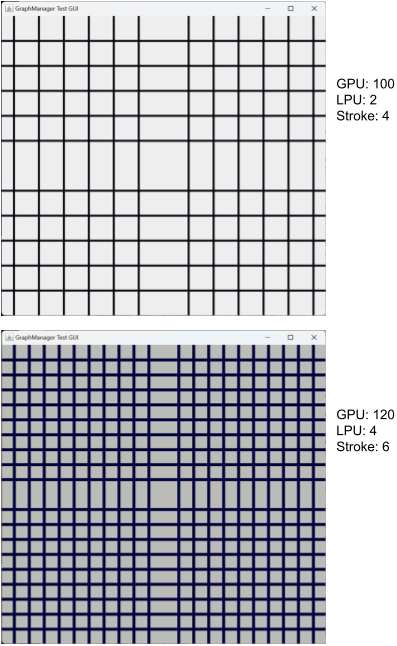
- Line 3: This is the primary grid unit value; the alternative is GPU + 20. See initTestData.
- Line 4: This is the primary text color; the alternative is FONT_RGB << 2. These dark colors contrast well with the possible grid colors (line 5). See initTestData.
- Line 5: This is the primary grid color, with an alternative value of GRID_RGB << 2. These are light colors that contrast well with the font and line colors. See initTestData.
- Line 6: The primary line spacing property value; the alternative is LPU + 2. See initTestData.
- Line 7: The primary line length propert6 value; the alternative is LENGTH + 10.
- Line 8: The primary line weight property value; the alternative is STROKE + 2. See initTestData.
- Line 9: The primary line color; the alternative is LINE_RGB << 2. These dark colors contrast well with the possible grid colors (line 5). See initTestData.
- Line 11: The name of the associated LinePropertySet (LinePropertySetGridLines, LinePropertysetTicMajor, etc.) for this TestData instance. See initProfile.
- Lines 13,14: The grid and font RGB values for this TestData instance.
- Line 15: The grid color for this TestData instance It is derived from gridRGB (line 14). See initTestData.
- Line 16: The lines-per-unit value of the given LinePropertySet. See initTestData.
- Line 17: The line-length value of the given LinePropertySet. See initTestData.
- Line 18: The stroke (weight) value of the given LinePropertySet. See initTestData.
- Line 19: The RGB value of the given LinePropertySet’s line color property. See initTestData.
- Line 20: The line color, derived from lineRGB line 19. See initTestData.
⬛ Class TestData Methods
The TestData class has two methods, as shown below.
🟦 public void initTestData( int dataSet )
This method determines which set of test data is to be configured. If the parameter’s value is 1, we use the alternative test data values; otherwise, we use the primary values (see Class TestData Fields). Here’s the code.
public void initTestData( int dataSet )
{
    fontRGB = FONT_RGB;
    gridRGB = GRID_RGB;
    gridColor = new Color( gridRGB );
    gpu = GPU;
    lpu = LPU;
    length = LENGTH;
    stroke = STROKE;
    lineRGB = LINE_RGB;
    lineColor = new Color( lineRGB );
    if ( dataSet == 1 )
    {
        fontRGB = (fontRGB << 2) & 0xFFFFFF;
        gridRGB = (gridRGB << 2) & 0xFFFFFF;
        gridColor = new Color( gridRGB );
        gpu += 20;
        lpu += 2;
        length += 10;
        stroke += 2;
        lineRGB = (lineRGB << 2) & 0xFFFFFF;
        lineColor = new Color( lineRGB );
    }
}
🟦 public void initProfile( String propSet )
This method copies the configured test data into the working profile. The parameter is the name of the LinePropertySet to update. The code looks like this.
public void initProfile( String propSet )
{
    lineSet = propSet;
    testGUI.setGridUnit( gpu );
    testGUI.setGridColor( gridColor );
    testGUI.setGridFontRGB( fontRGB );
    testGUI.setLineSpacing( propSet, lpu );
    testGUI.setLineStroke( propSet, stroke );
    testGUI.setLineLength( propSet, length );
    testGUI.setLineColor( propSet, lineColor );
    testGUI.setLineDraw( propSet, true );
}
Class GraphManagerTest
Our primary focus for this test is to verify that:
- The various components of the grid under the GraphManager’s control are drawn when required, and
- The components of the grid are drawn correctly,
“Various components” refers to horizontal and vertical lines in the tic major, tic minor, grid lines, and axes categories, and the labels drawn on the horizontal and vertical major tic marks.
GraphManagerTest Infrastructure
The following section discusses the GraphManagerTest class’s fields and private methods.
⬛ GraphManagerTest Fields
Following is an annotated list of the class’s fields.
1 2 3 4 5 6 7 8 9 10 11 12 13 14 15 16 17 18 19 20 21 22 23 24 25 26 27 28 29 30 31 32 33 34 35 36 37 38 39 | public class GraphManagerTest { private static final int defImgWidth = 300; private static final int defImgHeight = 400; private static final int defImgType = BufferedImage.TYPE_INT_RGB; private static final String AXES = LinePropertySetAxes.class.getSimpleName(); private static final String GRID_LINES = LinePropertySetGridLines.class.getSimpleName(); private static final String TIC_MAJOR = LinePropertySetTicMajor.class.getSimpleName(); private static final String TIC_MINOR = LinePropertySetTicMinor.class.getSimpleName(); private static final float tessScaleFactor = Tess4JConfig.getScaleFactor(); private static final float tessFontSize = Tess4JConfig.getFontSize(); private static final String tessFontName = Tess4JConfig.getFontName(); private static final float tessGPU = Tess4JConfig.getGPU(); private static final float tessLPU = 2; private static final int tessRGB = 0x000000; private final Tesseract tesseract = Tess4JConfig.getTesseract(); private static final Profile baseProfile = new Profile(); private static final Profile workingProfile = new Profile(); private static GraphManagerTestGUI testGUI; private BufferedImage workingImage; private Rectangle workingRect; private TestData testData = new TestData(); // ... } |
- Lines 3-6: These are the default values for constructing an image. Most of the test methods utilize the image managed by the test GUI, but two need custom-made images and bounding rectangles; see testGraphManagerProfile and testGraphManagerRectProfile. The fields are used in the private method prepareRectTest, which encapsulates the common code for the test methods cited above.
- Lines 8-15: Declarations of the simple class names of the LinePropertySet subclasses.
- Lines 17-22: Declarations of font configuration parameters when running a test utilizing the Tess4J API.
- Lines 24-26: Test configuration parameters for Tess4J tests: the grid unit, line spacing, and text color.
- Lines 28,29: This is the Tesseract object for tests utilizing the Tesss4J API.
- Line 30: Profile to encapsulate the properties supplied by the PropertyManager at the start of the test. The properties in the Profile are never modified. The Profile is used to restore PropertyManager values in the BeforeEach method.
- Line 31: Profile to be used as needed by individual test methods. It is restored to initial values in the BeforeEach method.
- Line 32: Test GUI. Initialized in the BeforeAll method.
- Line 34: The BufferedImage managed by the test GUI.
- Line 35: Rectangle within the workingImage that contains the graph managed by the test GUI.
- Line 37: Test data for the current test. Each test method configures this object with the necessary test data.
⬛ BeforeEach, BeforeAll Methods
The BeforeAll method is executed once, before the start of the first test. It initializes the test GUI in the context of the EDT. The BeforeEach method resets the PropertyManager and workingProfile fields to their initial values before every test. They look like this:
@BeforeAll
public static void beforeAll()
{
    GUIUtils.schedEDTAndWait(
        () -> testGUI = new GraphManagerTestGUI( workingProfile )
    );
}
@BeforeEach
public void beforeEach()
{
    baseProfile.apply();
    workingProfile.reset();
    testData.initTestData( 0 );
}
⬛ GraphManagerTest Private Methods
The next section will examine the GraphManagerTest class’s helper methods.
🟦 private void prepareRectTest()
Creates an image and a rectangle; references to both are stored in instance variables. The rectangle fits inside the image, leaving a margin on all four sides. The image is filled with the font color, which is guaranteed to be different from the background color. The image and rectangle can now be used to interface with a GraphManager instance. We expect that any drawing by the GraphManager will be restricted to the rectangular bounds within the image. The code looks like this:
private void prepareRectTest()
{
    workingImage =
        new BufferedImage( defImgWidth, defImgHeight, defImgType );
    int             rectXco         = 10;
    int             rectYco         = rectXco + 5;
    int             right           = rectYco + 5;
    int             bottom          = right + 5;
    int             rectWidth       = defImgWidth - rectXco - right;
    int             rectHeight      = defImgHeight - rectYco - bottom;
    workingRect =
        new Rectangle( rectXco, rectYco, rectWidth, rectHeight );
    int             intFG           = testData.fontRGB;
    for ( int row = 0 ; row < defImgHeight ; ++row )
        for ( int col = 0 ; col < defImgWidth ; ++col )
            workingImage.setRGB( col, row, intFG );
}
🟦 private boolean hasLabel( Rectangle rect )
This method verifies that text has been drawn inside the given bounds within the working image. Verification passes if at least one pixel equal to tessRGB is found within the given bounds. An example of its use might be:
- Tell the GraphManager to draw the vertical labels.
- Calculate the position of the first major tic mark on the x-axis.
- Configure a rectangle that describes the space immediately below the tic mark.
- Invoke hasLabel to verify that the described rectangle contains pixels with the expected text color.
Here’s the code for the hasLabel method..
private boolean hasLabel( Rectangle rect )
{
    boolean result  = false;
    int     maxXco  = rect.x + rect.width;
    int     maxYco  = rect.y + rect.height;
    for ( int xco = rect.x ; xco < maxXco ; ++xco )
        for ( int yco = rect.y ; yco < maxYco ; ++yco )
        {
            int rgb = workingImage.getRGB( xco, yco ) & 0xFFFFFF;
            if ( rgb == tessRGB )
                result = true;
        }
    return result;
}
🟦 private void drawAllConfigProfile()
This is a companion method to testDrawAll. It configures the workingProfile properties as required by another companion method, drawAllHasLine. An annotated listing for this method follows; see also figure Test drawAll Strategy below.
1 2 3 4 5 6 7 8 9 10 11 12 13 14 15 16 17 18 19 20 21 22 23 24 25 26 27 28 29 30 31 32 33 34 35 36 37 38 39 40 | private void drawAllConfigProfile() { final int strokeAll = 3; final int ticMinorLen = 10; final int ticMajorLen = 2 * ticMinorLen; final int ticMinorLPU = 4; final int ticMajorLPU = 2; final int gridLineLPU = 1; final int gpu = 100; workingImage = testGUI.getImage(); int gridWidth = workingImage.getWidth(); int gridHeight = workingImage.getHeight(); assertTrue( gridWidth > 2 * gpu ); assertTrue( gridHeight > 2 * gpu ); assertTrue( ticMajorLen < gridWidth / 4 ); assertTrue( ticMajorLen < gridHeight / 4 ); assertTrue( ticMajorLen >= 2 * ticMinorLen ); assertTrue( (gpu / ticMinorLPU) > strokeAll ); LinePropertySet axesSet = workingProfile.getLinePropertySet( AXES ); LinePropertySet gridLinesSet = workingProfile.getLinePropertySet( GRID_LINES ); LinePropertySet ticMajorSet = workingProfile.getLinePropertySet( TIC_MAJOR ); LinePropertySet ticMinorSet = workingProfile.getLinePropertySet( TIC_MINOR ); Stream.of( axesSet, gridLinesSet, ticMajorSet, ticMinorSet ) .forEach( s -> s.setStroke( strokeAll ) ); ticMinorSet.setSpacing( ticMinorLPU ); ticMajorSet.setSpacing( ticMajorLPU ); gridLinesSet.setSpacing( gridLineLPU ); ticMajorSet.setLength( ticMajorLen ); ticMinorSet.setLength( ticMinorLen ); workingProfile.setGridUnit( gpu ); } |
- Lines 3-9: Declare all magic numbers in a place where the maintenance programmer can find/compare them. With these specific values, we are trying to accomplish the following:
- We want a minimum of two grid lines, major tic marks, and minor tic marks visible between the y-axis and the right edge of the grid and between the x-axis and the top of the grid.
- We want at least one minor tic mark:
- Between the y-axis and the first major tic mark to the right of the y-axis and
- Between the x-axis and the first major tic mark above the x-axis.
- Lines 11-13: Get the dimensions of the working image.
- Lines 15-20: Sanity check:
- Lines 15,16: Make sure the grid width and height are large enough to contain two grid units; with the grid line LPU set at one and the tic LPUs greater than one, there will be at least two major tic marks, minor tic marks, and grid lines on each of the axes.
- Lines 17,18: This is for validating grid lines and axes. Verify that vertical tic marks do not extend into the grid’s upper quarter and horizontal tic marks do not extend into the grid’s right quarter. Now, if we choose a pixel in the upper or right quarters of the grid, we know that it may correspond to a grid line or axis but will not correspond to a tic mark.
- Lines 19,20: This is for validating tic marks. It verifies that we can select a pixel at the top or right of a major tic mark that does not also lie on a minor tic mark.

Given:
validating major tic marks
x-axis y-coordinate = 300
y-axis x-coordinate = 200
major tic length = 20
major tic lpu = 2
grid unit (GPU) = 100
Expected: there is a vertical tic mark 50 pixels to the right of the y-axis (y-axis + GPU ÷ lpu = 200 + 100 ÷ 2 = 250).
Expected: the vertical tic mark extends 10 pixels above the x-axis (y=290) and 10 pixels below the x-axis (y=310).
Expected: there should be a pixel with a value equal to the current line color with x-coordinate = 250, and y-coordinate = 281 (x-axis – length ÷ 2 + 1).
- Lines 22-29: Get the working Profile’s encapsulated LinePropertySets.
- Lines 31,32: Set the stroke (weight) of all line categories to the same value.
- Lines 34-36: Set the LPU for all line categories.
- Lines 37,38: Set the length values of the major and minor tics.
- Line 39: Set the GPU property in the working Profile.
🟦 private boolean drawAllHasLine( LinePropertySet propSet )
This is a companion method to testDrawAll. It returns true if the category of line represented by propSet has at least one horizontal and one vertical line. An annotated listing for this method follows. For a discussion of configuration parameters, see drawAllConfigProfile.
1 2 3 4 5 6 7 8 9 10 11 12 13 14 15 16 17 18 19 20 21 22 23 | private boolean drawAllHasLine( LinePropertySet propSet ) { float gridUnit = workingProfile.getGridUnit(); int width = workingImage.getWidth(); int height = workingImage.getHeight(); float xAxisYco = height / 2; float yAxisXco = width / 2; float lineOffset = propSet.hasSpacing() ? gridUnit / propSet.getSpacing() : 0; float testOffset = propSet.hasLength() ? propSet.getLength() / 2 - 1 : gridUnit * .6667f; Color color = propSet.getColor(); int expColor = color.getRGB() & 0xffffff; int vXco = (int)(yAxisXco + lineOffset); int vYco = (int)(xAxisYco - testOffset); int vPoint = workingImage.getRGB( vXco, vYco ) & 0xFFFFFF; int hXco = (int)(yAxisXco + testOffset); int hYco = (int)(xAxisYco - lineOffset); int hPoint = workingImage.getRGB( hXco, hYco ) & 0xFFFFFF; boolean result = expColor == vPoint && expColor == hPoint; return result; } |
- Line 3: Get the current GPU.
- Lines 4,5: Get the width and height of the working image.
- Lines 6,7: Get the y-coordinate of the x-axis and the x-coordinate of the y-axis.
- Lines 8,9: Get the expected offset from the axes for a line. If there is no line spacing, we’re working on the axes, and the offset will be 0. Otherwise, it will be GPU ÷ LPU.
- Lines 10,11: Get the offset from the center of the expected line to the test point. For a tic, this is half the length – 1; for the grid lines and axes, it is two-thirds of a grid unit (two-thirds of a grid unit will not be coincident with another grid line or tic mark since those lines have a spacing of 1, 2, and 4 LPUs).
- Lines 12,13: Get the integer value of the expected color of the line being tested.
- Lines 14,15: Get the coordinates of a test point for a vertical line:
- x = y-axis + lineOffset
- y = x-axis – testOffset
- Line 16: Get the value of the vertical line test point from the working image.
- Lines 17,18: Get the coordinates of a test point for a horizontal line:
- x = y-axis + testOffset
- y = x-axis – lineOffset
- Line 19: Get the value of the vertical line test point from the working image.
- Line 21: Determine whether the actual color of the vertical and horizontal test points equals the expected color.
- Line 22: Return the result.
🟦 private Rectangle2D getBoundingRectangle()
Generate a bounding rectangle that describes the working image. The code follows.
private Rectangle2D getBoundingRectangle()
{
    int         width   = workingImage.getWidth();
    int         height  = workingImage.getHeight();
    Rectangle2D rect    =
        new Rectangle2D.Double( 0, 0, width, height );
    return rect;
}
🟦 private LineGenerator getLineGenerator( int orientation )
This method instantiates a LineGenerator. The caller passes the type of lines to generate (HORIZONTAL, VERTICAL, or BOTH). The working image and currently configured test data determine the remaining parameters. The code looks like this.
private LineGenerator getLineGenerator( int orientation )
{
    boolean hasLength   = testGUI.getLineHasLength( testData.lineSet );
    float   length      = hasLength ? testData.length : -1;

    LineGenerator   lineGen = new LineGenerator(
        getBoundingRectangle(),
        testData.gpu,
        testData.lpu,
        length,
        orientation
    );
    return lineGen;
}
🟦 private void testNoLines( String propSet, Supplier<BufferedImage> getter )
This method verifies that no lines in a given category are drawn when its property set’s draw property is false. See testNoGridLines for an example of how this method is used. Here is an annotated listing for this method.
1 2 3 4 5 6 7 8 9 10 11 12 13 14 15 16 17 18 19 20 | private void testNoLines( String propSet, Supplier<BufferedImage> getter ) { testData.initProfile( propSet ); testGUI.setLineDraw( propSet, false ); workingImage = getter.get(); LineGenerator lineGen = getLineGenerator( LineGenerator.BOTH ); Iterator<Line2D> iter = lineGen.iterator(); assertTrue( iter.hasNext() ); for ( Line2D line : lineGen ) { int xco = (int)line.getX1(); int yco = (int)line.getY1(); int actRGB = workingImage.getRGB( xco, yco ) & 0xffffff; assertEquals( testData.gridRGB, actRGB ); } } |
- Lines 1,2: The caller passes the LinePropertySet for the category of lines to test, and a Supplier that invokes the method in the test GUI that draws those lines. For example:
testNoLines( GRID_LINES, testGUI::drawGridLines ); - Line 4: Initialize the working profile for the category of lines under test.
- Line 5: Reset the draw property for the category of lines under test.
- Line 6: Tell the GraphManager managed by the test GUI to draw the given category of lines and return the resulting BufferedImage.
- Lines 8,9: Get a LineGenerator that generates horizontal and vertical lines for the given property set.
- Line 10: Get an iterator for the horizontal and vertical lines generated by the LineGenerator.
- Line 11: Sanity check; verify that at least one line was generated.
- Lines 12-19: Verify that none of the generated lines are present in the working image:
- Lines 14,15: Get the coordinates of the first endpoint of the expected line.
- Lines 16,17: Get the pixel’s value at those coordinates in the working image.
- Line 18: Verify that the pixel in the working image is the same as the grid color (i.e., there’s no line at that position).
🟦 private void testDrawAxesInternal()
This is a companion method to testDrawAxes. It verifies that, given the currently configured test data, the GraphManager under test correctly draws the x- and y-axes. The following is an annotated listing of this method.
1 2 3 4 5 6 7 8 9 10 11 12 13 14 15 16 17 18 19 20 21 22 23 24 25 26 27 28 29 30 31 32 33 34 | private void testDrawAxesInternal() { workingImage = testGUI.drawAxes(); Rectangle2D rect = getBoundingRectangle(); Iterator<Line2D> iter = LineGenerator.axesIterator( rect ); Line2D line1 = iter.next(); Line2D line2 = iter.next(); Line2D expXAxis = null; Line2D expYAxis = null; if ( line1.getY1() == line1.getY2() ) { expXAxis = line1; expYAxis = line2; } else { expXAxis = line2; expYAxis = line1; } float stroke = testData.stroke; int rgb = testData.lineRGB; LineSegment expSegX = LineSegment.ofHorizontal( expXAxis, stroke, rgb ); LineSegment expSegY = LineSegment.ofVertical( expYAxis, stroke, rgb ); LineSegment actSegX = LineSegment.of( expXAxis.getP1(), workingImage ); LineSegment actSegY = LineSegment.of( expYAxis.getP1(), workingImage ); assertEquals( expSegX, actSegX ); assertEquals( expSegY, actSegY ); } |
- Line 3: Invoke the test GUI to draw the axes in the working image.
- Line 4: Get a bounding rectangle for the working image.
- Lines 5,6: Get a LineGenerator for axes drawn in the given rectangle.
- Lines 7,8: Get the two lines produced by the LineGenerator.
- Lines 9-20: Determine which of the two lines is the x-axis and which is the y-axis.
- Lines 22,23: Get the expected stroke and line color from the test data.
- Lines 24-27: Create LineSegments that encapsulate the axes’ expected coordinates, dimensions, and color.
- Lines 28-31: Create LineSegments that encapsulate the axes’ actual coordinates, dimensions, and color in the working image.
- Lines 32,33: Verify the expected data against the actual data.
🟦 private void testVerticalLines()
Verify that the working image contains all the expected vertical lines for the currently configured test data. The following is an annotated listing for this method.
1 2 3 4 5 6 7 8 9 10 11 12 13 14 15 | private void testVerticalLines() { LineGenerator lineGen = getLineGenerator( LineGenerator.VERTICAL ); float testStroke = testData.stroke; int testRGB = testData.lineRGB; for ( Line2D line : lineGen ) { LineSegment expSeg = LineSegment.ofVertical( line, testStroke, testRGB ); LineSegment actSeg = LineSegment.of( line.getP1(), workingImage ); assertEquals( expSeg, actSeg ); } } |
- Lines 3,4: Get a LineGenerator to generate vertical lines for the LinePropertySet configured in the test data.
- Lines 5,6: Get the stroke and color configured in the test data.
- Lines 7-14: For each generated line:
- Lines 9,10: Create a vertical LineSegment from the given line, stroke, and color.
- Lines 11,12: Generate the actual LineSegment found at the expected coordinates in the working image.
- Line 13: Verify that the two LineSegments are equal.
🟦 private void testHorizontalLines()
Verify that the working image contains all the expected horizontal lines for the currently configured test data. This method’s implementation is directly analogous to testVerticalLines. Its completion is an exercise for the student. The solution is in the GitHub repository.
🟦 private boolean hasLabel( Rectangle rect )
This method returns true if the working image contains a label within the given bounds. The label is deemed present if the bounded area includes at least one pixel with the expected text color determined by the currently configured test data. For an example of how it is used, see hasHorizontalLabel. Here’s a listing of this method.
private boolean hasLabel( Rectangle rect )
{
boolean result = false;
int maxXco = rect.x + rect.width;
int maxYco = rect.y + rect.height;
for ( int xco = rect.x ; xco < maxXco ; ++xco )
for ( int yco = rect.y ; yco < maxYco ; ++yco )
{
int rgb = workingImage.getRGB( xco, yco ) & 0xFFFFFF;
if ( rgb == tessRGB )
result = true;
}
return result;
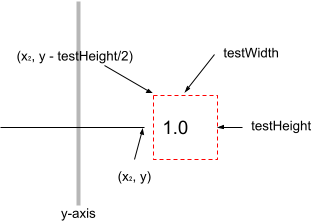
}🟦 private void hasHorizontalLabel()
Verify that the working image contains a label on at least one of the horizontal lines described by the currently configured test data. An annotated listing of this method follows. See also hasLabel above.
1 2 3 4 5 6 7 8 9 10 11 12 13 14 15 16 17 | private boolean hasHorizontalLabel() { LineGenerator lineGen = getLineGenerator( LineGenerator.HORIZONTAL ); Iterator<Line2D> iter = lineGen.iterator(); assertTrue( iter.hasNext() ); Line2D line = iter.next(); int testWidth = 20; int testHeight = 20; int xco = (int)line.getX2(); int yco = (int)(line.getY1() - testHeight / 2); Rectangle rect = new Rectangle( xco, yco, testWidth, testHeight ); boolean result = hasLabel( rect ); return result; } |
- Line 3,4: Get a LineGenerator for the horizontal lines described by the currently configured test data.
- Line 5: Get an iterator from the LineGenerator.
- Line 6: Sanity check: verify that the iterator produces at least one line.
- Line 8: Get a horizontal line from the iterator.
- Lines 9,10: Assume the label will be found within 20 pixels of the second endpoint of the line.
- Line 11: Set the x-coordinate of a bounding rectangle to the x-coordinate of the second endpoint of the line.
- Line 12: Set the y-coordinate of the bounding rectangle to the y-coordinate of the second endpoint of the line.
- Lines 13,14: Generate a rectangle that encloses the area where we expect a label to be found.
- Line 15: Determine if a label lies at least partly inside the generated rectangle (see also hasLabel).
🟦 private void hasVerticalLabel()
Verify that the working image contains a label on at least one of the horizontal lines described by the currently configured test data. This method’s implementation is directly analogous to hasHorizontalLabel. Its completion is an exercise for the student. The solution is in the GitHub repository.
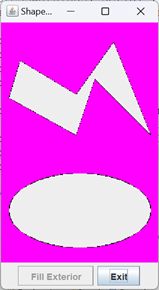

Digression: The Shape Interface
The Shape interface allows you to determine the boundaries of a geometric shape. Classes that implement Shape include Rectangle2D, Ellipse2D, Arc2D, and Polygon. The application ShapeDemo from the project sandbox provides an example of its use. The application window displays an ellipse and an irregular polygon. When you press the “Fill Exterior” button at the bottom of the window everything outside the two figures is filled with a new color. The relevant code looks like this:
private static class DemoPanel extends JPanel
{
    private final Shape         shape1;
    private final Shape         shape2;
    // ...
    public DemoPanel()
    {
        shape1 = getPolygon();
        shape2 = getEllipse();
        // ...
    }
    // ...
    public void fillExterior()
    {
        int rgb = extFill.getRGB() & 0xffffff;
        for ( int row = 0 ; row < imageHeight ; ++row )
            for ( int col = 0 ; col < imageWidth ; ++col )
                if ( !shape1.contains( col, row ) &&
                    !shape2.contains( col, row )
                )
                    image.setRGB( col, row, rgb );
    }
}
🟦 private List<Float> getExpectedHorizontalLabels()
Given the currently configured test data, this method compiles a list of values we expect to find displayed on the horizontal tic marks in the working image. Values in the list are ordered from highest to lowest (top to bottom on the y-axis). Find an annotated listing of this method below.
1 2 3 4 5 6 7 8 9 10 11 12 13 14 15 | private List<Float> getExpectedHorizontalLabels() { List<Float> list = new LinkedList<>(); float spacing = testData.gpu / testData.lpu; float xAxis = workingImage.getHeight() / 2; int xier = 1; for ( float mark = xAxis - spacing ; mark > 0 ; mark -= spacing ) { float val = xier++ / testData.lpu; list.add( 0, val ); list.add( -val ); } return list; } |

- Line 3: Create the list we will populate and return. We used a LinkedList instead of an ArrayList because we will be adding elements to the top of the list (line 11), and LinkedLists are generally better for that type of operation.*
- Line 4: Calculate the spacing between tic marks.
- Line 5: Calculate the y-coordinate of the x-axis.
- Lines 7-13: Populate the list:
- Line 8: Run a for loop:
- a) Begin at the y-coordinate of the first tic mark above the x-axis (float mark = xAxis – spacing);
- b) Calculate the y-coordinate of the next tic mark above the current tic mark (mark -= spacing);
- c) Continue until the calculated y-coordinate reaches 0 (mark > 0).
- Line 10: Calculate the unit value of the n
th tic mark above the x-axis. - Line 11: Add the unit value of the tic mark to the top of the list.
- Line 12: Add the corresponding unit value of the n
th tic mark below the x-axis to the bottom of the list. - Line 14: Return the list.
- Line 8: Run a for loop:
*More thought needs to go into an implementation decision like this. For example, later in our code, we will traverse the list from top to bottom, and an ArrayList is better for sequential access. And, is it worth the worry for a list of ten elements? In this case, the main advantage is that it allows us to discuss implementation choices for interface types. See Difference Between ArrayList and LinkedList on the Javatpoint website. For a big-O discussion, see When to use LinkedList over ArrayList in Java on the Stack Overflow website.
🟦 private List<Float> getExpectedVerticalLabels()
Given the currently configured test data, this method compiles a list of values we expect to find displayed on the vertical tic marks in the working image. Values in the list are ordered from lowest to highest (left to right on the x-axis). The implementation of this method is directly analogous to that of getExpectedHorizontalLabels and is an exercise for the student. The solution is in the GitHub repository.
🟦 private List<Float> parseFloats( String string )
Given a string formatted with decimal values separated by whitespace (e.g. "-2.0 -1.0 0.0 1.0 2.0"), this method converts the string to a list of type Float and returns the list. If a parse error is detected during conversion, the process prints a diagnostic to stderr and continues trying to parse the remaining tokens in the string. For an example of how parseFloats is used, see getLabels. Following is the code for this method.
private List<Float> parseFloats( String string )
{
    List<Float>     list    = new ArrayList<>();
    String[]        tokens  = string.split( "\\s" );
    for ( String token : tokens )
    {
        try
        {
            float   val = Float.parseFloat( token );
            list.add( val );
        }
        catch ( NumberFormatException exc )
        {
            String  msg = "OCR parse failure; token = " + token;
            System.err.println( msg );
        }
    }
    return list;
}
🟦 private List<Float> getLabels()
The getLabels method uses the Tess4J API to read all the labels from the working image. The labels on the vertical and horizontal tic marks are expected to be tested separately and will not both be present in the image under test. Before analyzing the image with Tess4J, the image is scaled to improve the analysis’s results. To scale the image, we will use Image.getScaledInstance
*For more about image scaling, see Image Scaling and Affine Transformations on Page 9: Optical Character Recognition of this lesson, and application ScalingDemo1 in the project sandbox.
1 2 3 4 5 6 7 8 9 10 11 12 13 14 15 16 17 18 19 20 21 22 23 24 25 26 27 28 29 30 31 32 33 | private List<Float> getLabels() { List<Float> list = null; int scaledWidth = (int)(workingImage.getWidth() * tessScaleFactor + .5); int scaledHeight = (int)(workingImage.getHeight() * tessScaleFactor + .5); int scaledType = workingImage.getType(); BufferedImage scaledImage = new BufferedImage( scaledWidth, scaledHeight, scaledType ); Image image = workingImage.getScaledInstance( scaledWidth, scaledHeight, Image.SCALE_REPLICATE ); Graphics2D gtx = scaledImage.createGraphics(); gtx.drawImage( image, 0, 0, null ); try { String tessStr = tesseract.doOCR( scaledImage ); list = parseFloats( tessStr ); } catch ( TesseractException exc ) { String message = "Fatal Tesseract error"; fail( message, exc ); } return list; } |
- Line 3: Declare the list that will be returned to the caller. The list is instantiated and populated in the parseFloats method (line 25).
- Lines 5-8: Calculate the size of the scaled image.
- Lines 9-11: Allocate the BufferedImage to hold the scaled result.
- Lines 13-18: Generate the scaled image using the SCALE_REPLICATE algorithm.
- Lines 19,20: Copy the generated image (line 13) into the BufferedImage (lines 10,11).
- Lines 22-26: Process the image through Tess4J and convert the result to a list of decimal values.
- Lines 27-31: If raised, catch the TesseractException and fail the test.
- Line 32: Return the list of decimal values.
🟦 private void validateFill( Rectangle rect )
This method verifies that the working image contains only the background color within the given bounds. There are two interesting things about the sample implementation:
- The algorithm searches the entire working image, not just the part of the image restricted to the rectangular bounds. Before testing a pixel against the background color, it verifies that the pixel coordinates are within the given bounds by invoking the rectangle’s contains method. This method is available for any class that implements the Shape interface, including shapes the geometry of which are not as straightforward as a rectangle, such as irregular polygons and circles. See also Shape Illustration.
- To improve the feedback from the JUnit assert facility, we use the overloads:
assertEquals(byte expected, byte actual, String message)assertNotEquals(Object unexpected, Object actual, String message)
Where message tells us the coordinates at which the assertion failed.
Here’s the code for the validateFill(Rectangle rect) method.
private void validateFill( Rectangle rect )
{
    int             rows            = workingImage.getHeight();
    int             cols            = workingImage.getWidth();
    for ( int row = 0 ; row < rows ; ++row )
        for ( int col = 0 ; col < cols ; ++col )
        {
            int rgb = workingImage.getRGB( col, row ) & 0xFFFFFF;
            String  msg = "col=" + col + ",row=" + row;
            if ( rect.contains( col, row  ) )
                assertEquals( testData.gridRGB, rgb, msg );
            else
                assertNotEquals( testData.gridRGB, rgb, msg );
        }
}
🟦 private void validateFill()
This method verifies that the working image contains only the background color. The code looks like this:
private void validateFill()
{
    int             width   = workingImage.getWidth();
    int             height  = workingImage.getHeight();
    Rectangle       rect    =
        new Rectangle( 0, 0, width, height );
    validateFill( rect );
}
🟦 private void initTessTestData()
This method configures the test data in preparation for OCR processing using the Tess4J API. It starts by configuring the test data to draw major tics (because labels are drawn on major tics). Other parameters recommended in Tess4JConfig are configured. Here’s the code.
private void initTessTestData()
{
    testData.initProfile( TIC_MAJOR );
    testGUI.setGridFontSize( tessFontSize );
    testGUI.setGridFontName( tessFontName );
    testGUI.setGridUnit( tessGPU );
    testGUI.setGridFontRGB( tessRGB );
    testGUI.setLineSpacing( TIC_MAJOR, tessLPU );
}
⬛ GraphManagerTest Public Methods
The next section will examine the GraphManagerTest class’s principal test methods.
🟦 public void testGraphManagerJComponentProfile()
This method serves no purpose other than to improve test coverage. It exercises the GraphManager(JComponent, Profile) constructor; it succeeds if it doesn’t crash. Here it is:
@Test
public void testGraphManagerJComponentProfile()
{
    @SuppressWarnings("unused")
    GraphManager    mgr =
        new GraphManager( new JPanel(), new Profile() );
}
🟦 public void testGraphManagerProfile()
This method exercises the GraphManager(Profile) constructor. It initializes the test data and changes the grid color to a unique value. After instantiating a GraphManager object, it calls the object’s refresh(Graphics2D, Rectangle2D) method, passing the graphics context for the workingImage as the Graphics2D argument and the workingRectangle as the Rectangle2D argument. Finally, it verifies that the working image has been initialized to the grid color within the bounds of the given rectangle. See prepareRectTest, which initializes the working image, the working rectangle, and the grid color.
Compare this test method to testGraphManagerRectProfile. The testGraphManagerProfile method sets the bounding rectangle in the GraphManager’s refresh(Graphics2D, Rectangle2D) method. The testGraphManagerRectProfile method sets the bounding rectangle in the constructor and then calls the GraphManager’s refresh(Graphics2D) method. Here’s the code.
public void testGraphManagerProfile()
{
    testData.initProfile( AXES );
    prepareRectTest();
    GraphManager    test    = new GraphManager( workingProfile );
    Graphics2D      gtx     = workingImage.createGraphics();
    test.refresh( gtx, workingRect );
    validateFill( workingRect );
}
🟦 public void testGraphManagerRectProfile()
This method exercises the GraphManager(Rectangle2D, Profile) constructor. It initializes the test data and changes the grid color to a unique value. After instantiating a GraphManager object, it calls the object’s refresh(Graphics2D) method, passing the graphics context for the workingImage. Finally, it verifies that the working image has been initialized to the grid color within the bounds of the given rectangle. See prepareRectTest, which initializes the working image, the working rectangle, and the grid color.
Compare this test method to testGraphManagerProfile. The testGraphManagerProfile method sets the bounding rectangle in the GraphManager’s refresh(Graphics2D, Rectangle2D) method. The testGraphManagerRectProfile method sets the bounding rectangle in the constructor and then calls the GraphManager’s refresh(Graphics2D) method. Here’s the code.
public void testGraphManagerRectProfile()
{
    testData.initProfile( AXES );
    prepareRectTest();
    GraphManager    test            =
        new GraphManager( workingRect, workingProfile );
    Graphics2D      gtx             = workingImage.createGraphics();
    test.refresh( gtx );
    validateFill( workingRect );
}
🟦 public void testDrawBackground( int paramNum )
This parameterized method runs twice, each time with a different grid background color. It invokes the GraphManager’s drawBackground method and verifies that the working image is filled with the given color. The code looks like this.
@ParameterizedTest
@ValueSource( ints= {0,1} )
public void testDrawBackground( int paramNum )
{
    testData.initTestData( paramNum );
    testData.initProfile( AXES );
    workingImage   = testGUI.drawBackground();
    validateFill();
}
🟦 public void testDrawAxes( int paramNum )
This parameterized method runs twice, each time with a different test configuration. It invokes the GraphManager’s drawAxes method and verifies that the working image is contains the expected axes. The listing for this method follows; see also testDrawAxesInternal.
@ParameterizedTest
@ValueSource( ints= {0,1} )
public void testDrawAxes( int paramNum )
{
    testData.initTestData( paramNum );
    testData.initProfile( AXES );
    testDrawAxesInternal();
}
🟦 public void testDrawGridLines( int paramNum )
🟦 public void testDrawMajorTics( int paramNum )
🟦 public void testDrawMinorTics( int paramNum )
These parameterized methods run twice, each time with different test parameters. They are all very similar. The code for testDrawGridLines follows; the code for all methods is in the GitHub repository. See also testVerticalLines and testHorizontalLines.
@ParameterizedTest
@ValueSource( ints= {0,1} )
public void testDrawGridLines( int paramNum  )
{
    testData.initTestData( paramNum );
    testData.initProfile( GRID_LINES );
    workingImage = testGUI.drawGridLines();
    testVerticalLines();
    testHorizontalLines();
}
🟦 public void testDrawText()
This method exercises the GraphManager.drawText() method. It verifies that, after calling drawText, the grid contains horizontal and vertical labels; it does not verify the labels are correct. Compare with testDrawHorizontalLabels and testDrawVerticalLabels, which verify that the labels reflect the correct values. The code follows. See also hasHorizontalLabel and hasVerticalLabel.
@Test
public void testDrawText()
{
    initTessTestData();
    workingImage = testGUI.drawText();
    assertTrue( hasHorizontalLabel() );
    assertTrue( hasVerticalLabel() );
}
🟦 public void testDrawHorizontalLabels()
This method invokes the GraphManager drawHorizontalLabels method and verifies that the resultant grid contains the expected labels on the horizontal tic marks. See also getExpectedHorizontalLabels and getLabels. The implementation of this method follows.
@Test
public void testDrawHorizontalLabels()
{
    initTessTestData();
    workingImage = testGUI.drawHorizontalLabels();
    Utils.pause( 250 );

    List<Float>     expValues   = getExpectedHorizontalLabels();
    List<Float>     actValues   = getLabels();
    assertEquals( expValues, actValues );
}
🟦 public void testDrawVerticalLabels()
This method invokes the GraphManager drawVerticalLabels method and verifies that the resultant grid contains the expected labels on the vertical tic marks. It’s modeled on testDrawHorizontalLabels, and its implementation is an exercise for the student; the solution is in the GitHub repository. See also getExpectedVerticalLabels and getLabels.
🟦 public void testDrawAll()
This test exercises the GraphManager.drawAll() method. We invoke the drawAll method and verify that every category of horizontal and vertical lines and horizontal and vertical labels are present in the result. However, it does not verify that the lines and labels are drawn correctly; for that, we have other test methods, such as testDrawAxes. Here’s the code.
@Test
public void testDrawAll()
{
    drawAllConfigProfile();
    workingImage = testGUI.drawAll();
    Stream.of( AXES, GRID_LINES, TIC_MAJOR, TIC_MINOR )
        .map( s -> workingProfile.getLinePropertySet( s ) )
        .forEach( s -> assertTrue( drawAllHasLine( s ) ) );

    initTessTestData();
    assertTrue( hasVerticalLabel() );
    assertTrue( hasHorizontalLabel() );
}
🟦 public void testNoGridLines()
🟦 public void testNoMajorTics()
🟦 public void testNoMinorTics()
The testNoGridLines method verifies that the GraphManager does not draw grid lines when the LinePropertySetGridLines draw property is false. The other methods do the same for major and minor tic marks. Here is the code for testNoGridLines. The other methods are similar, and their code can be found in the GitHub repository.
public void testNoGridLines()
{
    testNoLines( GRID_LINES, testGUI::drawGridLines );
}
🟦 public void testNoLabels()
The testNoLabels method verifies that the GraphManager does not draw labels when the GraphPropertySetMW fontDraw property is false. Here’s the code.
@Test
public void testNoLabels()
{
    initTessTestData();
    testGUI.setGridDrawLabels( false );
    workingImage = testGUI.drawVerticalLabels();
    List<Float>     actValues   = getLabels();
    assertTrue( actValues.isEmpty() );

    workingImage = testGUI.drawHorizontalLabels();
    actValues = getLabels();
    assertTrue( actValues.isEmpty() );
}
🟦 public void testResetProfile()
This test exercises the GraphManager resetProfile method. It changes the LinePropertySetTicMajor stroke property to a new value, resets the profile, then verifies that the original value is restored. The annotated code follows.
1 2 3 4 5 6 7 8 9 10 11 12 13 14 15 16 | @Test public void testResetProfile() { String propSetName = TIC_MAJOR; LinePropertySet propSet = workingProfile.getLinePropertySet( propSetName ); float origStroke = propSet.getStroke(); float newStroke = origStroke + 5; testGUI.setLineStroke( propSetName, newStroke ); float actStroke = propSet.getStroke(); assertEquals( newStroke, actStroke ); testGUI.invokeResetProfile(); actStroke = propSet.getStroke(); assertEquals( origStroke, actStroke ); } |
- Lines 4-6: Get the LinePropertySetTicMajor object from the working profile.
- Lines 7,8: Get the original stroke property value and calculate a new one.
- Line 9: Set the new value in the Profile object encapsulated in the test GUI.
- Lines 10,11: Sanity check; verify that the new value has been set.
- Line 13: Invoke the resetProfile method in the GraphManager under test.
- Lines 14,15: Get the stroke property from the working profile and verify that it has been returned to its original value.
Summary
On this page, we implemented a JUnit test for the GraphManager class. This consisted of GraphManagerTest and a supporting utility, GraphManagerTestGUI. Next, we will need a JUnit test for the ProfileEditorFeedback class.