As we approach a JUnit test for GraphManager, we face the challenge of validating the labels it draws on the x- and y-axes. This entails a) making sure the text is in the right place and b) making sure the text is correct. Making sure they’re in the right place will be an issue for a later time. In this lesson, we are concerned with making sure the text is correct. To do that, we will install a tool called Tesseract, which can look inside a raster (e.g., a BufferedImage), find the text, and convert it to strings that we can analyze in a program.
GitHub repository: Cartesian Plane Lesson 18
Previous page: Cartesian Plane Lesson 18 Page 8: GraphManager, ProfileEditorFeedback Window
Optical Character Recognition
Optical character recognition (OCR) is a technology for recognizing text in an image and converting it to encoded characters, such as Unicode. The image might be a screen capture of an electronically produced document, a photo of a document containing printed text, or a scan of a handwritten note. For testing purposes, we will use OCR to detect and interpret text in a BufferedImage produced by our GraphManager. For a more thorough discussion of OCR, see:
- Optical character recognition in Wikipedia.
- What is OCR (Optical Character Recognition)? on Amazon.com
- OCR (Optical Character Recognition) on Google
There are many OCR software solutions available. The best of them are costly, and a few are free. For a comparison of a variety of tools, see:
- Our search for the best OCR tool in 2023, and what we found from OpenNews
- Top Free OCR tools, APIs, and Open Source models from Eden AI
- What’s the best free Java OCR library? on Quora
For our project, we will use Tesseract, a product originally developed by Hewlett-Packard, with continued development (through 2018) by Google, and now an open-source project. For more information about Tesseract, see:
- Tesseract at UB Mannheim (includes the Windows installer)
- The Tesseract Home Page on GitHub
- The Tesseract README.md doc on GitHub
- Tesseract OCR Software Tutorial by NYU Libraries
Tesseract Installation
Before we can use Tesseract, it has to be installed, which requires two
⬛ Install the Tesseract Application
I installed Tesseract v5.4 on Windows using the installer from UB Mannheim. MacOS and other system installers are available on the Tesseract GitHub README page. I suggest that you add the Tesseract installation folder to your PATH. You must, at this time, add the TESSDATA_PREFIX variable to your environment. Its value should be the tessdata subdirectory of your Tesseract installation. On my MS Windows system, it looks like this: TESSDATA_PREFIX=C:\Program Files\Tesseract-OCR\tessdata
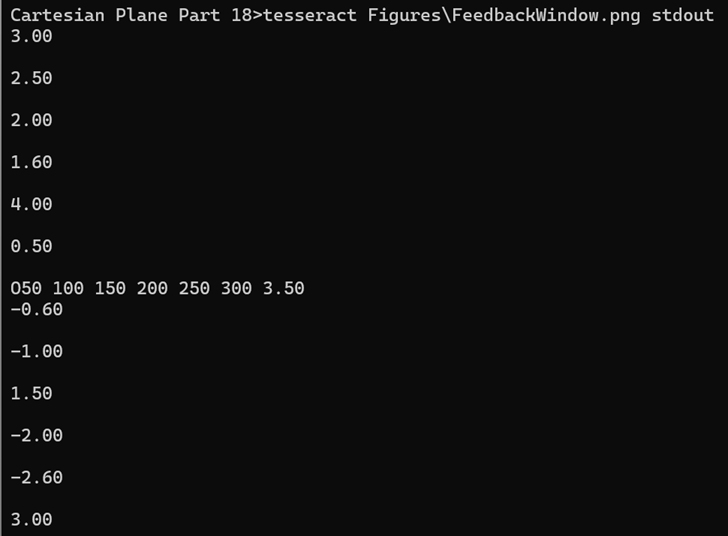
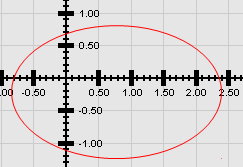
Tesseract is a fully functional command-line program. If you have put the installation directory in your path, point a command line to the project directory for this lesson, execute the following command, and see the result on the right. tesseract Figures\FeedbackWindow.png stdout
The output from the above command should reflect the text on the x- and y-axes of your Cartesian plane grid. If you look carefully, you’ll see that the output is wrong. We’ll address that below.
*Note: The first time I installed Tesseract, it didn’t work because I was missing two files from the installation’s tessdata subdirectory, eng.traineddata and osd.traineddata. I just finished a fresh installation, and there were no missing files. If necessary, you can find the files in the Tesseract GitHub repository, https://GitHub/tesseract-ocr/tree/main. In this directory, you can also find support for languages other than English (the first three characters of the filename denote the supported language, for example, spa for Spanish).
⬛ Install the tess4j Java API
The Tesseract application installation we performed above contains all the OS libraries needed to drive the Tesseract engine. We need the Java API, Tess4J, which provides access to those libraries. You can find it in the Tess4J Maven repository. If you are managing your project with Maven, add the following dependency to your POM file: <dependency>
<groupID>net.sourceforge.tess4j</groupID>
<artifactId>tess4j</artifactId>
<version>5.9.0</version>
</dependency>
If you’re not using Maven, find and download the tess4j jar file and add it to your project classpath. I am using tess4j-5.9.0.jar; the latest at this time is tess4j-5.13.0.jar.
Sample Tesseract Java Applications
The first thing we must do in a Tess4j application is set some configuration parameters. To do that, we need to introduce some terminology.
⬛ Terminology
🟦Orientation and Script Detection (OSD)
Orientation refers to the rotation of a page of text in a picture. For example, if you take a picture of a page of text, the text in the image may appear to be rotated left or right. Script refers to the alphabet used to display the text, such as Latin, Romanized Vietnamese (Chữ Quốc ngữ), or Arabic (اللغة العربية). In Tesseract, OSD can be enabled or disabled depending on the choice of Page Segmentation Mode (below).
🟦Page Segmentation Mode (PSM)
Page segmentation refers to dividing a page into discrete parts to improve character recognition. Examples of “discrete parts” include columns, blocks, lines, words, and characters (for additional discussion, see Page Segmentation and Classification on the Science Direct website and Using different Page Segmentation Modes in the Tesseract Command Line Usage documentation). Tesseract distinguishes between fourteen modes, numbered 0 through 13. Mode 0 disables page segmentation altogether but does provide OSD. Modes 1 and 3 provide “fully automated” page segmentation; mode 1 includes OSD, mode 3 (the default) does not. Here is the complete list of available modes with brief descriptions. Unless otherwise specified, the mode does not provide OSD.
- Mode 0: Orientation and script detection (OSD) only
- Mode 1: Page segmentation with OSD
- Mode 2: (not implemented)
- Mode 3: Page segmentation, no OSD (default)
- Mode 4: Assume single-column text, variable font sizes
- Mode 5: Assume single-column text, uniform font sizes
- Mode 6: Assume a single uniform block of text
- Mode 7: Treat the image as a single text line
- Mode 8: Treat the image as a single word
- Mode 9: Treat the image as a single word in a circle
- Mode 10: Treat the image as a single character
- Mode 11: Sparse text; find as much text as possible in no particular order
- Mode 12: Sparse text with OSD
- Mode 13: Raw line; treat the image as a single text line, bypassing “hacks that are Tesseract-specific”
For additional discussion of PSMs, see Tesseract Page Segmentation Modes (PSMs) Explained on the PyImageSearch website
🟦 Tesseract Engine Mode
The Tesseract engine comes in two flavors: the legacy engine (before version 4) and the Long Short-Term Memory (LSTM) engine. According to Wikipedia, LSTM is “a type of recurrent neural network (RNN) aimed at dealing with the vanishing gradient problem[2] present in traditional RNNs.” For additional discussion of this topic, I refer you to the following:
- Long short-term memory on Wikipedia
- Long Short-Term Memory Network on the ScienceDirect website
- How does Tesseract for OCR work? on the Docsumo website
Tesseract has four engine modes, numbered 0 through 3:
- Mode 0: Legacy engine only
- Mode 1: LSTM engine only
- Mode 2: Legacy engine combined with LSTM
- Mode 3: “Whatever is available” (default)
Which engine mode should you use? I can only tell you that in our GraphMananager test code, we use engine mode 1, which seems to work fine. I do not doubt that different engine modes work best under various circumstances and most likely provide a tradeoff between processing speed and quality of results. I suggest you experiment.
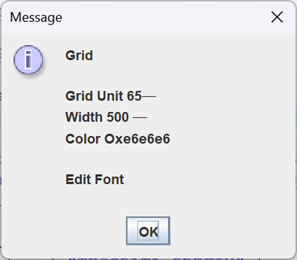
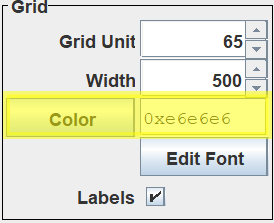
⏹Application Code
Our first sample application, Tess4JDemo1, can be found in our project in the …sandbox.ocr package. If you start it, it will allow you to select an image, preferably one containing text, and then run tess4j against it. The figure at right shows the result of running it against GridPanel FontEditor.png in the project Figures folder. Here’s the main method for this application. It allows the operator an opportunity to select a file and then passes the file to the constructor.
public static void main(String[] args)
{
    // Locate user directory.
    final String    strUserDir  = System.getProperty( "user.dir" );
    final File      userDir     = new File( strUserDir );

    // Create and configure file chooser
    JFileChooser    chooser     = new JFileChooser();
    FileNameExtensionFilter filter =
        new FileNameExtensionFilter( "Images", "jpg", "gif", "png" );
    chooser.setCurrentDirectory( userDir );
    chooser.setFileFilter(filter);

    // Allow operator to select a file; exit on cancel.
    File        file    = null;
    int         rVal    = chooser.showOpenDialog( null );
    if( rVal == JFileChooser.APPROVE_OPTION )
    {
        file = chooser.getSelectedFile();
        new Tess4JDemo1( file );
    }
}
Here’s the annotated code for the constructor. The complete code can be found in the GitHub repository.
1 2 3 4 5 6 7 8 9 10 11 12 13 14 15 16 17 18 19 20 21 | // ... private static final String dataPathStr = System.getenv( "TESSDATA_PREFIX" ); // ... public Tess4JDemo1( File imageFile ) { Tesseract tesseract = new Tesseract(); tesseract.setDatapath( dataPathStr ); tesseract.setLanguage("eng"); tesseract.setPageSegMode(3); tesseract.setOcrEngineMode(1); try { String result = tesseract.doOCR( imageFile ); JOptionPane.showMessageDialog( null, result ); } catch ( TesseractException exc ) { exc.printStackTrace(); } } |
- Lines 2,3: Find the Tesseract data path. See also Install the Tesseract Application above.
- Lines 7-11: Initialize Tesseract:
- Line 7: Create a Tesseract object.
- Line 8: Set the data path in the object.
- Line 9: Set the language to English.
- Line 10: Set the page segmentation mode (see Page Segmentation Mode).
- Line 11: Set the engine mode (see Tesseract Engine Mode).
- Lines 12-20: Analyze the image file, being prepared to catch a TesseractException:
- Line 14: Invoke the doOCR method. If this method encounters a problem, it will throw a TesseractException. Its output is an ordinary Java String, formatted in Unicode, which you can analyze and manipulate like any other String.
- Line 15: Display the output in a dialog.

Digression: Image Scaling and Affine Transformations
We’ve already seen that Tess4J can produce less-than-perfect results when extracting text from an image. One way to improve the reults is by scaling the image.
When we scale an image we make it larger or smaller; we do this by applying a scale factor, a percentage by which the image size is to be changed. Scaling can be applied uniformly, by applying the same scale factor to the width and height of an image, or non-uniformly, by changing the width by one scale factor and the height by another. Scaling can be applied to vector images or raster images. If you’re interested in a discussion of the two types of images, see the references below. In our unit test for GraphManager we will be dealing excusively with BufferedImages which are rasters.
We talked about rasters in an earlier lesson. A raster is a two-dimensional array of integers where each integer determines the color of the corresponding pixel in a picture. Since you can’t change the size of a pixel, scaling-up an image entails adding pixels, while scaling-down means subtracting pixels. Now the question becomes: how do you know which pixels to add or subtract? There are a variety of algorithms for making this choice; for a general discussion of scaling algorithms, see Keeping Your Renders Clean at fxguide and the Java documentation for java.awt.Image.
The easiest way to scale an image is by using the getScaledImage method in the Image class:
getScaledInstance(int width, int height, int hints)
Where:
width
is the width of the image after scaling
height
is the height of the image after scaling
hints
is a bit-wise combination of the following:
- SCALE_DEFAULT: Let the AWT do what it thinks best
- SCALE_AREA_AVERAGING: Use the area-averaging algorithm
- SCALE_FAST: Use an algorithm that favors speed over quality
- SCALE_REPLICATE: Use the replicate algorithm
- SCALE_SMOOTH: Use an algorithm that favors quality over speed
For example:
private Image scale( BufferedImage imageIn, float factor )
{
    int     scaledWidth     = (int)(imageIn.getWidth() * factor + .5);
    int     scaledHeight    = (int)(imageIn.getHeight() * factor + .5);
    int     hints           = Image.SCALE_SMOOTH;
    Image   imageOut        =
        imageIn.getScaledInstance(scaledWidth, scaledHeight, hints );
    return imageOut;
}

Application ScalingDemo2 in package …sandbox.ocr allows you to play with scale factors. At the top of the application window is some text. At the bottom of the window is a spinner that allows you to increase or decrease the scale factor. This application performs scaling by applying an affine transformation directly to the application window. Following is an excerpt from the application code that performs this operation:
public void paintComponent( Graphics graphics )
{
    width = getWidth();
    height = getHeight();
    gtx = (Graphics2D)graphics.create();

    gtx.setColor( bgColor );
    gtx.fillRect( 0, 0, width, height );

    applyScale();
    ...
}
private void applyScale()
{
    AffineTransform     transform       = new AffineTransform();
    transform.scale( scaleFactor, scaleFactor );
    gtx.transform( transform );
}
In the above code, new AffineTransform() creates an object that can store a transform. The next line adds a scale transform to the object; and gtx.transform(transform) adds the transform to the graphics context. Following this, any drawing done with the graphics context will have the transform applied.

Affine transforms are an effective and efficient way to apply transformations to your geometric data. To a transform you can add multiple operations, which will be combined into a matrix and executed simultaneously during the drawing operation. The most common operations are translation, rotation, and scale. The Java documentation for AffineTransform also lists flip and shear. Application AffineTransformDemo1 allows you to observe the effects of combining translation, rotation, and scaling operations into one transform. The code that constructs the transform is shown below. For more information about the mathematics behind affine transformations see Transformations and Matrices on the MathIsFun website.
private void applyTransforms()
{
    // The translation operation first moves the origin of
    // this component to its center, (width/2,height/2)
    // then apples the the offsets set by the operator.
    double              centerXco   = width / 2.0 + xcoTranslate;
    double              centerYco   = height / 2.0 + ycoTranslate;
    AffineTransform     transform   = new AffineTransform();
    transform.translate( centerXco, centerYco );
    transform.scale( scaleFactor, scaleFactor );
    transform.rotate( rotateFactor );
    gtx.transform( transform );
}
Additional references:
- Image Scaling in Wikipedia
- Comparison gallery of image scaling algorithms in Wikipedia
- Raster vs. Vector Images in the University of Michigan Library Research Guides
- How Can I Resize an Image Using Java? from Baeldung
- Image Scaling in Java from IDR Solutions
- Affine transformations in Wikipedia
- Transforming Shapes, Text, and Images in the Oracle Java tutorial
⬛ Improving Tess4J Output
One way I’ve found to improve Tess4J performance is to scale up the image containing the text I want to extract. Application Tess4JDemo2 in the project sandbox shows an example. It starts by initializing Tess4J in the constructor:
public Tess4JDemo2()
{
    tesseract.setDatapath( dataPathStr );
    tesseract.setLanguage("eng");
    tesseract.setPageSegMode(3);
    tesseract.setOcrEngineMode(1);
    // ...
}
As shown in the above figure (left), Tess4JDemo2 displays some text in a window, applying the scale factor configured at the bottom of the GUI:
public void paintComponent( Graphics graphics )
{
    width = getWidth();
    height = getHeight();
    gtx = (Graphics2D)graphics.create();
    // ...
    AffineTransform     transform       = new AffineTransform();
    transform.scale( scaleFactor, scaleFactor );
    gtx.transform( transform );
    // ...
    currLine = 1;
    drawAlphaText();
    ++currLine;
    drawNumericText();
    // ...
}
When you push the OCR button, it obtains an image of the window using the technique we’re already familiar with:
private BufferedImage getImage()
{
    int             imageWidth      = getWidth();
    int             imageHeight     = getHeight();
    int             imageType       = BufferedImage.TYPE_INT_RGB;
    BufferedImage   image           =
        new BufferedImage( imageWidth, imageHeight, imageType );
    paintComponent( image.getGraphics() );
    return image;
}
Finally, it lets Tess4J extract text from the image and displays the result in a separate window (above right).
private void extract( ActionEvent evt )
{
BufferedImage image = getImage();
try
{
String text = tesseract.doOCR( image );
// ... append text to output window
}
catch ( TesseractException exc )
{
// ...
}
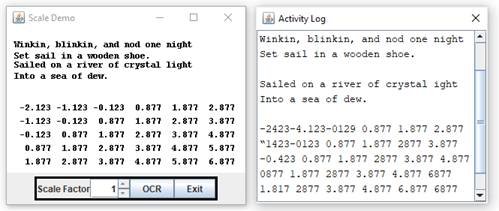
}We get several errors when we capture text with a scale factor of 1. The figure below shows the expected result on the left and the actual result on the right:
Winkin, blinkin, and nod one night
Set sail in a wooden shoe.
Sailed on a river of crystal light
Into a sea of dew.
-2.123 -1.123 -0.123 0.877 1.877 2.877
-1.123 -0.123 0.877 1.877 2.877 3.877
-0.123 0.877 1.877 2.877 3.877 4.877
0.877 1.877 2.877 3.877 4.877 5.877
1.877 2.877 3.877 4.877 5.877 6.877
Winkin, blinkin, and nod one night
Set sail in a wooden shoe.
Sailed on a river of crystal ight
Into a sea of dew.
-2423-4.123-0129 0.877 1.877 2.877
“1423-0123 0.877 1.877 2877 3.877
-0.423 0.877 1.877 2877 3.877 4.877
0877 1.877 2877 3.877 4.877 6877
1.817 2877 3.877 4.877 6.877 6877
If we increase the scale factor to 1.5, we get a much-improved result:
Winkin, blinkin, and nod one night
Set sail in a wooden shoe.
Sailed on a river of crystal light
Into a sea of dew.
-2.123 -1.123 -0.123 0.877 1.877 2.877
-1.123 -0.123 0.877 1.877 2.877 3.877
-0.123 0.877 1.877 2.877 3.877 4.877
O877 1.877 2877 3.877 4.877 5.877
1.877 2877 3.877 4.877 5.877 6.877
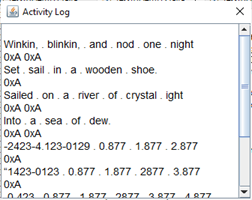
Application Tess4JDemo3 is almost identical to Tess4JDemo2, but it highlights the white space Tesseract uses to format its output. In the figure at right, you see that the application has substituted a period for every space and printed out the Unicode value of every line separator. From this, we can see that Tesseract delimits vertical lines using the Unix convention (linefeed (0xA)) as opposed to the Windows convention (carriage return (0xD), linefeed (0xA)).
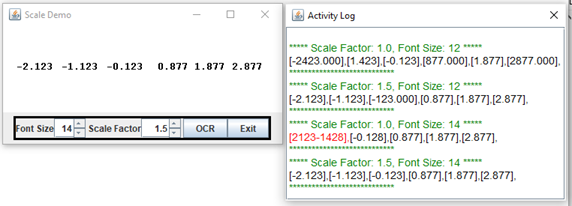
This leads me to wonder if we can get the same result by increasing the font size without applying a scale factor. The Application Tess4Demo4 allows you to experiment with changing the font size and the scaling factor. This demo starts with strictly numeric text, which will be the case when we write the JUnit test for GraphManager. In the output window, we highlight any text that can’t be converted to a number in red. Unlike previous applications, scaling is applied to the image taken from the application window, not the application window itself. I have found the best results come from scaling up to at least 1.5. Changing the font size doesn’t seem to make a difference.
Tesseract Property Encapsulation: Tess4JConfig
⏹ Properties
We want to encapsulate a variety of properties associated with Tess4J. These fall into two categories.
- Initialization properties for the Tess4J API: data path, language, segmentation mode, and engine mode.
- Configuration properties for the class under test that will improve our success rate when using Tesseract to extract data from an image. These are:
- The best GPU to use. Our GPU needs to be big enough that labels drawn on the grid do not overlap and small enough that we have more than one or two data points to validate.
- The best factor by which to scale an image before analyzing it with Tesseract.
- Font properties. The best font and font size to use when drawing text that we will be inspecting with Tesseract.
We’ll want to handle these properties just like we do with the application properties in PropertyManager. We’ll need a name and a default value for each property; the default value must be overridable in the environment or on the command line. As shown in the listing below, we will use a constant variable for the property names and default values, just like in PropertyManager. However, it would be inappropriate to put them in PropertyManager because, unlike everything else in PropertyManager, they are not part of the released product. As shown in the following listing, we will put them into the class Tess4JConfig, which will live under the test source tree in the package com.acmemail.judah.cartesian_plane.test_utils.
1 2 3 4 5 6 7 8 9 10 11 12 13 14 15 16 17 18 19 | public class Tess4JConfig { public static final String LANGUAGE_PN = "tess4jLanguage"; public static final String LANGUAGE_DV = "eng"; public static final String SEG_MODE_PN = "tess4jSegMode"; public static final int SEG_MODE_DV = 6; public static final String ENG_MODE_PN = "tess4jEnjMode"; public static final int ENG_MODE_DV = 1; public static final String SCALE_FACTOR_PN = "tess4jScaleFactor"; public static final float SCALE_FACTOR_DV = 1.5f; public static final String GPU_PN = "tess4jGPU"; public static final float GPU_DV = 100f; public static final String FONT_SIZE_PN = "tess4jFontSize"; public static final float FONT_SIZE_DV = 14f; public static final String FONT_NAME_PN = "tess4jFontName"; public static final String FONT_NAME_DV = Font.MONOSPACED; // ... } |
As shown in the figure above, every property name begins with tess4j. As a project standard, we shall assume that any name starting with tess4j is only for use within the test code. Test developers should assign the prefix only to names associated with Tess4J, and any new names beginning with the prefix should be integrated into Tess4JConfig. Lines 3-8 contain the property names and default values for initializing a Tesseract object (except for the data path declared in the TESSDATA_PREFIX environment variable; see Class Variables below). Lines 10-17 contain the property names and default values recommended for the scale factor to apply before extracting text from a BufferedImage, the grid unit for the grid, and the font name and size for the labels.
⬛ Helper Methods
🟦 private static String getProperty( String propName )
This method attempts to get the value of the given property name from the set of system properties (recall that this is where properties defined on the command line can be found). Failing to obtain the value in the system properties, it looks for the property in the environment. It returns null if it can’t find the property name in the system properties or the environment. A listing of the code for this method follows.
private static String getProperty( String propName )
{
    String  val     = null;
    if ( (val = System.getProperty( propName )) != null )
        ;
    else
        val = System.getenv( propName );
    return val;
}
🟦 private static float getProperty( String propName, float defVal )
🟦 private static int getProperty( String propName, int defVal )
🟦 private static String getProperty( String propName, String defVal )
These methods attempt to get the value of the given property name from the command line or the environment. Failing to do so, they apply the given default. A listing of the code for the getProperty(String,int) follows. The code for the other two methods is left as an exercise for the student; the solution can be found in the GitHub repository.
private static int getProperty( String propName, int defVal )
{
    int     val     = defVal;
    String  strVal  = getProperty( propName );
    if ( strVal != null )
    {
        try
        {
            val = Integer.parseInt( strVal );
        }
        catch ( NumberFormatException exc )
        {
            exc.printStackTrace();
            val = defVal;
        }
    }
    return val;
}
⬛ Constructor
Instantiation of this class is meaningless. We have a private default constructor that prevents it. It looks like this.
private Tess4JConfig()
{
}
⬛ Class Variables
We have final, private class variables for every named property (see Properties) and the data path property. Every variable is initialized in its declaration. Here is a listing of their declarations.
private static final String dataPath        =
    getProperty( "TESSDATA_PREFIX" );
private static final String  language       =
    getProperty( LANGUAGE_PN, LANGUAGE_DV );
private static final int     segMode        =
    getProperty( SEG_MODE_PN, SEG_MODE_DV );
private static final int     engMode        =
    getProperty( ENG_MODE_PN, ENG_MODE_DV );
private static final float   scaleFactor    =
    getProperty( SCALE_FACTOR_PN, SCALE_FACTOR_DV );
private static final float   gpu            =
    getProperty( GPU_PN, GPU_DV );
private static final float   fontSize       =
    getProperty( FONT_SIZE_PN, FONT_SIZE_DV );
private static final String  fontName       =
    getProperty( FONT_NAME_PN, FONT_NAME_DV );
⬛ Public Methods
🟦 public static type get…
🟦 public static Tesseract getTesseract()
We have a getter for every property (including the data path property) and a method to instantiate and initialize a Tesseract object. The getters are straightforward; here’s a sampling:
public static String getDataPath()
{
    return dataPath;
}
public static int getSegmentationMode()
{
    return segMode;
}
// ...
The following is a listing of the getTesseract method.
public static Tesseract getTesseract()
{
    Tesseract   tesseract   = new Tesseract();
    if ( dataPath != null )
        tesseract.setDatapath( dataPath );
    tesseract.setLanguage( language );
    tesseract.setPageSegMode( segMode );
    tesseract.setOcrEngineMode( engMode );
    return tesseract;
}
Summary
On this page, we examined a tool for performing Optical Character Recognition with the goal of using it to validate the labels on the x- and y-axes of the grid drawn by GraphManager. On the next page, we will develop a utility for validating the length, width, and color of lines drawn on the grid.