This lesson is about testing, primarily unit testing. It’s about learning to use the important Java tool JUnit to develop unit tests that are consistent, reliable, and automated. For more about JUnit see:
- The JUnit 5 Homepage, from JUnit.org
- JUnit 5 User Guide, from JUnit.org
- JUnit 5 Assertions, from JUnit.org
See also:
- Embracing JUnit 5 with Eclipse, from Eclipse Foundation
- Adding JUnit5 library to a Project, from TestingDocs.com
- Langr, J., Hunt, A., & Thomas, D. (2015). Pragmatic Unit Testing in Java 8 with JUnit (1st ed.). Pragmatic Bookshelf (Amazon page).
GitHub repository: Cartesian Plane Part 6
Previous lesson: Cartesian Plane Lesson 5
Testing in the Large
Testing is a complex effort with many moving parts, starting with unit testing, advancing through integration testing, and finally, acceptance testing. Then, it starts all over again from the bottom with regression testing. And those are just the most formal bits. Other testing topics include debugging, bench testing, prototyping, and “proof of concept” demonstrations. These lessons are focused on the developer’s formal tasks, primarily unit testing. First, there are a couple of things unit testing is not.
Unit testing is not the responsibility of the test group. It is the responsibility of the developer. Think of it as testing your for loops. The test group has no interest in your for loops. You must ensure your for loops are working before you declare that your code is ready to be passed to the test group. Likewise, unless the product you’re selling is an API, the test group has no interest in whether or not a particular method is working the way it’s supposed to.
Unit testing is not debugging. Debugging is about discovering the cause behind a known problem. Unit testing is about demonstrating that there are no problems. When you’re trying to find a specific problem, there are all sorts of things you can do that are not appropriate for unit testing, such as stepping through a method in the debugger, adding a main method to a class that, under normal circumstances, does not need one, adding print statements at strategic places in your code, even developing a ghost front end to drive an API in an unusual or very specific way.
Formal Tasks vs. Informal Tasks: in this context, I call unit testing a formal task because there is a deliverable involved: the code and documentation associated with the unit test. Debugging would be an informal task because there is no deliverable (other than the working code).
Digression: Testing Floating Point Values for Equality
One more thing to review before we write our test: Part of our test will entail evaluating two floating point values equality. As you may know, testing floating point values for equality can be tricky because of rounding errors. If you are unaware of that, try running this bit of code:
1 2 3 4 5 6 7 8 9 | public class RoundingErrorDemo { public static void main(String[] args) { double dVar1 = .7 + .1; double dVar2 = .9 - .1; System.out.println( dVar1 == dVar2 ); } } |
To circumvent this problem, we can use the epsilon test for equality (sometimes called the delta test for equality). Choose a very small value for epsilon, say .00001. Now, take the difference between the two values. If the difference is less than epsilon, we can treat the two values as though they were equal. Here’s a helper method to illustrate the technique:
1 2 3 4 5 6 7 | private static boolean equal( float fVal1, float fVal2 ) { final float epsilon = .0001f; float diff = Math.abs( fVal1 - fVal2 ); boolean equal = diff < epsilon; return equal; } |
Note: if you’re a devotee of numerical analysis, you may object to calling this method equal. If so, feel free to rename it “closeEnoughForJazz.”
Unit Testing: Example
Unit testing focuses on the visible portions of your application/system/software unit. In Java, that means public classes and public methods. Usually, you have a unit test class (sometimes more than one) for each public class in your code. Each test class has a test method (sometimes more than one) for each public method to be tested. Suppose we develop the Circle class:
1 2 3 4 5 6 7 8 9 10 11 12 13 14 15 16 17 18 19 20 21 22 23 24 25 26 27 28 29 30 31 32 33 34 35 36 37 38 39 40 41 42 43 44 45 46 47 48 49 50 51 52 53 54 55 56 57 58 59 60 61 62 63 64 65 66 67 68 69 70 71 72 73 74 75 76 77 78 79 80 81 82 83 84 85 86 87 88 89 90 91 92 93 94 95 96 97 98 99 100 101 102 103 | public class Circle { private double xco; private double yco; private double radius; /** * Construct a circle with a given center and radius; * * @param xco x-coordinate of the given center * @param yco y-coordinate of the given center * @param radius given radius */ public Circle( double xco, double yco, double radius ) { super(); this.xco = xco; this.yco = yco; this.radius = radius; } /** * Gets the circumference of this circle. * * @return the area of this circle */ public double getCircumference() { double circumference = 2 * radius * Math.PI; return circumference; } /** * Gets the area of this circle. * * @return the area of this circle */ public double getArea() { double area = radius * radius * Math.PI; return area; } /** * Gets the x-coordinate of the center of the circle. * * @return the x-coordinate of the center of the circle */ public double getXco() { return xco; } /** * Sets the x-coordinate of the center of the circle. * * @param xco the new x-coordinate of the center of the circle */ public void setXco(double xco) { this.xco = xco; } /** * Gets the y-coordinate of the center of the circle. * * @return the y-coordinate of the center of the circle */ public double getYco() { return yco; } /** * Sets the y-coordinate of the center of the circle. * * @param yco the new y-coordinate of the center of the circle */ public void setYco(double yco) { this.yco = yco; } /** * Gets the radius of the circle. * * @return the radius of the circle */ public double getRadius() { return radius; } /** * Sets the radius of the circle. * * @param radius the new radius of the circle */ public void setRadius(double radius) { this.radius = radius; } } |
Now, we need a test class (conventionally named CircleTest) containing a test method for each public method.
1 2 3 4 5 6 7 8 9 10 11 12 13 14 15 16 17 18 19 20 21 22 23 24 25 26 27 28 29 30 31 32 33 34 35 36 37 38 39 40 41 42 43 44 45 46 47 48 49 50 51 52 53 54 55 56 57 58 59 60 61 62 63 64 65 66 67 68 69 70 71 72 73 74 75 76 77 78 79 80 81 82 83 84 85 86 87 88 89 90 91 92 93 94 95 96 97 98 99 100 101 102 103 104 105 106 107 108 109 110 111 112 113 114 115 116 117 118 119 120 121 122 123 124 125 126 127 128 129 130 131 132 133 134 135 136 137 138 139 140 141 142 143 144 145 146 147 148 149 150 151 152 153 154 | public class CircleTest { public static void main( String[] args ) { boolean result = true; result = result && ctorTest(); result = result && getAreaTest(); result = result && getCircumferenceTest(); result = result && getRadiusTest(); result = result && setRadiusTest(); result = result && getXcoTest(); result = result && setXcoTest(); result = result && getYcoTest(); result = result && setYcoTest(); String msg = result ? "Unit test passed" : "unit test failed"; System.err.println( msg ); } private static boolean ctorTest() { double xco = 10; double yco = 20; double radius = 30; Circle circle = new Circle( xco, yco, radius ); double actXco = circle.getXco(); double actYco = circle.getYco(); double actRadius = circle.getRadius(); boolean result = true; result = result && testEquals( "ctorTest", xco, actXco ); result = result && testEquals( "ctorTest", yco, actYco ); result = result && testEquals( "ctorTest", radius, actRadius ); return result; } private static boolean getCircumferenceTest() { double radius = 30; double expCircum = Math.PI * 2 * radius; Circle circle = new Circle( 0, 0, radius ); double actCircum = circle.getCircumference(); boolean result = testEquals( "getCircumferenceTest", expCircum, actCircum ); return result; } private static boolean getAreaTest() { double radius = 30; double expArea = Math.PI * radius * radius; Circle circle = new Circle( 0, 0, radius ); double actArea = circle.getArea(); boolean result = testEquals( "getAreaTest", expArea, actArea ); return result; } private static boolean getXcoTest() { Circle circle = new Circle( 0, 0, 0 ); double expVal = 10; circle.setXco( expVal ); double actVal = circle.getXco(); boolean result = testEquals( "getXcoTest", expVal, actVal ); return result; } private static boolean setXcoTest() { Circle circle = new Circle( 0, 0, 0 ); double expVal = 10; circle.setXco( expVal ); double actVal = circle.getXco(); boolean result = testEquals( "setXcoTest", expVal, actVal ); return result; } private static boolean getYcoTest() { Circle circle = new Circle( 0, 0, 0 ); double expVal = 10; circle.setYco( expVal ); double actVal = circle.getYco(); boolean result = testEquals( "getAreaTest", expVal, actVal ); return result; } private static boolean setYcoTest() { Circle circle = new Circle( 0, 0, 0 ); double expVal = 10; circle.setYco( expVal ); double actVal = circle.getYco(); boolean result = testEquals( "setYcoTest", expVal, actVal ); return result; } private static boolean setRadiusTest() { Circle circle = new Circle( 0, 0, 0 ); double expVal = 10; circle.setRadius( expVal ); double actVal = circle.getRadius(); boolean result = testEquals( "setRadiusTest", expVal, actVal ); return result; } private static boolean getRadiusTest() { Circle circle = new Circle( 0, 0, 0 ); double expVal = 10; circle.setRadius( expVal ); double actVal = circle.getRadius(); boolean result = testEquals( "getRadiusTest", expVal, actVal ); return result; } private static boolean testEquals( String testName, double expValue, double actValue ) { final double epsilon = .001; double diff = Math.abs( expValue - actValue ); boolean result = diff < epsilon; { if ( !result ) { String msg = testName + ": expected = " + expValue + " actual = " + actValue; System.err.println( msg ); } return result; } } } |
Here are some general guidelines for developing unit tests for Java.
Among other things, this makes it easier to release production code without having all the test code mixed in. That’s why our Cartesian plane project source code is divided into main and test subdirectories:
    root
        src
            main
                java
            test
                java
Unit tests are a persistent part of your development environment; treat them as such!
You should develop your unit test code just like you would your production code. Follow best-practice coding paradigms. If you have a coding standard, follow it. Each test class should be under source control (preferably the same source control as your production code), and if the production class changes, you must update the test class. Use encapsulation liberally:
-
- Don’t stuff too much logic into a single test method; use multiple methods to test different aspects of a complex operation.
- Use helper methods to encapsulate frequently used code (frequently = more than once!).
- Use helper methods to encapsulate different steps in a complex test method.
- Make your helper methods private. If you want to share helper methods among multiple test classes, you can create one or more test utility classes or even a package.
Automate your tests.
Ideally, executing a unit test is as easy as running a program. You want to avoid manual testing such as “enter 25 into the tax field and click OK; verify that… .”
Each public class on your production tree should be represented on your test tree.
There should be at least one test class for every production class. Can there be exceptions to this? Sure. A class that does nothing but declare constants might (might!) not need a unit test. But… your development group may have a policy of having a unit test for every production class. If this is true: a) count yourself lucky. This may seem irritating at times, but trust me, you’ll find yourself living a happier and healthier life. b) Follow the policy even if it means writing a “test” class that tests nothing.
Use JUnit to develop your unit tests.
JUnit is an extremely versatile and useful tool for writing Java unit tests. For an introduction to JUnit, see below.
Introduction to JUnit
JUnit is used to create and execute unit tests in Java. The first thing you’ll notice after creating your first unit test is that it has no main method; a JUnit test is driven by the JUnit engine, which executes one or more test cases and keeps track of when and where they fail. Let’s write a JUnit test for the Circle class we looked at above.
To initiate a JUnit test in Eclipse, go to Package Explorer, right-click on the class name for which you want a unit test, and select new->JUnit Test Case. If you do this for the Circle class, you’ll see a dialog like this:
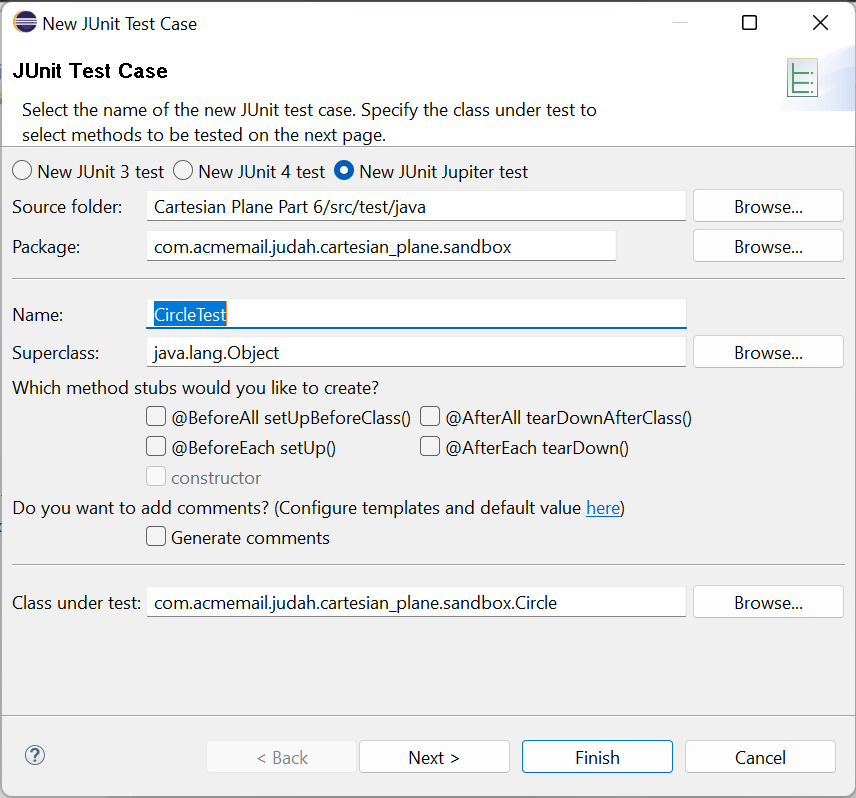
Note: you may need to add the JUnit library to Eclipse by hand. To do this, right-click on the project name and select Build Path -> Add Libraries. This will bring up a dialog that allows you to add JUnit to your build.
Click the next button to see a list of all the public methods available in the Circle class, including any public methods available from its superclass, Object. Select all the methods directly under Circle and click Finish.
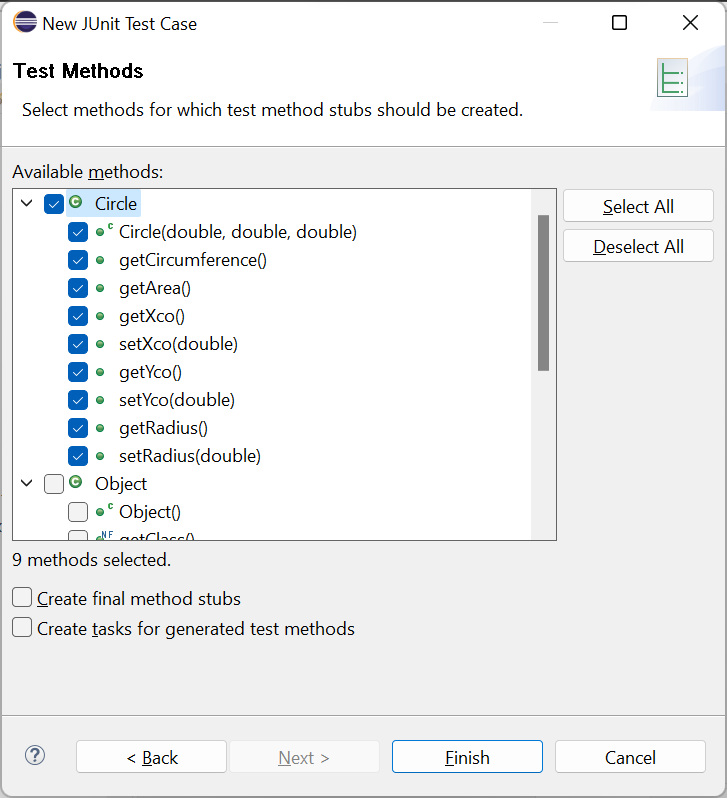
Eclipse will create a new test class under your test source tree and insert a stub for a test method for each production method you selected in the new JUnit Test Case dialog.
The JUnit test source code looks like this:
1 2 3 4 5 6 7 8 9 10 11 12 13 14 15 16 17 18 19 20 21 22 23 24 25 26 27 28 29 30 31 32 33 34 35 36 37 38 39 40 41 42 43 44 45 46 47 48 | class CircleTest { @Test void testCircle() { fail("Not yet implemented"); } @Test void testGetCircumference() { fail("Not yet implemented"); } @Test void testGetArea() { fail("Not yet implemented"); } @Test void testGetXco() { fail("Not yet implemented"); } @Test void testSetXco() { fail("Not yet implemented"); } @Test void testGetYco() { fail("Not yet implemented"); } @Test void testSetYco() { fail("Not yet implemented"); } @Test void testGetRadius() { fail("Not yet implemented"); } @Test void testSetRadius() { fail("Not yet implemented"); } } |
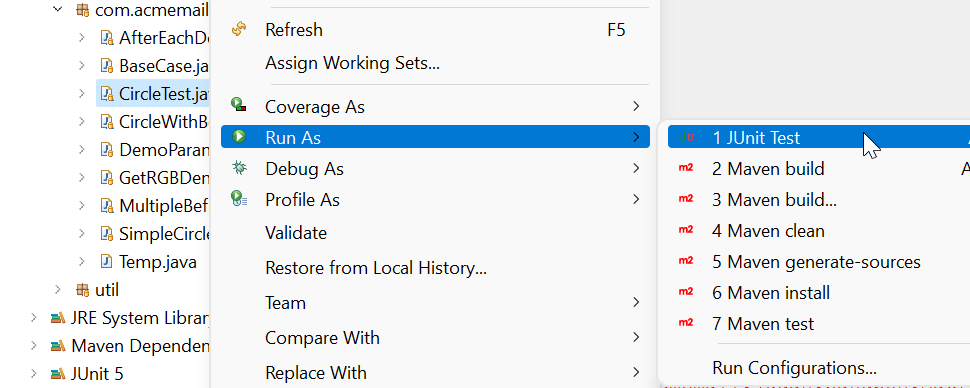
From Java’s point of view, your JUnit test is now fully formed and ready for execution, though execution will result in a unit test failure. In Package Explorer, right-click on CircleTest and select Run As -> JUnit Test. To start in the debugger, select Debug As -> JUnit Test. You can also use the shortcuts you would normally use to start an application; if you have a JUnit test class open in your editor, Eclipse will recognize that it needs to start in JUnit. In Windows, the shortcuts are control-F11 to run and F11 to start in the debugger. JUnit will run each of your tests and report the result; even if one fails, JUnit will still attempt to execute the remaining tests. The results are displayed in Eclipse in this format:
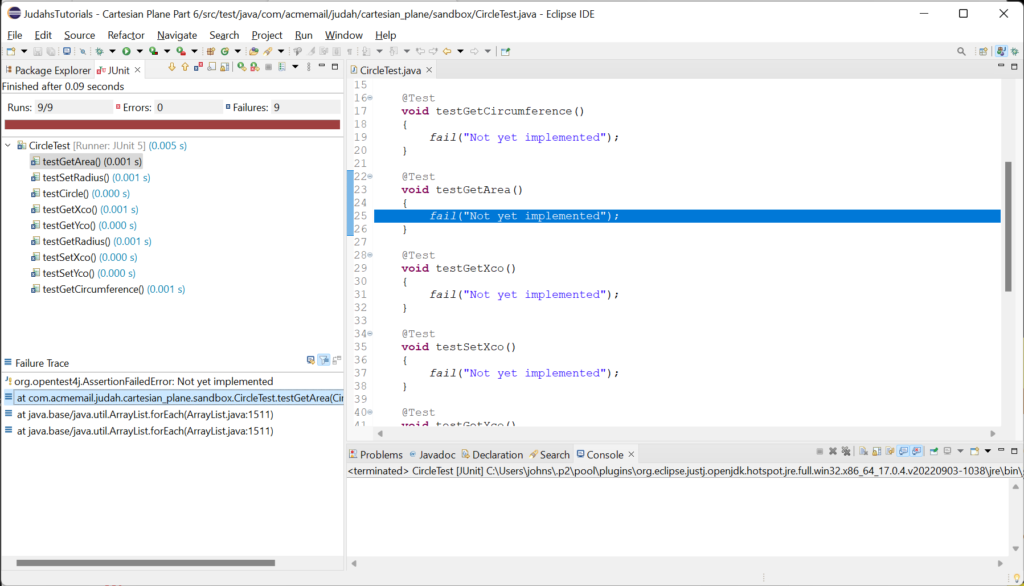
On the left, where you would normally see Package Explorer, each executed test and its status is displayed. You can see from the blue Xs displayed next to our tests that they all failed. At the lower left, you can see the Failure Trace window. For each test, this window tells you why the test failed (in this case, because the tests are “Not yet implemented”). Below the first line is a stack trace showing where the test failed in your code. For the first test in the CircleTest class, it tells us that the failure occurred at line 25 in CircleTest.java. If you double-click on any line in the stack trace, Eclipse will helpfully take you to an editor window displaying that line of code.
Let’s quickly illustrate a successful test case in the CircleTest class. Replace the testSetXco method stub with the code below.
Note: Jumping ahead just a bit, most JUnit tests make extensive use of the JUnit Assertions class. If you look at the top of your test class you should see this line of code which was generated when the test class was created:
import static org.junit.jupiter.api.Assertions.*;
The static means that individual methods in the Assertions class can be used without prepending the name of the class. This is why fail( “Not yet implemented.” ) compiles. If the import statement is missing you may have to add it yourself, for example:
import static org.junit.jupiter.api.Assertions.fail;
import static
org.junit.jupiter.api.Assertions.assertEquals;
which is what you will need to make the next example work.
1 2 3 4 5 6 7 8 9 10 11 12 | private static final double epsilon = .001; // ... @Test void testSetXco() { Circle circle = new Circle( 0, 0, 0 ); double expVal = 10; circle.setXco( expVal ); double actVal = circle.getXco(); assertEquals( expVal, actVal, epsilon ); } |
Note that for convenience, I have declared epsilon as a class variable at the top of the class.
In this code, @Test is a tag that identifies the following method as a JUnit test. If you want to omit the test, comment it out, and JUnit will no longer try to execute it. The assertEquals method comes from the JUnit Assertions class. It has to be imported before you can use it. There are several ways to do this:
- This is the way we usually employ imports:
  import org.junit.jupiter.api.Assertions;
  ...
Assertions.assertEquals( expVal, actVal, epsilon ); - If we do a static import, it relieves us of the need to prepend the class name to the method we’re invoking:
  import static org.junit.jupiter.api.Assertions.assertEquals;
  ...
assertEquals( expVal, actVal, epsilon ); - Example 2, above, only imports assertEquals; to statically import all methods from the Assertions class, use:
import static org.junit.jupiter.api.Assertions.*;
This overload of the assertEquals method uses the epsilon test for equality to compare two double values. If the values are equal (within the given tolerance epsilon), the test passes; if not, the test fails. I will temporarily corrupt Circle.java to cause this test to fail (I’ll make getXco return yco); this is the result.
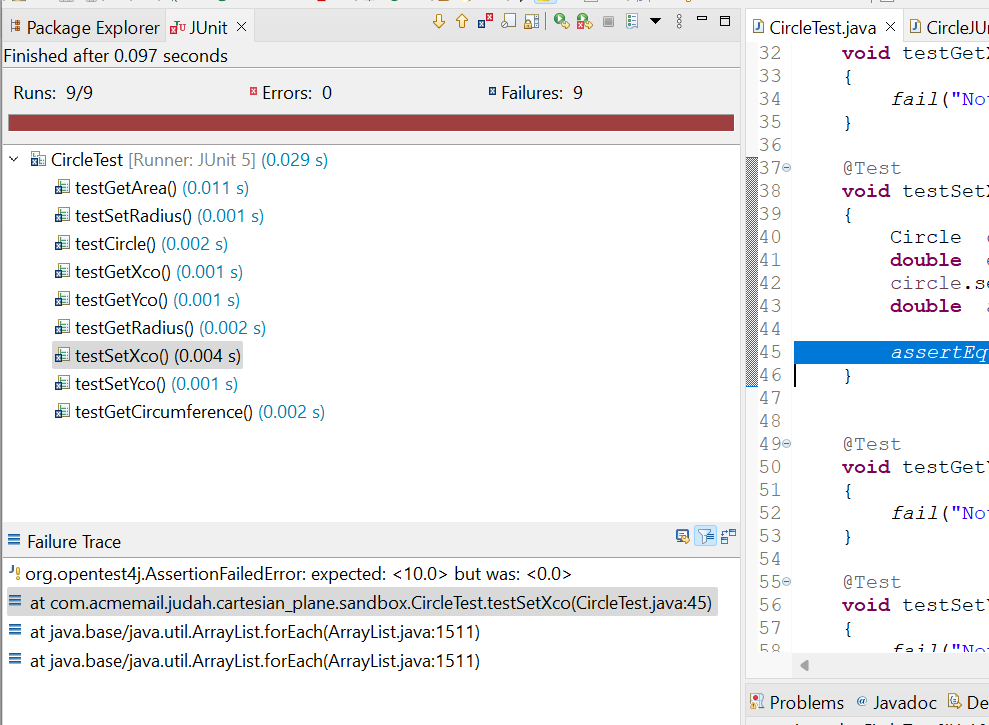
The upper left corner of the results window tells me that getXco failed; the first line of the Failure Trace window tells me why it failed (“expected <10.0> but was <0.0>”); and the second line refers to CircleTest.java line 45, which is where the test failed.
Let’s fill in just a little more of CircleTest before moving on. Here are the tests for the constructor and getCircumference:
1 2 3 4 5 6 7 8 9 10 11 12 13 14 15 16 17 18 19 20 21 22 23 24 25 26 27 28 29 30 31 32 33 34 35 36 37 38 | import static org.junit.jupiter.api.Assertions.fail; import static org.junit.jupiter.api.Assertions.assertEquals; import org.junit.jupiter.api.Test; class CircleTest { private static final double epsilon = .001; @Test void testCircle() { double xco = 10; double yco = 20; double radius = 30; Circle circle = new Circle( xco, yco, radius ); double actXco = circle.getXco(); double actYco = circle.getYco(); double actRadius = circle.getRadius(); assertEquals( xco, actXco ); assertEquals( yco, actYco ); assertEquals( radius, actRadius, epsilon ); } @Test void testGetCircumference() { double radius = 30; double expCircum = Math.PI * 2 * radius; Circle circle = new Circle( 0, 0, radius ); double actCircum = circle.getCircumference(); assertEquals( expCircum, actCircum, epsilon ); } // ... } |
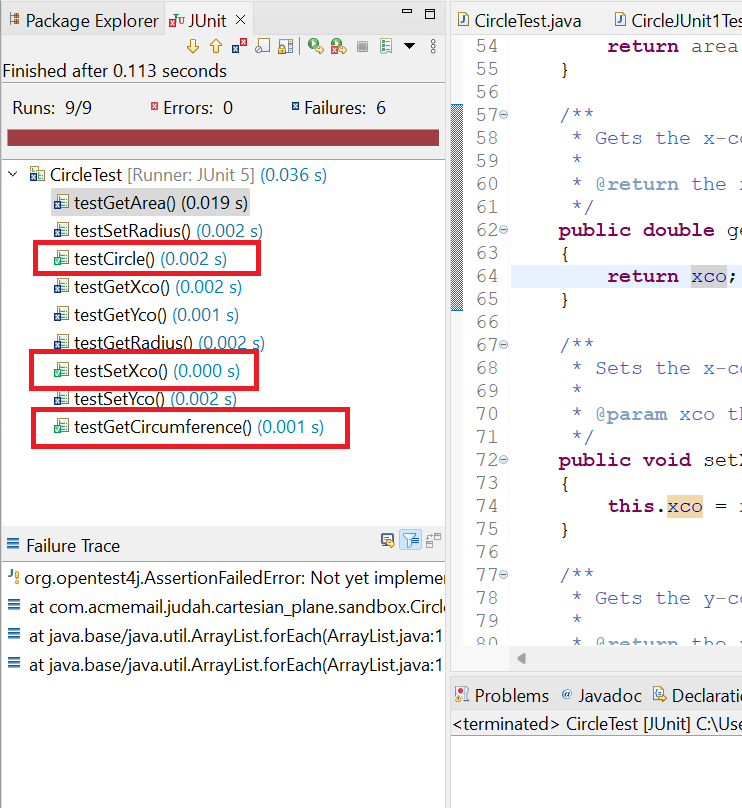
Executing this unit test shows that we have successfully tested three methods in the Circle class.
More About JUnit Assertions
Let’s have a look at the JUnit 5 Assertions class. The documentation can be found here: JUnit 5 Assertions. At first glance, there appears to be a lot here to digest. But most of the methods you’re looking at are overloads. For example (if I’ve counted correctly) assertEquals has 30 overloads, including: assertEquals( int, int )
assertEquals( long, long )
assertEquals( Object, Object)
Here are a few of the most common assertion methods and examples of using them
assertNotEquals( int iVal1, int iVal ): true (passes) if iVal1 != iVal2assertNotEquals( oldID, newID )
assertTrue( condition ): true (passes) if condition is trueassertTrue( maxValue > minValue )
assertTrue( val >= min && val < max )
assertFalse( condition ): true (passes) if condition is falseassertFalse( root < 0 )
assertEquals( Object o1, Object o2 ): true (passes) if o1.equals( o2 ) is trueassertEquals( list1, list2 )
assertNotEquals( Object o1, Object o2 ): true (passes) if o1.equals( o2 ) is falseassertNotEquals( oldPassword, newPassword )
assertNotNull( Object obj ): true (passes) if obj is not nullassertNotNull( result )
assertArrayEquals( float[] exp, float[] act, float epsilon ): true (passes) if array exp is the same size as array act, and corresponding elements of the two arrays are equal within the tolerance specified by epsilonassertArrayEquals( vector1, vector2, .001f )
More Help from JUnit
JUnit has many more useful features for developing unit tests. One of them is the before-each method. If a method is preceded by the tag @BeforeEach, it will be executed immediately before each test method in the test class is executed.
If you look at the tests in the CircleTest class, you will see that they all perform similar tasks: construct a Circle object, test for correct initial values, set a new value, verify that the new value persists, etc. Let’s do some encapsulation of the common tasks.
Note: the @BeforeEach tag must be imported before it can be used. This is true of any of the JUnit tags.
1 2 3 4 5 6 7 8 9 10 11 12 13 14 15 16 17 18 19 20 | import static org.junit.jupiter.api.Assertions.assertEquals; import org.junit.jupiter.api.BeforeEach; import org.junit.jupiter.api.Test; class CircleWithBeforeEachTest { private static final double epsilon = .001; private static final double defXco = 10; private static final double defYco = 2 * defXco; private static final double defRadius = 2 * defYco; private static final double defTestVal = 2 * defRadius; private Circle circle; @BeforeEach public void beforeEach() { circle = new Circle( defXco, defYco, defRadius ); } // ... } |
Note: The name of the before-each method can be anything you like. It’s the @BeforeEach tag that makes it a before-each method.
So, I have placed some default test values in class variables (note that they have been carefully chosen so that none are equal) and an instance variable. The before-each method will initialize the instance variable immediately before executing each test. Now, the method tests can be simplified; here are two of the simplified tests.
1 2 3 4 5 6 7 8 9 10 11 12 13 14 15 16 17 18 19 | @Test void testCircle() { double actXco = circle.getXco(); double actYco = circle.getYco(); double actRadius = circle.getRadius(); assertEquals( defXco, actXco, epsilon ); assertEquals( defYco, actYco, epsilon ); assertEquals( defRadius, actRadius, epsilon ); } @Test void testGetCircumference() { double expCircum = Math.PI * 2 * defRadius; double actCircum = circle.getCircumference(); assertEquals( expCircum, actCircum, epsilon ); } |
In case you’re wondering, you can also designate an after-each method that will be executed immediately after each test. Here’s an example that will be useful in a later lesson in this tutorial.
1 2 3 4 5 6 7 8 9 10 11 12 13 14 15 16 17 18 19 20 21 22 | class AfterEachDemo { private CartesianPlane defCartesianPlane; private Root defRoot; @BeforeEach void setUp() throws Exception { defCartesianPlane = new CartesianPlane(); defRoot = new Root( defCartesianPlane ); defRoot.start(); } // ... @AfterEach void test() { JFrame rootFrame = TestUtils.getRootFrame(); assertNotNull( rootFrame ); rootFrame.dispose(); } } |
JUnit also has a before-all (@BeforeAll) method that is executed once, before any tests, and an after-all (@AfterAll) method that is executed once, after every test has completed. The JUnit 5 User Guide documents these tags (and others, some of which we will discuss later).
By the way, you may have noticed that the code for testing the getters and setters in the Circle class is identical:
1 2 3 4 5 6 7 8 9 10 11 12 13 14 15 16 | @Test void testGetXco() { circle.setXco( defTestVal ); double actVal = circle.getXco(); assertEquals( defTestVal, actVal, epsilon ); } @Test void testSetXco() { circle.setXco( defTestVal ); double actVal = circle.getXco(); assertEquals( defTestVal, actVal, epsilon ); } |
I’m assuming here that I’m part of a group with a policy that requires a test for every element of whatever project I’m working on. If that’s true I need a test for getXco and another for setXco. I have worked on projects that did not require unit tests but wrote them anyway (see note above about happier/healthier lives). For such a project, I would be perfectly happy with a single test method called testSetGetXco. But, as I’ve said before, if you’re working on a project with stringent unit testing requirements, a) rejoice! This is a good thing! And b) FOLLOW THE POLICY.
Code Coverage
Code coverage (a.k.a. test coverage) is a measure of how much of your code has undergone unit testing. Eclipse has a built-in tool for providing this measurement, EclEmma (see the EclEmma home page). EclEmma is an implementation of JaCoCo (JAva COde COverage; see the JaCoCo home page). EclEmma/JaCoCo are not the most full-featured test coverage tools, but… they work. And they work very well. And they’re free. If you want something more fully featured, you can always go out and get, for example, Parasoft Jtest, which costs $3,500 for a single license.
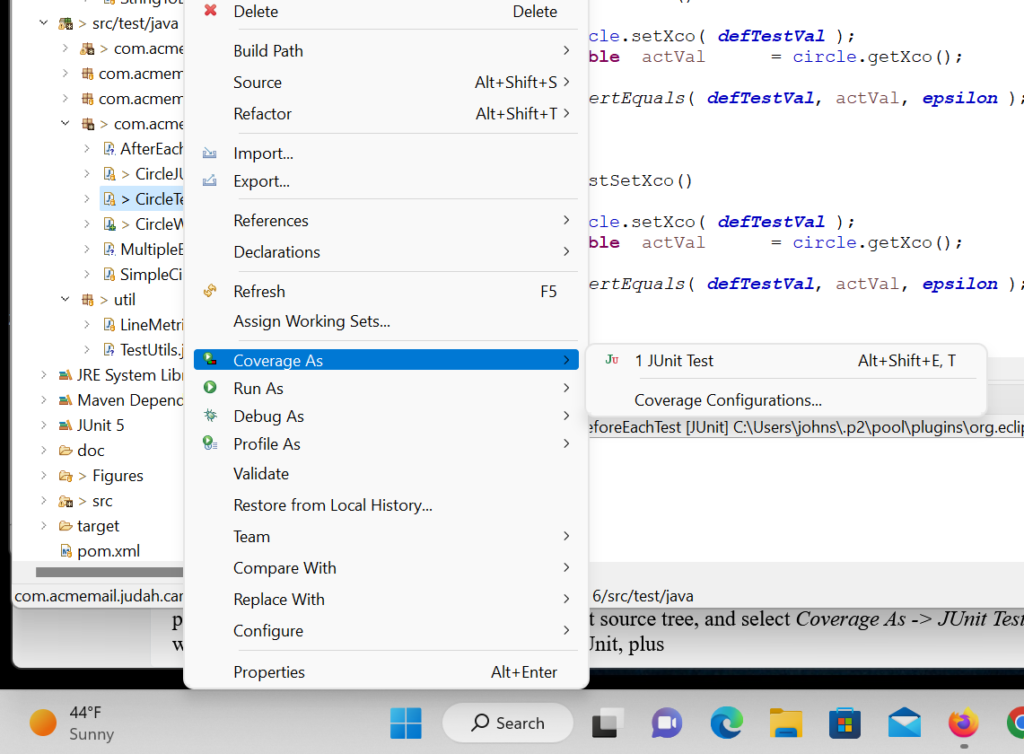
To begin gathering coverage metrics on Eclipse, go to Package Explorer and right-click on a) a single unit test class; b) a package containing unit tests; or c) the entire test source tree, and select Coverage As -> JUnit Test.
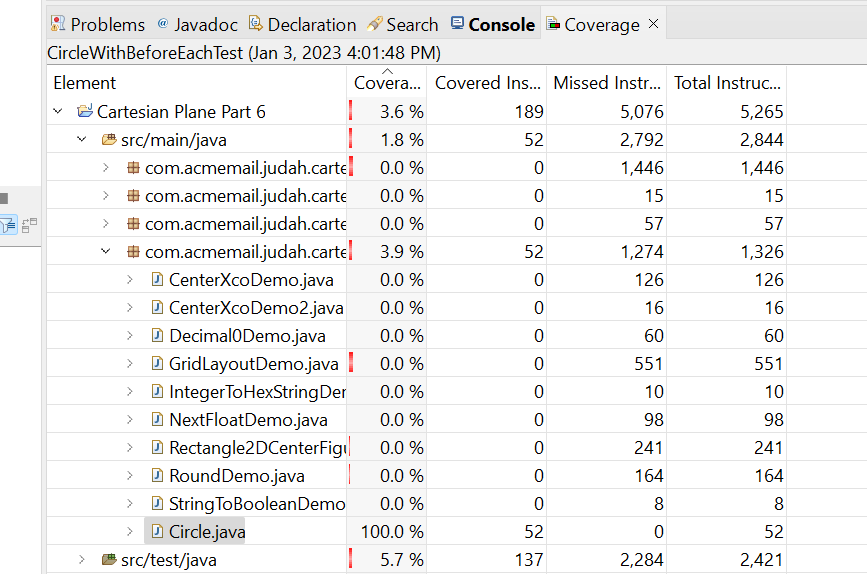
This will give you all the analysis you expect from JUnit, plus a console detailing the code coverage metrics at the project, package, and class levels. If you run CircleTest with coverage, you can see that we get 100% code coverage on the class. (100% coverage is always your goal; it can be difficult to reach. We’ll talk about this from time to time in later lessons.) If you open CircleTest.java in the editor, you can see exactly which lines of code were covered and which were not.
Unit Testing for the Cartesian Plane Project
Returning to the Cartesian Plane project, I see we will need unit tests for:
In package com.acmemail.judah.cartesian_plane:
-
- CartesianPlane
- CPConstants
- LineGenerator
In package com.acmemail.judah.cartesian_plane.app:
-
- Main
In package com.acmemail.judah.cartesian_plane.graphic_utils:
-
- Root
Unit Testing the CPConstants Class
Let’s pick a relatively easy one to do first: CPConstants.
- Make sure you have package com.acmemail.judah.cartesian_plane represented on the test source tree (if necessary, right-click on src/test/java in Package Explorer, select New -> package, and create the package).
- On the src/main/java tree, find package com.acmemail.judah.cartesian_plane, right-click on CPConstants, and select New -> JUnit Test. Make sure the name of the test is CPConstantsTest and the class under test is CPConstants. (If this isn’t working perfectly for you, see the above Note.)
- Click on Next, select all the methods directly under CPConstants, and click Finish. Verify that your test has been created on the test source tree in package com.acmemail.judah.cartesian_plane.
If it isn’t already, open CPConstantsTest.java in the editor. In the method testAsInt, delete the fail invocation and replace it with this:
1 2 3 4 5 6 7 8 9 10 | @Test void testAsInt() { int[] testVals = { -5, -1, 0, 1, 5 }; for ( int val : testVals ) { int actVal = CPConstants.asInt( "" + val ); assertEquals( val, actVal ); } } |
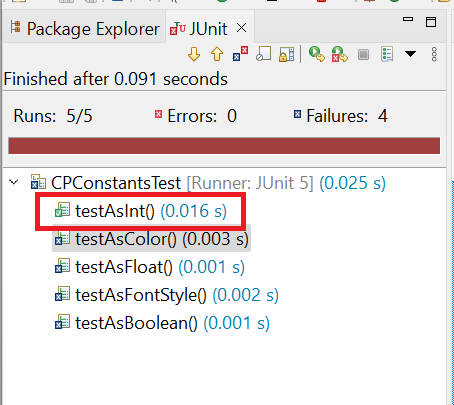
Now run CPConstantsTest (right-click on CPConstantsTest and select Run As -> JUnit Test). Verify that testAsInt completed successfully, and all the other tests failed.
The test method testAsFloat is very similar to testAsInt:
1 2 3 4 5 6 7 8 9 10 | @Test void testAsFloat() { float[] testVals = { -5.1f, -1.1f, 0, 1.1f, 5.1f }; for ( float val : testVals ) { float actVal = CPConstants.asFloat( "" + val ); assertEquals( val, actVal, .001 ); } } |
If you substitute the above code for the stub in CPConstantsTest.java, you should now have two tests that pass.
The test for asBoolean is a little different. The Javadoc for asBoolean says that the string “true” (regardless of case) will return true, and anything else will return false. For this test, we’ll have two arrays: an array of strings and a corresponding array of Boolean values that represent the expected values.
1 2 3 4 5 6 7 8 9 10 11 12 13 14 | @Test void testAsBoolean() { String[] strVals = { "True", "true", "TRUE", "False", "false", "FALSE", "a" }; boolean[] expVals = { true, true, true, false, false, false, false }; for ( int inx = 0 ; inx < strVals.length ; ++inx ) { boolean actVal = CPConstants.asBoolean( strVals[inx] ); boolean expVal = expVals[inx]; assertEquals( actVal, expVal ); } } |
The Javadoc for asColor says that the input string has to be a decimal or hexadecimal number, where hexadecimal numbers start with either “0x” or “#.” So our test inputs should include at least one decimal number string (“512”) and two hexadecimal number strings (“0x1000″, “#32000”). Let’s try this approach:
- Start with an integer;
- Convert the integer to decimal and hexadecimal strings;
- Pass each string to asColor and verify that the Color we get back encodes the original integer.
int     iVal  = 16711935;  // 0xFF00FF
String  sVal  = "" + iVal;
Color   color = CPConstants.asColor( sVal );
// do something to verify that color encodes 0xff00ff
So, about that last step, how do we know what integer is encoded by a Color object? The Color class has a method that tells us, getRGB:
Color color = new Color( 512 );
int   rgb   = color.getRGB();
// expected: rgb == 512
There’s one wrinkle to this strategy: the value returned by getRGB() includes the alpha bits (the value in the high-order byte of the integer that encodes the transparency of the color; see Java Color Primer). In other words, the value you put into a Color is not the value returned by getRGB(). The following program demonstrates this discrepancy.
1 2 3 4 5 6 7 8 9 10 11 12 | public static void main(String[] args) { int colorValIn = 0xFF00FF; Color color = new Color( colorValIn ); int colorValOut = color.getRGB(); String fmt = "color in: %08X%ncolor out: %08X%n"; System.out.printf( fmt, colorValIn, colorValOut ); } // output: // color in: 00FF00FF // color out: FFFF00FF |
When we compare the expected value to the value returned by getRGB(), we first have to ensure that the alpha bits are turned off (set to 0s). So, how do you turn off specific bits in an integer? That requires a bit of knowledge about Java bitwise operations (for a discussion of bitwise operations, see Bitwise and Bit Shift Operators in the Oracle Java Tutorial). The application SuppressAlphaBitsDemo in the project sandbox package (which you can find in the GitHub repository) demonstrates how to do this. Here’s a summary of how it works:
- Given: rgb is an integer value returned by Color.getRGB().
- Start by identifying the bits you want to turn off. The high-order byte of a 32-bit integer can be represented by the hexadecimal value 0xFF000000:
int alphaMask = 0xFF000000; // 11111111000000000000000000000000 - Now “flip the bits”; change all 0 bits to 1 and all 1 bits to 0; this is called the integer’s bitwise complement. You do that with the complement operator, “~” (that’s the tilde; on most American keyboards, it’s found in the upper left corner of your keyboard layout).
~alphaMask // 00000000111111111111111111111111 - Perform a bitwise and (&) operation using the complement of the alpha mask and rgb; the result is an integer value with all the alpha bits set to 0.
int result = ~alphaMask & rgb;
To streamline this logic, let’s write a helper method that takes a Color object and the expected integer that it encodes and then verifies that the encoding is correct:
1 2 3 4 5 6 7 8 9 10 11 12 13 14 | /** * Compares an integer value to a Color converted to an integer. * The alpha bits in the Color value are suppressed * prior to performing the comparison. * * @param expVal given integer value * @param color given Color value */ private static void testColorAsInt( int expVal, Color color ) { int rgb = color.getRGB(); int actVal = rgb & ~0xFF000000; assertEquals( expVal, actVal ); } |
If you’re not convinced that the above logic is correct, I don’t blame you; I’m not either. Let’s bench test it: encode the algorithm in a sample application that demonstrates what happens is what we expect. Here’s ValidateTestColorAsInt from the project’s sandbox package.
1 2 3 4 5 6 7 8 9 10 11 12 13 14 15 16 17 18 19 20 21 22 23 24 25 26 27 28 | public class ValidateTestColorAsInt { public static void main(String[] args) { int cyanInt = 0x00FFFF; int magentaInt = 0xFF00FF; int yellowInt = 0xFFFF00; Color cyan = new Color( cyanInt ); Color magenta = new Color( magentaInt ); Color yellow = new Color( yellowInt ); testColorAsInt( cyanInt, cyan ); testColorAsInt( magentaInt, magenta ); testColorAsInt( yellowInt, yellow ); } private static void testColorAsInt( int expVal, Color color ) { int rgb = color.getRGB(); int actVal = rgb & ~0xFF000000; System.out.printf( "rgb without masking: %08x%n", rgb ); System.out.printf( "rgb after masking: %08x%n", actVal ); System.out.printf( "expected value: %08x%n", expVal ); System.out.println( "expected == actual? " + (expVal == actVal) ); System.out.println( "=============================" ); } } |
Here’s the output from the program:
rgb without masking: ff00ffff
rgb after masking:   0000ffff
expected value:      0000ffff
expected == actual? true
=============================
rgb without masking: ffff00ff
rgb after masking:   00ff00ff
expected value:      00ff00ff
expected == actual? true
=============================
rgb without masking: ffffff00
rgb after masking:   00ffff00
expected value:      00ffff00
expected == actual? true
=============================
And here’s the final asColor test logic.
1 2 3 4 5 6 7 8 9 10 11 12 13 14 15 16 17 18 19 20 21 22 23 24 25 26 27 | @Test void testAsColor() { int[] iVals = { 0xff00ff, 0x00cc00, 0x0e0e0e }; for ( int iVal : iVals ) { String strVal1 = "0x" + Integer.toHexString( iVal ); String strVal2 = "#" + Integer.toHexString( iVal ); String strVal3 = "" + iVal; Color actVal1 = CPConstants.asColor( strVal1 ); Color actVal2 = CPConstants.asColor( strVal2 ); Color actVal3 = CPConstants.asColor( strVal3 ); // Compare the original integer value to the value of the // Color expressed as an int. The Color value includes // the alpha component (bits 28-31, 0xFF000000) which must // be turned off before performing the comparison testColorAsInt( iVal, actVal1 ); testColorAsInt( iVal, actVal2 ); testColorAsInt( iVal, actVal3 ); } } |
The last method we have to test in CPConstants is asFontStyle. The Javadoc for this method says that we can supply three possible strings (“plain”, “italic” and “bold”) and that they will be treated as case-insensitive. Testing six possible stings should cover all the bases.
1 2 3 4 5 6 7 8 9 10 11 12 13 14 15 16 17 | @Test void testAsFontStyle() { int pValUpper = CPConstants.asFontStyle( "PLAIN" ); assertEquals( Font.PLAIN, pValUpper ); int bValUpper = CPConstants.asFontStyle( "BOLD" ); assertEquals( Font.BOLD, bValUpper ); int iValUpper = CPConstants.asFontStyle( "ITALIC" ); assertEquals( Font.ITALIC, iValUpper ); int pValLower = CPConstants.asFontStyle( "plain" ); assertEquals( Font.PLAIN, pValLower ); int bValLower = CPConstants.asFontStyle( "bold" ); assertEquals( Font.BOLD, bValLower ); int iValLower = CPConstants.asFontStyle( "italic" ); assertEquals( Font.ITALIC, iValLower ); } |
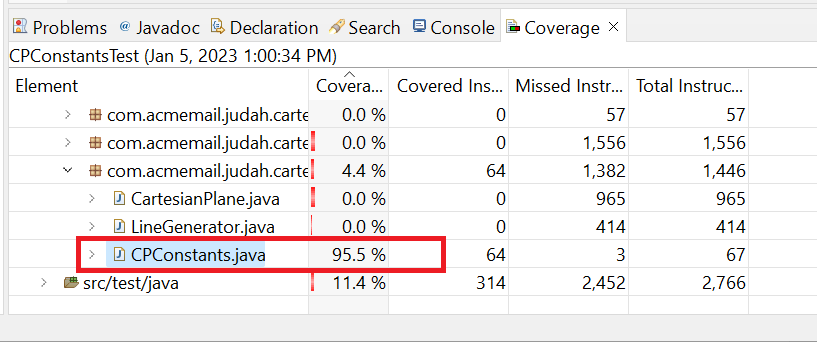
Now, when I execute CPConstantsTest I see that all the tests pass. But what kind of code coverage have I gotten out of my test? To find out right-click on CPConstantsTest in Package Explorer and select Coverage As -> JUnit Test. Here are the results that I get when I do this.
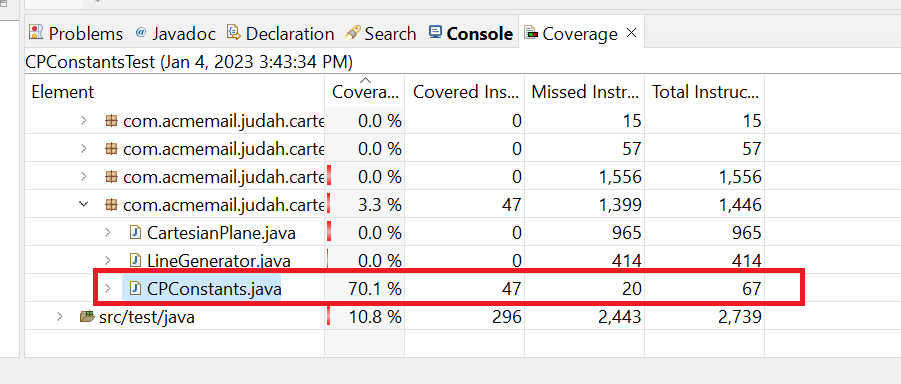
Seventy percent coverage is not very good. To see what we’re missing, look at CPConstants.java in the editor:
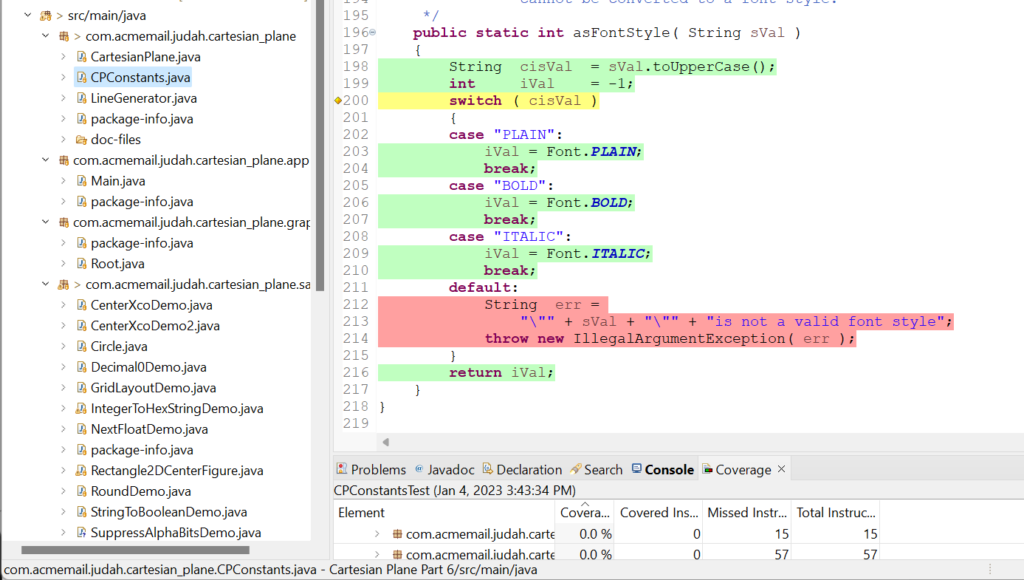
One thing we missed was the logic for what happens when we pass an incorrect value to asFontStyle(). This is sometimes called go-wrong testing: does my code respond correctly when given an invalid value? In this case, asFontStyle() should throw an IllegalArgumentException. Come to think of it, even though it doesn’t show up in the code coverage metrics, the Javadoc says that I should also be throwing exceptions when invalid values are passed to asInt, asFloat, and asColor, and I haven’t tested any of that. So, how do you test a condition that will cause an exception to be thrown?
Fortunately, JUnit has an assertion just for that: assertThrows(Class<T> expectedType, Executable executable)
To use this assertion, we need:
- The Class object underlying the exception we’re looking for, IllegalArgumentException. We can get that via the class variable IllegalArgumentException.class. This is a parameterized type, Class<T>. If we want to save the return value in a variable (as I always do), the variable will have to be type Class<IllegalArgumentException>:
     Class<IllegalArgumentException> clazz   =
IllegalArgumentException.class; - An Executable. Executable is a functional interface usually provided via a lambda. We haven’t gotten around to talking about either of those things yet, but it’s simple enough to copy and paste:
() -> CPConstants.asFontStyle( "INVALID" )
This translates as: “call the asFontStyle method passing the string “INVALID.”
The invocation of the assertion looks like this: assertThrows( clazz, () -> CPConstants.asFontStyle( "INVALID" ) );
The assertion passes if asFontStyle() throws an IllegalArgumentException, otherwise it fails. Here’s the final version of testAsFontStyle:
1 2 3 4 5 6 7 8 9 10 11 12 13 14 15 16 17 18 19 20 21 22 | @Test void testAsFontStyle() { int pValUpper = CPConstants.asFontStyle( "PLAIN" ); assertEquals( Font.PLAIN, pValUpper ); int bValUpper = CPConstants.asFontStyle( "BOLD" ); assertEquals( Font.BOLD, bValUpper ); int iValUpper = CPConstants.asFontStyle( "ITALIC" ); assertEquals( Font.ITALIC, iValUpper ); int pValLower = CPConstants.asFontStyle( "plain" ); assertEquals( Font.PLAIN, pValLower ); int bValLower = CPConstants.asFontStyle( "bold" ); assertEquals( Font.BOLD, bValLower ); int iValLower = CPConstants.asFontStyle( "italic" ); assertEquals( Font.ITALIC, iValLower ); // Test go-wrong path Class<IllegalArgumentException> clazz = IllegalArgumentException.class; assertThrows( clazz, () -> CPConstants.asFontStyle( "INVALID" ) ); } |
As mentioned, we must also test the exception paths in asInt, asFloat, and asColor. These methods potentially throw NumberFormatException, so that’s the class we have to test for: Class<NumberFormatException> clazz =
NumberFormatException.class;
1 2 3 4 5 6 7 8 9 10 11 12 13 14 15 | @Test void testAsInt() { int[] testVals = { -5, -1, 0, 1, 5 }; for ( int val : testVals ) { int actVal = CPConstants.asInt( "" + val ); assertEquals( val, actVal ); } // Go-wrong path: verify that NumberFormatException is thrown // if a non-numeric string is passed. Class<NumberFormatException> clazz = NumberFormatException.class; assertThrows( clazz, () -> CPConstants.asInt( "five" ) ); } |
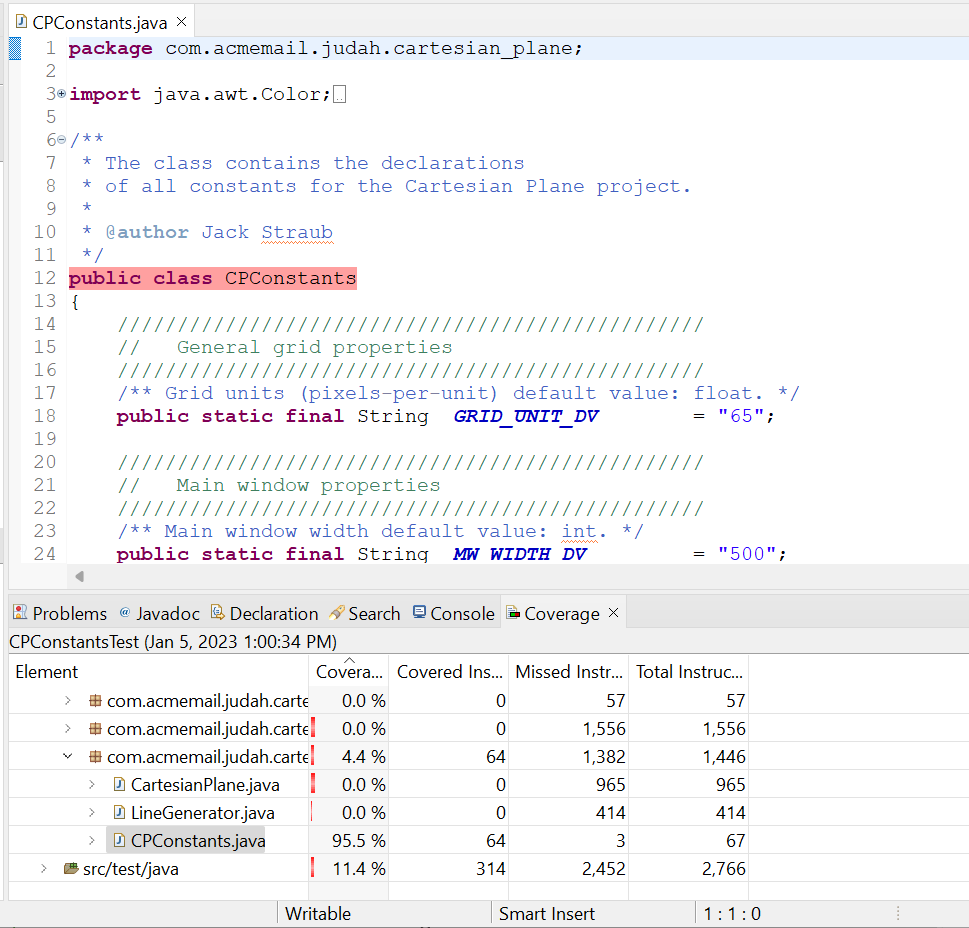
Now, if we run code coverage, our metrics are improved, but still not perfect:
To see where we are missing coverage, we can open CPConstants.java in the editor. This tells us that the code at line 12 hasn’t been tested; this line corresponds to the class declaration public class CPConstants.
So what are we missing? Recall Java’s rule about constructors: if you don’t explicitly write a constructor yourself, the compiler will generate the default constructor for you. So we have failed to get coverage on the default constructor CPConstants() even though we didn’t write it and can’t even see it. Can we fix this? If we were using a commercial code coverage tool we could probably configure it to eliminate generated code from the metrics, but JaCoCo doesn’t have that feature. We could add a “test” for the constructor to CPConstantsTest:
1 2 3 4 5 6 7 | @Test public void testCPConstants() { // This is just to get code coverage on the constructor // generated by the compiler. new CPConstants(); } |
This will get us up to 100% coverage but there’s a philosophical problem. One of the commonly accepted “best practices” for writing Java code is that classes like CPConstants, which are not intended ever to be instantiated, should be given an explicit, private constructor to prevent instantiation (see Joshua Block, Effective Java Third Edition, Item 4):
1 2 3 4 5 6 | /** * Private constructor to prevent instantiation. */ private CPConstants() { } |
So, your choice: best practices or 100% coverage? (If you’re thinking, “c’mon, you can get both,” you’re right, but that’s an advanced topic with technical and philosophical issues. Let’s not go there, at least for now.)
By the way: there are other places where the compiler generates code for you, notably when you declare an enum.
Unit Testing the Root Class
Testing the Root class is pretty straightforward. All I have to do to get 100% coverage is instantiate and start it:
Root root   = new Root( new JPanel() );
root.start();
There are two glitches:
Glitch #1: The start method initiates GUI processing in its own thread. We’re not ready to talk about threads yet, but think of it this way: starting a new thread is like having a plumber’s helper. The plumber is in the bathroom on the second story of a house. The helper stands at the bottom of the stairs on the first story, waiting for instructions. The plumber shouts, “OK, turn the water on.” To turn the water on, the helper has to run down to the basement and twist the shutoff valve several times, and then the water has to flow up to the second-story bathroom; i.e., there’s going to be a delay between when the instruction is given, and water comes out of the tap in the bathroom. The plumber can’t give the order and immediately start complaining because there’s no water; he has to wait some minimum time for the order to be executed and to take effect.
This is the situation when we tell the Root object to start in a new thread; we have to give it time before we can see the results. This is pretty easy because the Thread class has a class method, sleep(long milliseconds), that will allow us to pause some number of milliseconds while I wait for the new thread to do its thing. However, the annoying thing about the sleep method is that it potentially throws InterruptedException. It probably won’t and, in this context, I don’t care if it does, but InterruptedException is a checked exception, so I need to enclose it in try/catch blocks:
    try
    {
        Thread.sleep( millis );
    }
    catch ( InterruptedException exc )
    {
        // ignore exception
    }
What we’ve got above is fine so far, but in the future, especially when we start doing more GUI testing, we will have many places where we have to pause for some time. I don’t relish the idea of writing try/catch logic every time I need to pause, and it makes my code look messy. So, let’s encapsulate it. Remember the TestUtils class? Let’s add a pause(long milliseconds) class method to it. The new pause method will call Thread.sleep, catch the InterrptedException if it occurs, and ignore it when it does.
1 2 3 4 5 6 7 8 9 10 11 12 13 14 15 16 17 18 19 | /** * Put the current thread to sleep * for a given number of milliseconds. * An InterruptedException may occur; * if it does it will be ignored. * * @param millis the given number of milliseconds */ public static void pause( long millis ) { try { Thread.sleep( millis ); } catch ( InterruptedException exc ) { // ignore exception } } |
So now my RootTest JUnit test class looks like this:
1 2 3 4 5 6 7 8 9 10 11 12 13 | import javax.swing.JPanel; import org.junit.jupiter.api.Test; import util.TestUtils; class RootTest { @Test void test() { Root root = new Root( new JPanel() ); root.start(); TestUtils.pause( 2000 ); } } |
This gives us 100% code coverage on the Root class. But…
Glitch #2: it doesn’t test anything other than that Root.start() doesn’t cause the program to crash. I know I said earlier that, under some circumstances, we might have to write a unit test that tests nothing. But isn’t there something we can do here? Can’t we at least verify that the GUI has appeared?
To find out if it’s visible we have to interrogate the JFrame contained in the Root instance. We could venture deep into GUIland and find the JFrame and ask it… but that’s a complex operation that we’ll save for another lesson. For now, let’s consider another principal of testing: if you can’t find a good way to thoroughly test your code as it is, consider changing your code. Here, we have a relatively trivial instance of adhering to this principle. I’m simply going to propose that we add a method to the Root class that will allow us to ask if the instance has been started.
Now the question is: can I justify adding a public method to a class solely to satisfy one testing need? I will argue that started is a significant property of an instance of Root and may be useful to other non-testing users, so yes, it’s justified.
The new method in the Root class will be a Boolean method. The way it will know if it’s “started” or not will be by checking the isVisible property of the enclosed JFrame:
1 2 3 4 5 6 7 8 9 10 11 12 13 14 15 16 17 18 19 20 | public class Root implements Runnable { /** The application frame. */ private JFrame frame = null; // ... /** * Indicates whether this instance has been started or not. * The instance is considered <em>started</em> * if the underlying JFrame is visible. * * @return true if this instance has been started * * @see #start() */ public boolean isStarted() { return frame.isVisible(); } // ... } |
Now the RootTest JUnit test class looks like this:
1 2 3 4 5 6 7 8 9 10 11 12 | class RootTest { @Test void test() { Root root = new Root( new JPanel() ); assertFalse( root.isStarted() ); root.start(); TestUtils.pause( 2000 ); assertTrue( root.isStarted() ); } } |
We still have three classes that need unit tests: LineGenerator, CartesianPlane, and Main. I’m going to leave CartesianPlane and Main for a later lesson. But let’s go ahead and write the test for LineGenerator. We’ll do that on Page 2 of this lesson.