In this lesson we will extend our user input support to plotting polar equations, and saving and restoring equations. We’ll also begin building a GUI, starting with a discussion of dialogs.
Note: if you’re not familiar with polar equations you can skip the section that discusses support for them. The main purpose of the exercise is to see how encapsulation makes it easy to extend the functionality of a module. However, the subject is very interesting and worth exploring. To learn more about polar equations, see Polar and Cartesian Coordinates on the Math is Fun web site.
Here are some helpful links to support the material in this lesson.
- Polar and Cartesian Coordinates on the Math is Fun web site
- How to Make Dialogs in the Oracle Java Tutorials
- JOptionPane, in the Java API
- HTML Tables, in the W3Schools tutorials
Note that I have put a discussion of the sample applications and JUnit tests for this lesson on separate pages:
GitHub repository: Cartesian Plane Part 12
Previous lesson: Cartesian Plane Lesson 11: User Input, Testing
Tweaking the User Input Module
In order to support our goals for this lesson we’ll have to add some extensions to the user input module. For our dialogs we’ll have to be able to give an equation a name. For this we will:
- Add the methods setName and getName to the Equation interface and the Exp4jEquation class.
- Add the name instance variable to the Exp4jEquation class.
- Make the equation name a optional argument when issuing the EQUATION command, and be prepared to use it in the InputParser class.
Equation Names
Here are the tweaks for giving names to equations.
🟫 interface Equation
public interface Equation
{
    void setName( String name );
    String getName();
    // ...
}
🟫 class Exp4jEquation
public class Exp4jEquation implements Equation
{
    private final Map<String,Double>    vars        = new HashMap<>();
    private String                      name        = "";
    // ...
    @Override
    public void setName( String name )
    {
        this.name = name;
    }

    @Override
    public String getName()
    {
        return name;
    }
    // ...
}
🟫 class InputParser
public class InputParser
{
    // ...
        case EQUATION:
            equation = equation.newEquation();
            equation.setName( argString );
            break;
    // ...
}
Polar Equations
Currently we have the ability to plot two kinds of equations in the Cartesian plane:
- Cartesian equations, y = f(x)
Variable x ranges over an interval, such as -2 ≤ x ≤ 2, and we calculate values for y. Example:y = -2x^2 + 3x -4 - Parametric equations, (x,y) = f (t)
Variable t (the parameter) ranges over an interval, such as 0 ≤ t ≤ 2π, and we calculate values x(t) and y(t). Recall, by the way, that t is the default name for the parameter variable; the user can change that using the PARAM command. Example:x = a * sin(n * t) * cos(t)y = a * sin(n * t) * sin(t)
In polar notation, coordinates are expressed as a radius (r) and angle (theta). To plot such an equation, we usually allow theta (default variable name t) to range over an interval, then, for each sequential value of t, we calculate a value for the radius (default variable name r). Example: for 0 ≤ t ≤ 2π
r = f(t)
It’s also possible, if unusual, to allow r to range over an interval and compute values for theta: for -1 ≤ t ≤ 1 t = f(r)
In our code, the default variable names for radius and theta will be r and t, but we’ll give the user the option to change the names using two new commands, RADIUS and THETA: RADIUS rad THETA t0
To plot a polar equation in the Cartesian plane we need to be able to convert polar coordinates, (r,t) to Cartesian coordinates, (x,y), but that turns out to be pretty easy: x = r * cos(t) y = r * sin(t)
■ class Exp4jEquation
See also: Exp4JEquation JUnit Tests
Most of the work of adding support for polar equations is going to take place in Exp4jEquation. What sorts of changes are we going to have to make there? Well, just like we keep track of the parameter variable name for parametric equations, we’re going to have to keep track of the variable names for radius and theta. That means two new instance variables, and two new pairs of accessors:
public class Exp4jEquation implements Equation
{
    // ...
    private String                      param       = "t";
    private String                      radius      = "r";
    private String                      theta       = "t";
    // ...
    @Override
    public String getRadiusName()...
    public void setRadiusName( String radius )...
    public String getThetaName()...
    public void setThetaName( String theta )
    // ...
}
Just like we have expression variables for calculating x and y values, we’ll need variables for calculating r and theta; and we’ll need getters and setters for both:
public class Exp4jEquation implements Equation
{
    // ...
    private String                      xExprStr    = "1";
    private String                      yExprStr    = "1";
    private String                      tExprStr    = "1";
    private String                      rExprStr    = "1";
    // ...
    private Expression                  xExpr       = null;
    private Expression                  yExpr       = null;
    private Expression                  tExpr       = null;
    private Expression                  rExpr       = null;
    // ...
    public String String getXExpression()...
    public public Result setXExpression( String exprStr )
    public String String getYExpression()...
    public public Result setYExpression( String exprStr )
    public String String getRExpression()...
    public public Result setRExpression( String exprStr )
    public String String getTExpression()...
    public public Result setTExpression( String exprStr )
    // ...
}
The new Expression variables will have to be initialized in the constructors. Also, the setters for these variables will be non-trivial because of the need to validate the input; however, despite their complexity, they’re pretty easy to implement because we have encapsulated the validation logic. Here’s the code for one of the constructors, and the setRExpression method; the remainder of the code can be found in the GitHub repository.
public Exp4jEquation()
{
    initMap();
    setXExpression( xExprStr );
    setYExpression( yExprStr );
    setTExpression( tExprStr );
    setRExpression( rExprStr );
}
// ...
public Result setRExpression( String exprStr )
{
    Result    result  = validateExpr( exprStr, e -> rExpr = e );
    if ( result.isSuccess() )
        this.rExprStr = exprStr;
    return result;
}
Finally, we’ll have to add two additional methods, for generating Stream<Point2D> values from tExpr and rExpr:
public Stream<Point2D> rPlot()... // generate radius values from theta
public Stream<Point2D> tPlot()... // generate theta values from radius
We’ll look at the details of these two methods below, at the end of this section. Meantime, other changes to the module are required to support this new functionality.
■ interface Equation
We’ll need to add declarations for all the new setters and getters, and for tPlot and rPlot:
String getRadiusName();
void setRadiusName(String radius);
String getThetaName();
void setThetaName(String theta);
Stream<Point2D> rPlot();
Stream<Point2D> tPlot();
■ enum Command
We’ll need new constants for setting the radius and theta variable names and expressions, and for generating plots from polar equations:
// ...
REQUALS(
    "Describes any well-formed expression "
    + "for the evaluation of \"radius\" "
    + "in the polar equation \"r=f(t)\""
),
TEQUALS(
    "Describes any well-formed expression "
    + "for the evaluation of \"theta\" "
    + "in the polar equation \"t=f(r)\""
),
THETA( "Describes the name of the angle variable in a polar equation" ),
RADIUS( "Describes the name of the radius variable in a polar equation" ),
RPLOT( "Generates a plot of the polar equation r = f(t)" ),
TPLOT( "Generates a plot of the polar equation t = f(r)" ),
// ...
■ class CommandReader
We’ll need shortcuts for REQUALS and TEQUALS; note that this is a simple modification to the shortcuts table:
private static final Shortcut[] shortcuts   =
{
    new Shortcut( "x=", Command.XEQUALS ),
    new Shortcut( "y=", Command.YEQUALS ),
    new Shortcut( "r=", Command.REQUALS ),
    new Shortcut( "t=", Command.TEQUALS ),
    new Shortcut( "X=", Command.XEQUALS ),
    new Shortcut( "Y=", Command.YEQUALS ),
    new Shortcut( "R=", Command.REQUALS ),
    new Shortcut( "T=", Command.TEQUALS ),
};
■ class InputParser
See also: InputParser JUnit Tests
Finally, we’ll need to be able to process the new commands in the InputParser class. Note that dealing with RADIUS and THETA is just like dealing with PARAM which, you’ll recall, looks like this:
private void setParameterName()
{
    if ( argString.isEmpty() )
        System.out.println( equation.getParam() );
    else if ( !equation.isValidName( argString ) )
        formatError( argString, "is not a valid variable name" );
    else
        equation.setParam( argString );
}
To do the same thing for RADIUS and THETA we could just copy the setParameterName method and change some variable names. Or, using functional interfaces, we can have one method to set all three names, using the same strategy that we did for parseArg:
private void setName( Consumer<String> setter, Supplier<String> getter )
{
    if ( argString.isEmpty() )
        System.out.println( getter.get() );
    else if ( !equation.isValidName( argString ) )
        formatError( argString, "is not a valid variable name" );
    else
        setter.accept( argString );
}
The final changes to InputParser are in the switch statement in the parseInput( Command command, String argString ) method. Note again, how functional interfaces and encapsulation of the parseArg method have made this fairly painless:
switch ( command )
{
// ...
case REQUALS:
    parseArg( equation::setRExpression, equation::getRExpression );
    break;
case TEQUALS:
    parseArg( equation::setTExpression, equation::getTExpression );
    break;
case RADIUS:
    setName( equation::setRadiusName, equation::getRadiusName );
    break;
case THETA:
    setName( equation::setThetaName, equation::getThetaName );
    break;
case PARAM:
    setName( equation::setParam, equation::getParam );
    break;

// ...
case EXIT:
case NONE:
case YPLOT:
case XYPLOT:
case RPLOT:
case TPLOT:
case OPEN:
case SAVE:
    // ignore these
    break;
// ...
}
🔳 Plotting a Polar Equation
See also: Polar JUnit Tests
To assist in processing polar coordinates I have come up with a class for encapsulating them. Polar is an immutable class with two properties:
- private final double radius
- private final double theta
Also, this is a class without a public constructor. Instead, to get an instance of this class, you can call a class method:
public static Polar of( double radius, double theta )
Creates a Polar object with the given properties.public static Polar ofXY( double xco, double yco )
Creates a Polar object from Cartesian coordinates.public static Polar of( Point2D point )
Creates a Polar object from Cartesian coordinates encapsulated in a Point2D object.
It has some convenience methods related to its purpose of dealing with radii and angles:
public static double radiusOfXY( double xco, double yco )
Calculates the radius, as used in polar coordinates, from the given Cartesian coordinates.public static double thetaOfXY( double xco, double yco )
Calculates the angle, as used in polar coordinates, from the given Cartesian coordinates.
It has a method to convert this to Cartesian coordinates, encapsulated in a Point2D:
public Point2D toPoint()
Converts this to Cartesian coordinates.
It also overrides toString and, unsurprisingly, has getters for its two properties.
Here is the class in its entirety. Note that it does have a constructor, but it’s private:
1 2 3 4 5 6 7 8 9 10 11 12 13 14 15 16 17 18 19 20 21 22 23 24 25 26 27 28 29 30 31 32 33 34 35 36 37 38 39 40 41 42 43 44 45 46 47 48 49 50 51 52 53 54 55 56 57 58 59 60 61 62 63 64 65 66 67 68 69 70 71 72 73 74 75 76 77 78 79 80 81 82 | public class Polar { private final double radius; private final double theta; private Polar( double radius, double theta ) { this.radius = radius; this.theta = theta; } public Complex toComplex() { double real = radius * Math.cos( theta ); double imag = radius * Math.sin( theta ); Complex zed = new Complex( real, imag ); return zed; } public Point2D toPoint() { Complex cpx = toComplex(); Point2D point = new Point2D.Double( cpx.re(), cpx.im() ); return point; } public double getRadius() { return radius; } public double getTheta() { return theta; } @Override public String toString() { StringBuilder bldr = new StringBuilder( "PolarZ(" ) .append( radius ) .append( "," ) .append( theta ) .append( ")" ); return bldr.toString(); } public static Polar of( Point2D point ) { Polar pzed = ofXY( point.getX(), point.getY() ); return pzed; } public static Polar of( double radius, double theta ) { Polar pzed = new Polar( radius, theta ); return pzed; } public static Polar ofXY( double xco, double yco ) { double radius = radiusOfXY( xco, yco ); double theta = thetaOfXY( xco, yco ); Polar pzed = new Polar( radius, theta ); return pzed; } public static double radiusOfXY( double xco, double yco ) { double sum = xco * xco + yco * yco; double radius = Math.sqrt( sum ); return radius; } public static double thetaOfXY( double xco, double yco ) { double ratio = yco / xco; double theta = Math.atan( ratio ); return theta; } } |
Note: My original design for this class included conversions to/from complex coordinates. If you like doodling on the complex plane you might consider adding this functionality yourself.
◼ The tPlot and rPlot Methods
These are the methods in Exp4jEquation that generate the Stream<Point2D> to plot a polar equation on the Cartesian plane. They look an awful lot like the yPlot method. In yPlot, from a given value of x we calculate y = f(x), then map the result to Point2D( x, y ). In rPlot there’s an extra step: for a given value of t, calculate r = f(t) and map the result to Polar( r, t ), then map the polar coordinates to Point2D( r * cos(t), r * sin(t) ). Here is a side-by-side comparison of yPlot and rPlot:
yPlot:
Update variable values in yExpr
Validate yExpr
Iterate x, start ≤ x ≤ end
    set value of x in yExpr
    map to object:
        Point2D(x, yexpr.evaluate())
rPlot:
Update variable values in rExpr
Validate rExpr
Iterate t, start ≤ t ≤ end
    set value of t in rExpr
    map to object:
        Polar(rexpr.evaluate(), t)
    map to object: Point2D()
Here’s the code for rPlot and tPlot followed by some notes.
Note: the pseudocode, above, uses the default variables names for radius and theta, r and t. The actual code accounts for the possibility that the user has specified non-default names, stored in the instance variables radius and theta.
1 2 3 4 5 6 7 8 9 10 11 12 13 14 15 16 17 18 19 20 21 22 23 24 25 26 27 28 29 30 31 32 33 34 35 | public Stream<Point2D> rPlot() { rExpr.setVariables( vars ); ValidationResult result = rExpr.validate( true ); if ( !result.isValid() ) { String message = "Unexpected r-expression validation failure."; throw new ValidationException( message ); } Stream<Point2D> stream = DoubleStream.iterate( rStart, t -> t <= rEnd, t -> t += rStep ) .peek( t -> rExpr.setVariable( theta, t ) ) .mapToObj( t -> Polar.of( rExpr.evaluate(), t ) ) .map( Polar::toPoint ); return stream; } public Stream<Point2D> tPlot() { tExpr.setVariables( vars ); ValidationResult result = tExpr.validate( true ); if ( !result.isValid() ) { String message = "Unexpected t-expression validation failure."; throw new ValidationException( message ); } Stream<Point2D> stream = DoubleStream.iterate( rStart, r -> r <= rEnd, r -> r += rStep ) .peek( r -> tExpr.setVariable( radius, r ) ) .mapToObj( r -> Polar.of( r, tExpr.evaluate() ) ) .map( Polar::toPoint ); return stream; } |
- Line 3: Updates the values of variables inside rExpr.
- Line 4: Validates rExpr.
- Lines 5-9: Throws an exception if validation fails.
- Line 12: Iterates on t, for rStart <= t <= rEnd
- Line 13: Sets the value of theta in rExpr.
- Line 14: Maps t and r to a Polar object.
- Line 15: Maps the polar coordinates to Cartesian coordinates.
Dialogs
A dialog is a window that is used to interact with an operator. Dialogs are usually (there are exceptions) pop-up in nature; that is, they’re invisible until they’re needed, then they “pop-up” onto the display and disappear again after the operator completes the required interaction. The classic example is the error dialog. An operator makes an error, perhaps typing something incorrectly, and a dialog describing the error appears. The operator examines the error message, then dismisses the dialog by pushing the OK button.

Another example is the are you sure dialog. You often see this dialog when trying to exit from an editor with unsaved changes. A dialog pops up asking if you’re sure you want to do that, then gives you the option to reply YES or NO.
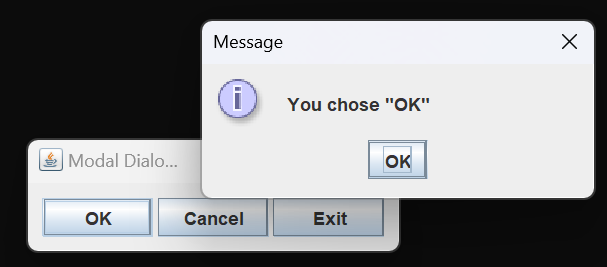
Dialogs are usually (again, there are exceptions) modal in nature. When a modal dialog is visible (the alternative, by the way, would be non-modal or modeless) the operator can’t interact with other windows until the dialog is dismissed. If you run ModalDialogDemo from the project sandbox it will bring up a window with three buttons. If you choose the OK or Cancel buttons a dialog will pop up; afterwards, you won’t be able to interact with the original window until you dismiss the dialog.
■ Simple Dialogs: the JOptionPane Class
The simplest way to create and deploy a dialog in Java is with the JOptionPane class. This class has numerous class methods to display different kinds of dialogs. For each kind of dialog, there are several overloads that give you varying levels of control over dialog features such as the dialog title, the icon and the configuration of buttons. The first argument to most of the methods is the parent window. If you don’t have a particular window in mind as the parent, you can pass null for this argument. Here are the different kinds of dialogs that JOptionPane supports, and an example of each.
Note: I’m not going to try discuss every possible overloaded method. You can find the details for these in the JOptionPane Javadoc.
■ Message Dialogs
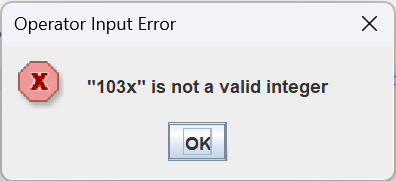
This kind of dialog displays a message with an OK button. When you display a message dialog your program is suspended until the operator dismisses it. You can display a message dialog using one of the showMessageDialog methods; the following example uses an overload in which we specify the parent window (null); a message (“that was not a valid value”); the dialog title (“User Input Error”); and the error icon (JOptionPane.ERROR_MESSAGE).

System.out.println( "waiting for dialog" );
JOptionPane.showMessageDialog(
    null,
    "That was not a valid value",
    "User Input Error",
    JOptionPane.ERROR_MESSAGE
);
System.out.println( "dialog dismissed" );
■ Confirm Dialogs
Confirm dialogs display a message with two or more buttons that allow you to make a choice. Display a confirm dialog using one of the showConfirmDialog methods; these methods return a value telling you what the operator’s choice was. The following example uses an overload in which we specify the parent window (null); a message (“Are you sure?”); the dialog title (“Confirm Operator Choice”); and the option to display yes/no buttons (JOptionPane.YES_NO_OPTION).
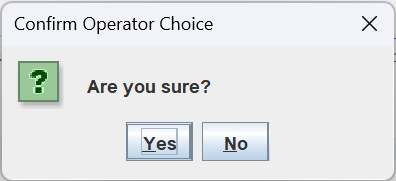
int choice  = JOptionPane.showConfirmDialog(
    null,
    "Are you sure?",
    "Confirm Operator Choice",
    JOptionPane.YES_NO_OPTION
);
■ Input Dialogs
Input dialogs display a message, a text box, and two buttons, usually OK/Cancel. Display an input dialog using one of the showInputDialog methods; these methods return:
- If OK was pressed, the string contained in the text box; otherwise
- They return null.
If the operator presses OK without entering text, the empty string is returned. The following example uses an overload in which we specify the parent window (null) and a message (“Enter your name:”); OK/Cancel buttons are displayed by default.
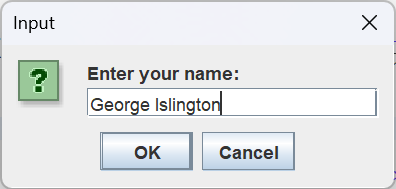
String name = JOptionPane.showInputDialog(
    null,
    "Enter your name:"
);
if ( name == null )
    System.out.println( "Operation cancelled" );
else if ( name.isEmpty() )
    System.out.println( "No data entered" );
else
    System.out.println( "the operator's name is: " + name );
■ Option Dialogs
These are highly customizable dialogs, displaying a message and possibly an array of choices; usually a button will be displayed for each choice in the array, but this can be configured. Display an option dialog using the showOptionDialog method. This method returns an integer reflecting the operator’s choice; it will be either negative, or an index into the array of options (if provided). The following example specifies:
- The parent window: null
- A message: “What would you like to purchase?”
- A dialog title: “Tacitus’s Pet Shop”
- The option type: DEFAULT_OPTION; this will be ignored because we are specifying our own array of options.
- The message type: QUESTION_MESSAGE which controls the icon displayed in the dialog.
- A custom icon: null (we are not supplying a custom icon).
- An array of options.
- The initial value; if the operator pushes the enter key without selecting a button with a mouse, “Hamster” will be selected.

String[] options     =
{
    "Dog", "Cat", "Hamster",
    "Canary", "Snake", "Cancel"
};
int choice = JOptionPane.showOptionDialog(
    null,
    "What would you like to purchase?",
    "Tacitus's Pet Shop",
    JOptionPane.DEFAULT_OPTION,
    JOptionPane.QUESTION_MESSAGE,
    null,
    options,
    "Hamster"
);
if ( choice < 0 )
    System.out.println( "No choice mad" );
else
    System.out.println( "Purchasing: " + options[choice] );
■ Formatting Text in a Dialog
Text in a dialog can be formatted using HTML. UsagePopupDemo2, in the project sandbox, shows how to format the Command usage message as an HTML table. Here’s the code and a picture of the result.
1 2 3 4 5 6 7 8 9 10 11 12 13 14 15 16 17 18 19 20 21 22 23 24 25 26 27 28 29 30 31 32 33 34 35 36 | /** Start of HTML string; everything up to start of table body. */ private static final String header = "<html>" + "<head><title>HTML Usage Demo</title></head>" + "<body>" + "<table>" + "<tbody>"; /** End of HTML string; everything from end of table body. */ private static final String trailer = "</tbody>" + "</table>" + "</body>" + "</html>"; public static void main(String[] args) { StringBuilder bldr = new StringBuilder( header ); Arrays.stream( Command.values() ) .filter( e -> e != Command.INVALID ) .filter( e -> e!= Command.NONE ) .sorted( (e1,e2) -> e1.name().compareTo( e2.name() ) ) .forEach( e -> bldr.append( "<tr><td>" ) .append( e ) .append( "</td><td style='width: 300px;'>" ) .append( e.getDescription() ) .append( "</td></tr>") ); bldr.append( trailer ); JOptionPane.showMessageDialog( null, bldr ); System.out.println( bldr ); } } |

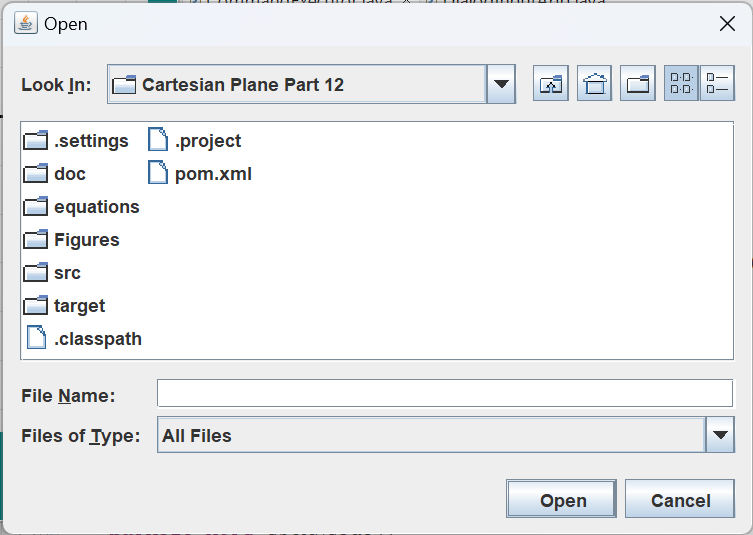
■ Specialized Dialogs
Java has some specialized dialogs ready for use, notably JColorChooser and JFileChooser. I’m not going to try to explain how to use JColorChooser. We’ll be discussing JFileChooser later in the lesson, when we talk about opening and saving equations. For the official tutorials, see How to Use Color Choosers and How to Use File Choosers in the Oracle Java Tutorial.

Custom Dialogs: ItemSelectionDialog
See also: ItemSelectionDialog JUnit Tests

When necessary, you can build your own dialogs from scratch. We are going to build a dialog that contains a list, from which items can be selected, and OK and Cancel buttons. When we wish to offer the operator a choice of selections, we’ll open this dialog. The operator will, presumably, select an appropriate choice, and push the OK button, at which point the dialog will disappear and we’ll do something with the operator’s choice. If the operator chooses Cancel the dialog will disappear and we will ignore any selection the operator may have made. Our dialog will be encapsulated in the ItemSelectionDialog class, and will be flexible enough to use any time we need to offer the operator a list of options.
𝅇 Anatomy of a Dialog
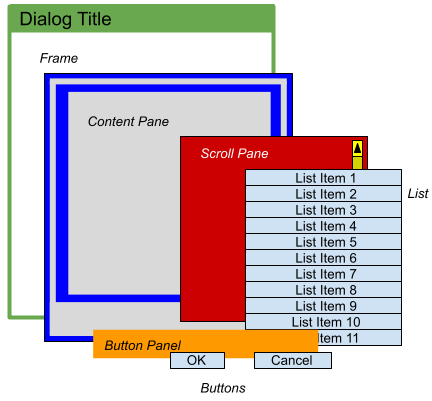
In Swing, the package that contains Java’s high-level GUI components, the root of a dialog is a frame represented JDialog object. The frame contains a content pane where we can place GUI components. Some of those components will have children, and the parent is responsible for arranging the children according to some algorithm. The content pane is one such component. The algorithm for laying out child components is determined by the parent’s layout manager. Our content pane is going to have a BorderLayout, which means we can instruct the pane to put children in one of five locations, labeled north, south, east, west and center. For our dialog, we will use the center location for displaying the list, and the south location for displaying the buttons. From there we will build our GUI in layers; Figure 1 shows what components we’ll be using, and where they’ll be positioned.

- The south location of our content pane will be occupied by the button panel. The panel itself is represented by a JPanel which arranges its children in a FlowLayout. This is the default layout, and it’s about as simple as it gets; as space allows, children are laid out first from left to right, then top to bottom. The button panel will have two children, each of type JButton. The code for creating the button panel looks like this (we’ll talk about the addActionListener logic shortly):
private JPanel getButtonPanel()
{
    JPanel panel = new JPanel();
    JButton okButton = new JButton( "OK" );
    JButton cancelButton = new JButton( "Cancel" );
    panel.add( okButton );
    panel.add( cancelButton );

    okButton.addActionListener( e -> setAndClose( OK_STATUS ) );
    cancelButton
        .addActionListener( e -> setAndClose( CANCEL_STATUS ) );

    // we still need to set the "default button";
    // see Keyboard Actions, below.

    return panel;
}
- The center location of our content pane will contain a scroll pane (type JScrollPane) which in turn contains a list (type JList) in its viewport. The scroll pane provides vertical and horizontal scroll bars as needed; if not needed, the scroll bars will not be visible. Here’s the code for assembling this part of the GUI.
private JScrollPane getScrolledList()
{
    JScrollPane pane = new JScrollPane();
    pane.setViewportView( jList );

    // ...
    // we still need to set the "default button";
    // see Keyboard Actions, below.

    return pane;
}
- Final assembly of the content pane itself is just a question of obtaining the above two pieces, and putting them in the correct locations:
private JPanel getContentPane()
{
    JPanel pane = new JPanel( new BorderLayout() );
    pane.add( getScrolledList(), BorderLayout.CENTER );
    pane.add( getButtonPanel(), BorderLayout.SOUTH );
    return pane;
}
- The job of creating the frame and setting the content pane belongs to the constructor. In addition, the constructor creates and configures the list. Here’s the code, followed by some notes.
1 2 3 4 5 6 7 8 9 10 11 12 13 14 | private final JDialog dialog; private final JList<Object> jList; public ItemSelectionDialog( Window owner, String title, Object[] items ) { jList = new JList<>( items ); if ( items.length > 0 ) jList.setSelectedIndex( 0 ); dialog = new JDialog( owner, title ); dialog.setModal( true ); dialog.setContentPane( getContentPane() ); dialog.pack(); } |
- Line 2: Declares the list variable, type JList. Note that a JList is a generic type. We’ve made ours a list of type Object so that it will support selection from any type of list.
- Lines 7-8: Selects, if possible, the first item in the list. If we don’t do this the operator will be able to push the OK button even though nothing is selected in the list.
- Line 11: Makes the dialog modal.
- Line 12: Sets the content pane.
- Line 13: Initiates the process that will give the dialog a size, and layout all of its components.
◾Other Public Constructors and Methods
- This class has an additional constructor, purely for convenience: it allows the owner argument to be null.
public ItemSelectionDialog( String title, Object[] items )
{
    this( null, title, items );
}
- The show method makes the dialog visible; recall that when a modal dialog is made visible the invoking code is suspended until the dialog is dismissed. Once dismissed, this method returns either a) the index of the selected item, if the operator presses OK; or b) -1, if the operator dismisses the dialog in any other way.
private static final int OK_STATUS = 0;
private static final int CANCEL_STATUS = 1;

private int closeStatus = -1;
// ...
public int show()
{
    closeStatus = CANCEL_STATUS;
    dialog.setVisible( true );

    int rval =
        closeStatus == OK_STATUS ? jList.getSelectedIndex() : -1;
    return rval;
}
◼ Additional Private Methods
There’s one more method that exists for the convenience of action listeners. We’ve seen listeners before, notably the property-change listeners, which are notified when the value of a property changes. Action listeners are notified when an action occurs, such as when a push button is pressed. Recall that in getButtonPanel we created two push buttons, and added action listeners to them:
    okButton.addActionListener( e -> setAndClose( OK_STATUS ) );
    cancelButton.addActionListener( e -> setAndClose( CANCEL_STATUS ) );
When one of these buttons is pressed, the given status is passed to the setAndClose method. This method records the given status for later reference, and makes the dialog invisible, causing control to return to the public show method. The setAndClose method looks like this:
private void setAndClose( int closeStatus )
{
    this.closeStatus = closeStatus;
    dialog.setVisible( false );
}
ItemSelectionDialogDemo1, from the project sandbox, presents an example of how to use the ItemSelectionDialog class.
1 2 3 4 5 6 7 8 9 10 11 12 13 14 15 16 17 | public class ItemSelectionDialogDemo1 { public static void main(String[] args) { String[] names = { "Sally", "Manny", "Jane", "Moe", "Anapurna", "Jack", "Alice", "Tweedledee", "Elizabeth", "Tweedledum", }; ItemSelectionDialog dialog = new ItemSelectionDialog( "Choose a Name", names ); int choice = dialog.show(); System.out.println( "Option: " + choice ); if ( choice >= 0 ) System.out.println( names[choice] ); System.exit( 0 ); } } |
◼ Keyboard Actions
If you run one of the sample JOptionPane dialog demos, InputDialogDemo1 from the project sandbox would be a good example, you’ll see that the dialog automatically responds to certain keyboard actions. Notably, pressing the enter key will activate the OK button, and pressing the escape key is equivalent of selecting the Cancel button. It would be convenient if our custom dialog acted the same way.
□ Responding to the enter Key
Implementing the code for this action is fairly easy; we just have to set the default button in the JDialog object. The way you do this is through the dialog’s JRootPane. (If you’re curious about root panes, and other obscure components of dialogs and frames, see How to Use Root Panes, in the Oracle Java tutorial.) To do this I’ll go to the getButtonPanel method, where I will get the dialog’s root pane and set the default button to the OK button:
private JPanel getButtonPanel()
{
    // ...
    JRootPane rootPane = dialog.getRootPane();
    rootPane.setDefaultButton( okButton );

    return panel;
}
□ Responding to the escape Key
Implementing the escape action is not quite as simple. We have to make entries into two tables, implemented as maps. The two tables belong to our JList object, so our code will go into the getScrolledList method.
Note: the following discussion can be confusing because we’re using key in two different contexts. On the one hand it will refer to the escape key as used on the keyboard, and creating a Keystroke object. But it can also refer to the key in a map. In the following code, key used in conjunction with the InputMap and ActionMap refers to the key in a map.
The first thing the we need is an Action object. Action is a sub-interface of ActionListener, so instantiating an Action object entails implementing the actionPerformed(ActionEvent) method required by ActionListener. The Action interface has some additional abstract methods that require implementation, but that need not concern us here, because our Action object is going to be a subclass of AbstractAction. This class implements all the methods required by the Action interface except for actionPerformed. So our Action object will be implemented as an anonymous subclass of AbstractAction that overrides the actionPerformed method:
Action action = new AbstractAction() {
    public void actionPerformed( ActionEvent evt ) {
        setAndClose( CANCEL_STATUS );
    }
};
Now our Action needs to go into the JList object’s action map, which is equivalent to type Map<Object,Action>. We will need an associated key. As you can see from the type, the key can be any object but, in practice, it is usually a string. We will use a string which, to avoid conflicts across libraries, will begin with our root package name: String key = "com.acmemail.judah.CancelOnEscape";
To put it into the action map we will use: ActionMap actMap = jList.getActionMap(); actMap.put( key, action );
Next we need to an an entry in the JList object’s input map, which is equivalent to type Map<KeyStroke,Object>. The key to the input map entry is a KeyStroke object that encapsulates the escape key: char esc = '\u001b'; KeyStroke keyStroke = KeyStroke.getKeyStroke( esc );
The value of the entry will be the key (as in map key) to the action map entry that contains the desired Action: InputMap inMap = jList.getInputMap(); inMap.put( keyStroke, key );
Now, if the operator presses the escape key while the JList is listening to the keyboard (i.e., the JList has keyboard focus), the following sequence of events occurs:
- Operator presses escape key;
- Swing looks in the input map, and sees that the escape key maps to a string;
- The string from the input map is used as a key to retrieve the Action from the action map;
- The Action’s actionPerformed method is invoked, which, in turn invokes setAndClose(CANCEL_STATUS);
- The setAndClose method sets the dialog status to CANCEL_STATUS and make the dialog invisible;
- Because our dialog is modal, when it becomes invisible application control returns to the show method (the method that originally made the dialog visible);
- The show method returns -1 to the invoker.
Here is the getScrolledList method in its entirety:
1 2 3 4 5 6 7 8 9 10 11 12 13 14 15 16 17 18 19 20 21 22 23 24 | private JScrollPane getScrolledList() { JScrollPane pane = new JScrollPane(); pane.setViewportView( jList ); // Define action @SuppressWarnings("serial") Action action = new AbstractAction() { public void actionPerformed( ActionEvent evt ) { setAndClose( CANCEL_STATUS ); } }; char esc = '\u001b'; KeyStroke keyStroke = KeyStroke.getKeyStroke( esc ); String key = "com.acmemail.judah.CancelOnEscape"; InputMap inMap = jList.getInputMap(); ActionMap actMap = jList.getActionMap(); actMap.put( key, action ); inMap.put( keyStroke, key ); return pane; } |
The FileManager Class
See also: FileManager JUnit Tests
The FileManager class will assist us in reading and writing equations. This will be particularly convenient for an application that implements the OPEN and CLOSE commands (see the CommandExecutor class on the Sample Applications page for this lesson). This is a utility class with overloaded methods for opening a file and reading an equation, and for saving an equation to a file. If an open method succeeds it returns a new Equation object; if it fails it returns null.
Open a file and read an equation:
- Equation open()
- Equation open( String path )
- Equation open( File file )
- Equation open( BufferedReader bufReader )
Save an equation to a file:
- void save( Equation equation )
- void save( String path, Equation equation )
- void save( File file, Equation equation )
- void save( PrintWriter pWriter, Equation equation )
The open() and save(Equation) methods use a JFileChooser, a standard Swing component, to prompt the operator for a file name. An instance of a JFileChooser is instantiated and initialized in a static initialization block. It looks like this:
1 2 3 4 5 6 7 8 | private static JFileChooser chooser; static { String userDir = System.getProperty( "user.dir" ); File baseDir = new File( userDir ); chooser = new JFileChooser( baseDir ); } |
Notes:
- Lines 3-8: Constitutes the static initialization block. (In case your not familiar with static initialization blocks, they are placed in the same part of the class where you declare field variables. It consists of the word static followed by a block statement. Inside the block statement goes everything you need to initialize your class variables.)
- Line 5: Obtains the user.dir property. This is the directory from which your Java program was executed; it’s the first place the Java File class looks for relative path names.
- Line 6: Instantiates a File object encapsulating the user.dir property value.
- Line 7: Instantiates a JFileChooser. The first time the object is used, the dialog will open in the given directory. If the operator directs the GUI to a different directory, that will be the default directory the next time the dialog is opened.
To find an existing file to open for reading, display the JFileChooser dialog using the showOpenDialog method. To find a file to write to (existing or not) use the showSaveDialog method. The operator may select a file and push the dialog’s Open or Save button, or dismiss the dialog without selecting a file. The return value from the show… method will tell you which action the operator took. If the operator selected Open or Save, the return value will be APPROVE_OPTION, and you can use the getSelectedFile method to determine which file the operator selected.

The code for these methods follows.
1 2 3 4 5 6 7 8 9 10 11 12 13 14 15 16 17 18 19 | public static void save( Equation equation ) { int action = chooser.showSaveDialog( null ); if ( action == JFileChooser.APPROVE_OPTION ) { save( chooser.getSelectedFile(), equation ); } } public static Equation open() { int action = chooser.showOpenDialog( null ); Equation equation = null; if ( action == JFileChooser.APPROVE_OPTION ) { equation = open( chooser.getSelectedFile() ); } return equation; } |
If the path to a file is already known the application has two choices:
- Pass the string containing the file’s path to either open( String path ) or save( String path, Equation equation )
- Obtain a File object encapsulating the path, and call either open( File file ) or save( File file, Equation equation )
The overloads that take strings as arguments simply convert the strings to Files, and invoke the methods that require Files as arguments:
1 2 3 4 5 6 7 8 9 10 11 12 | public static void save( String path, Equation equation ) { File file = new File( path ); save( file, equation ); } public static Equation open( String path ) { File file = new File( path ); Equation equation = open( file ); return equation; } |
The overloads that take Files as arguments (the opening methods) do the work of opening and closing the I/O streams. They use the strategy we’ve seen many times before in this project: instantiate the required I/O streams in a try-with-resources statement, then pass the resources to methods that do the actual reading and writing (the I/O methods) from within the try block. The opening method does all the exception handling, relieving the corresponding I/O method of that burden. When the I/O method returns, the try block in the opening method exits, and the I/O streams are automatically closed:
1 2 3 4 5 6 7 8 9 10 11 12 13 14 15 16 17 18 19 20 21 22 23 24 25 26 27 28 29 30 31 32 33 34 35 36 37 38 39 40 41 42 43 44 45 46 | public static void save( File file, Equation equation ) { try ( PrintWriter pWriter = new PrintWriter( file ) ) { save( pWriter, equation ); } catch ( IOException exc ) { String msg = "Error writing \"" + file.getAbsolutePath() + "\": " + exc.getMessage(); JOptionPane.showMessageDialog( null, "Save File Error", msg, JOptionPane.ERROR_MESSAGE ); } } public static Equation open( File file ) { Equation equation = null; try ( FileReader fReader = new FileReader( file ); BufferedReader bReader = new BufferedReader( fReader ); ) { equation = open( bReader ); } catch ( IOException exc ) { String msg = "Error reading \"" + file.getAbsolutePath() + "\": " + exc.getMessage(); JOptionPane.showMessageDialog( null, msg, "Read File Error", JOptionPane.ERROR_MESSAGE ); } return equation; } |
At the top of the oveload hierarchy we have save( PrintWriter pWriter, Equation equation ) and open( BufferedReader bufReader ). The save method has the most work to do. It’s going to decompose the target Equation and write commands to the output file in the same format that an operator working from the console might enter them. This is an example of what an output file would look like:
equation rose
start 0
end 7
step .001
set a=3,n=4,t
x= a sin(n t)cos(t)
y= a sin(n t)sin(t)
The save method divides its job into subtasks, each of which is performed by a dedicated helper method. For convenience, a List<String> is implemented as a class variable, and each helper method writes individual command lines to the list. At the start of the save method the list is emptied, at at the end the lines are written sequentially to the output file. The save method and its helpers follow.
1 2 3 4 5 6 7 8 9 10 11 12 13 14 15 16 17 18 19 20 21 22 23 24 25 26 27 28 29 30 31 32 33 34 35 36 37 38 39 40 41 42 43 44 45 46 47 | private static List<String> lines = new ArrayList<>(); // ... public static void save( PrintWriter pWriter, Equation equation ) throws IOException { lines.clear(); lines.add( Command.EQUATION.toString() + " " + equation.getName() ); writeRange( equation ); writeVars( equation ); writeParameterNames( equation ); writeExpressions( equation ); lines.forEach( pWriter::println ); } private static void writeRange( Equation equation ) { lines.add( "start " + equation.getRangeStart() ); lines.add( "end " + equation.getRangeEnd() ); lines.add( "step " + equation.getRangeStep() ); } private static void writeParameterNames( Equation equation ) { lines.add( "param " + equation.getParam() ); lines.add( "radius " + equation.getRadiusName() ); lines.add( "theta " + equation.getThetaName() ); } private static void writeVars( Equation equation ) { StringBuilder bldr = new StringBuilder( "set " ); Map<String,Double> varMap = equation.getVars(); varMap.forEach( (n,v) -> bldr.append( String.format( "%s=%f,", n, v ) ) ); // delete the last comma bldr.deleteCharAt( bldr.length() - 1 ); lines.add( bldr.toString() ); } private static void writeExpressions( Equation equation ) { lines.add("y= " + equation.getYExpression() ); lines.add("x= " + equation.getXExpression() ); lines.add("t= " + equation.getTExpression() ); lines.add("r= " + equation.getRExpression() ); } |
The top-level open method is quite a bit simpler; once we have a buffered reader we use it to instantiate a CommandReader. The CommandReader parses an input file one line at a time, and the results are passed to an InputParser for processing. At the end of the process the InputParser has a fully configured equation, which we can return to the caller. It looks like this:
makes the dialog visible; recall that when a modal dialog is made visible the invoking code is suspended until the dialog is made invisible. Once made invisible, this method returns either a) if the operator presses OK, the index of the selected item in the list; or b) -1.
Note: recall that the stream() method of the BufferedReader class returns a Stream<String> consisting of the individual lines from the input file.
1 2 3 4 5 6 7 8 9 10 | public static Equation open( BufferedReader bufReader ) throws IOException { InputParser parser = new InputParser(); CommandReader reader = new CommandReader( bufReader ); reader.stream().forEach( parser::parseInput ); Equation equation = parser.getEquation(); return equation; } |
For examples of how to use the FileManager class, see the CommandExecutor class on the Sample Applications page for this lesson.
Summary
In this lesson we looked at a range of topics, including how to extend our user input module with another type of equation, how to write dialogs, and how to read and write files containing equation configuration data. In the next lesson we’ll add more extensions to the user input module, including a new expression parser (an alternative to Exp4j); the ability to maintain, and select from, a list of pre-configured equations; and extending the range of builtin functions available for expression processing.