In this lesson we will develop a facility for interrogating the window hierarchy of an application GUI. For example, you might want to find the OK button in the dialog titled Select A Service, or maybe the text box in a JFileChooser dialog. The ability to do this is particularly convenient for testing, but it can also be helpful in production; for example, you might want to find a slider in one part of your GUI, and connect it to a distant part of your application, so that you always know when the value of the slider changes.
The first page of this lesson provides a detailed discussion of how to develop such a facility. The next page develops a JUnit test for the facility, and the third page shows how to revise some of our existing JUnit tests to reduce our dependence on tools like Robot, which are less than perfect for driving automated tests.
Page 2: Cartesian Plane Lesson 14: GUI Testing: ComponentFinder JUnit Test
Page 3: Cartesian Plane Lesson 14: GUI Testing: Revised JUnit Tests
GitHub repository: Cartesian Plane Part 14
Previous lesson: Cartesian Plane Lesson 13: More Extensions
Java’s Window Taxonomy
In Java, all things graphic are rooted in the java.awt package. This package includes displayable objects and utility objects. An example of a displayable object is Dialog. An example of a utility object is MouseEvent. In this lesson we are concerned with displayable objects, including dialogs, frames, push buttons, toggle buttons, scrollbars and other GUI features. These are called components, and are rooted in the Component class. The accompanying figure illustrates the lowest levels of this hierarchy.

Within this hierarchy, a Container is an object that can manage other components. Window is the superclass of anything that can be displayed directly on a graphic device, such as the screen on your tablet or computer; these components are also known as a top-level windows. A Dialog is a top-level window that behaves like a dialog, and a Frame is a top-level window that serves as the primary collection of components for driving an application. Typically (but not necessarily always), a Dialog is a Window that comes and goes as needed; think about an error dialog, that notifies the operator of a problem, then disappears; or our ItemSelectionDialog, which appears just long enough for the operator to choose an item. A Frame typically (but not always) appears when an application starts, and remains visible throughout the application’s life. A dialog is often modal; while visible, you can’t interact with any part of the application except the dialog. Frames are never modal.
Many of the original AWT components are no longer used. These include buttons, checkboxes and labels. They have been superseded by components in the Swing package. The two top-level components, Dialog and Frame, have largely been superseded by their derivative Swing cousins, JDialog and JFrame. The modern hierarchy looks like this:

Note: In the above figure, AbstractButton and all the class names that begin with J belong to the javax.swing package. I eliminated the package name from the figure for readability.
For the remainder of this tutorial, we will, as much as possible, limit ourselves to dealing with JDialog and JFrame when we talk about top-level windows, and subclasses of JComponent for all the other GUI components.
Anatomy of a GUI
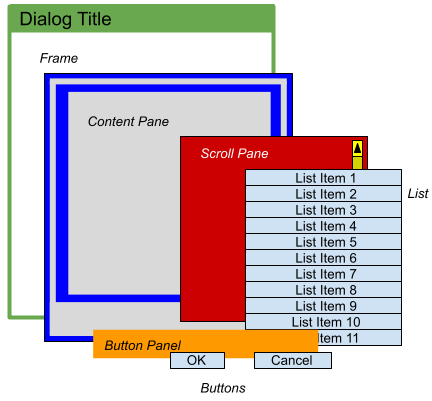
In the previous section we talked about the class hierarchy of the Java GUI components. When assembled into a display, a GUI also has a physical hierarchy. We were introduced to this in a previous lesson when we implemented the ItemSelectionDialog class. For our purposes, every physical arrangement of components is rooted in a top-level window, encapsulated by the Window class. Specifically, we are interested in the Window subclasses JDialog and JFrame. The physical arrangement of the ItemSelectionDialog begins with a JDialog. The JDialog contains a content pane (type JPanel). The content pane contains two components, a JScrollPane, which contains a JList, and another JPanel, which contains two JButtons.

In a moment we’re going to go looking for specific components within the ItemSelectionDialog’s physical hierarchy. Why would we want to do that? Well, if we were writing a test, we could find the JList and mark a specific item as selected. Then we could find the OK button and push it, programmatically, to simulate the operator physically pressing it, and verify that it returns the correct index. How would we find it?
- First, find the JDialog. (How do we do that? See below.)
- Once we’ve got the dialog we can get the dialog’s content pane (JDialog.getContentPane()).
- Now we can get the content pane’s child components (JPanel.getComponents()).
- The method getComponents returns an array; the ItemSelectionDialog’s content pane will have two, a JScrollPane and a JPanel. We can look through the array till we find the JPanel.
- Now get the JPanel‘s child components. That will give us two JButtons, and we can find the one with the OK label, using JButton.getText().
OK, so how do we find our dialog? The Window class has a class method that will give us an array of all the top-level windows; we can look through the array for the one we want. The ListWindows program in the project sandbox shows us how to do this. First it displays the application’s eight top-level windows, including two JFrames and six JDialogs. Then it gets the array of all top-level windows, and prints out some properties of each: its class name, title and whether or not it’s visible.

javax.swing.JFrame
Background
true
javax.swing.JFrame
Graphics Frame
true
javax.swing.JDialog
Moses
...
The code for the method that analyzes the top-level windows follows, along with some notes. The complete program can be found in the GitHub repository.
1 2 3 4 5 6 7 8 9 10 11 12 13 14 15 16 17 18 19 20 21 22 23 24 25 26 27 28 29 30 31 32 | private static void printTopWindows() { Window[] windows = Window.getWindows(); try { Thread.sleep( 500 ); Arrays.stream( windows ) .filter( w -> w instanceof JFrame ) .map( w -> (JFrame)w ) .forEach( jf -> { System.out.println( jf.getClass().getName() ); System.out.println( jf.getTitle() ); System.out.println( jf.isVisible() ); System.out.println(); }); Arrays.stream( windows ) .filter( w -> w instanceof JDialog ) .map( w -> (JDialog)w ) .forEach( jd -> { System.out.println( jd.getClass().getName() ); System.out.println( jd.getTitle() ); System.out.println( jd.isVisible() ); System.out.println(); }); } catch ( InterruptedException exc ) { exc.printStackTrace(); System.exit( 1 ); } } |
- Line 3: Gets the list of all top-level windows.
- Line 6: Gives the GUI a chance to finish displaying itself.
- Line 7: Generates a stream of type Window.
- Line 8: Filters out anything that isn’t a JFrame.
- Line 9: Maps the Stream<Window> to a Stream<JFrame>
- Line 10: For each JFrame in the stream:
- Line 11: Prints the name of the class.
- Line 12: Prints the window title.
- Line 13: Prints whether or not the window is visible.
- Lines 17-25: Repeat the above process, filtering for JDialogs instead of JFrames.
A First Look at a Testing Strategy
Let’s start developing a strategy for testing GUI components. Here’s a suggestion based on the test we implemented for ItemSelectionDialog using Robot:
- Start an ItemSelectionDialog. As we’ve seen, this will have to be done in a dedicated thread.
- Find the JList and OK buttons in the dialog.
- Select the third item in the list (without using Robot).
- Push (without using Robot) the OK button.
- Wait for the dialog thread to expire.
- Verify that the dialog returned the correct index.
To support our effort I have developed the ComponentException class. This class encapsulates an unchecked exception that we can throw when our logic unexpectedly goes wrong; for example, if we can’t find the OK button in an ItemSelectionDialog. There nothing special about it. In fact, I let Eclipse write it for me (we saw how to do that in a previous lesson). The declaration looks like this: public class ComponentException extends RuntimeException
Review: Extending RuntimeException makes this an unchecked exception.
All the code we’re about to look at can be found in the ItemSelectionDialogTestDemo in the project sandbox. We have no instance variables and a handful of class variables; here’s a list, followed by some notes.
1 2 3 4 5 6 7 8 9 10 11 12 13 14 15 | public class ItemSelectionDialogTestDemo { private static JComponent contentPane; private static JScrollPane scrollPane; private static JList<?> jList; private static ListModel<?> listModel; private static List<?> listItems; private static JPanel buttonPanel; private static JButton okButton; private static JButton cancelButton; private static final String dialogTitle = "Dialog Test Demo"; private static int dialogStatus = Integer.MAX_VALUE; private static String dialogItem = null; // ... |
Notes: see Item Selection Dialog Components, above:
- Line 3: Once we’ve identified it, this variable will hold the content pane from the JDialog.
- Line 4: This will hold the JScrollPane from the ItemSelectionDialog.
- Line 5: This variable will store the JList component from the JScrollPane.
- Line 6: This is part of the JList that we’ll need in order to be able to access the items in the list; we’ll talk more about it, below.
- Line 7: After we find the JList, this will be a list of the items it displays (see below).
- Line 8: This variable will hold the JPanel that contains the OK and Cancel buttons.
- Lines 9-10: These are the OK and Cancel buttons.
- Line 12: This is the title we’ll use for the ItemSelectionDialog.
- Line 13: This variable will store the final status of the ItemSelectionDialog after it’s closed. It is set from the showDialog method (below).
- Line 14: The item selected from the dialog before it’s closed. It’s set by the showDialog method.
Here’s the method that starts the ItemSelectionDialog. It will look a lot like the start-the-dialog methods that we’ve seen before. It starts the dialog, waits for it to complete, then saves the state of the dialog in class variables.
private static void showDialog()
{
    String[]    items   =
    { "Barbara", "Mike", "Natasha", "Boris", "George", "Martha" };
    ItemSelectionDialog dialog  =
        new ItemSelectionDialog( dialogTitle, items );
    dialogStatus = dialog.show();
    if ( dialogStatus >= 0 )
        dialogItem = items[dialogStatus];
}
The most interesting code in this program is executed in tiny steps by helper methods invoked from main. Before we look at those, let’s make some notes about the logic progression in the main method, itself.
1 2 3 4 5 6 7 8 9 10 11 12 13 14 15 16 17 18 19 20 21 22 23 24 25 26 27 28 | public static void main(String[] args) throws InterruptedException { Thread showThread = new Thread( () -> showDialog() ); showThread.start(); Thread.sleep( 500 ); getContentPane(); getScrollPane(); getList(); getListItems(); getButtonPanel(); getOKButton(); getCancelButton(); int selectedIndex = 2; selectJListItem( selectedIndex ); clickOKButton(); showThread.join(); Object expItem = listItems.get( selectedIndex ); System.out.println( "Expected status: " + selectedIndex ); System.out.println( "Actual status: " + dialogStatus ); System.out.println( "Expected item: " + expItem ); System.out.println( "Actual item: " + dialogItem ); System.exit( 0 ); } |
- Line 2: Throws declaration, necessitated by the use of Thread.sleep and Thread.join, lines 6 and 20, below.
- Line 4: Creates the thread will will display the dialog; () -> showDialog() is the lambda that implements the Runnable functional interface required by the thread.
- Line 5: Starts the thread that will execute startDialog.
- Line 6: Pauses for half a second to give the dialog a chance to initialize and be displayed.
- Line 8: Gets the content pane from the JDialog.
- Line 9: Gets the JScrollPane from the content pane.
- Line 10: Gets the JList from the scroll pane (more details available below).
- Line 11: Gets the list of items from the JList.
- Line 13: Gets, from the content pane, the JPanel that contains the OK and Cancel buttons.
- Lines 14-15: Gets the OK and Cancel buttons from the JPanel obtained above.
- Lines 17-18: Selects the third item (the item at index 2) in the JList (more below; see also selectJListItem).
- Line 19: Selects the OK button (more below), causing the dialog to close, and its thread to expire (see also clickOKButton).
- Line 20: Waits for the dialog thread to fully expire.
- Lines 22-26: Prints diagnostics comparing what we expected to happen to what actually happened.
- Line 27: Terminates the program.
◼ The getContentPane Method
This method first has to find the JDialog that encapsulates our ItemSelectionDialog, and then get the content pane out of it:
1 2 3 4 5 6 7 8 9 10 11 12 13 14 15 16 17 18 19 20 21 22 23 24 | private static void getContentPane() { JDialog dialog = Arrays.stream( Window.getWindows() ) .filter( w -> w.isVisible() ) .filter( w -> w instanceof JDialog ) .map( w -> (JDialog)w ) .findFirst() .orElse( null ); if ( dialog == null ) throw new ComponentException( "No dialogs found" ); if ( !dialogTitle.equals( dialog.getTitle() ) ) throw new ComponentException( dialogTitle + ": dialog not found" ); Container pane = dialog.getContentPane(); if ( !(pane instanceof JComponent) ) { String message = "Content pane invalid type: " + pane.getClass().getName(); throw new ComponentException( message ); } contentPane = (JComponent)pane; } |
- Line 3: Gets the array of top-level windows from the Window class, and streams its elements. We could probably make the assumption here that the array contains exactly one element corresponding to the ItemSelectionDialog, but let’s be thorough.
- Line 4: Filters out any Window that isn’t visible.
- Line 5: Filters out any Window that isn’t a JDialog.
- Line 6: Maps the Stream<Window> to a Stream<JDialog>.
- Line 7: Finds the first element of the stream to pass the filters. Recall that this method returns an Optional object.
- Line 8: If the Optional obtained at line 7 is non-empty, returns the item it contains; otherwise, if it’s empty, returns null.
- Lines 10-11: Sanity check; if we haven’t found a JDialog, declare an error and abort the process.
- Lines 12-13: Sanity check; if we found a JDialog, but it’s not the one we’re looking for, declare an error and abort the process.
- Line 14: Gets the dialog’s content pane.
- Lines 16-22: Sanity check: we expect most of out components to be type JComponent; if that’s not true for the content pane, declare an error and abort the process.
- Line 23: Sets the content pane in the appropriate class variable.
◼ The getComponent Helper Method
This helpful little utility looks through the components contained in a JComponent, and finds the first one that matches a predicate:
1 2 3 4 5 6 7 8 9 10 11 | private static JComponent getComponent( JComponent parent, Predicate<Component> pred ) { JComponent comp = Arrays.stream( parent.getComponents() ) .filter( w -> w instanceof JComponent ) .map( w -> (JComponent)w ) .filter( pred::test ) .findFirst() .orElse( null ); return comp; } |
- Line 4: Looks inside the component to search, and finds its array of components; generates a Stream<Component>.
- Line 5: Eliminates from the stream any component that is not a JComponent.
- Line 6: Maps the Stream<Component> to a Stream<JComponent>.
- Line 7: Filters out any element of the stream that doesn’t pass the given predicate. The predicate, for example, might assert “must be a JButton” AND “must be labeled ‘OK’.”
- Line 8: Finds the first element that passes the above filters (remember that this method returns an Optional).
- Line 9: Gets the element contained in the Optional obtained at line 8, or null if the Optional is empty.
◼ The getScrollPane Helper Method
Most of the work needed by this method is performed by getComponent. We call it passing the content pane as the component to search, and tell it that we want the first contained component that is type JScrollPane: c -> (c instanceof JScrollPane)
If we don’t find what we’re looking for, we throw an exception.
private static void getScrollPane()
{
    scrollPane = (JScrollPane)
        getComponent( contentPane, c -> (c instanceof JScrollPane) );
    if ( scrollPane == null )
        throw new ComponentException( "JScrollPane not found" );
}
◼ A little more about JListJList⟼ ListModel⟼ {item list}
The JList component is all about managing the “look and feel” of a list. It doesn’t not manage its list of items directly. Instead, the JList contains a ListModel object that is responsible for the care and feeding of the item list. If you want to interrogate and/or manage the list of items, first you have to get the JList’s ListModel, then you use methods within ListModel to interrogate the list of items:
listmodel = jList.getModel();
listmodel.getElementAt( i )... // get the item at the given index
◼ A little more about JScrollPaneJScrollPane ⟼ JViewport ⟼ JList ⟼ {item list}
As we saw when we implemented ItemSelectionDialog, a JScrollPane contains a viewport, and the viewport contains the component that we want to scroll:
// class ItemSelectionDialog
private JScrollPane getScrolledList()
{
    JScrollPane pane    = new JScrollPane();
    pane.setViewportView( jList );
    // ...
To get the list back out of the JScrollPane, first we have to find the scroll pane, then we have to get the scroll pane’s viewport, then we have to get the viewport’s view. Which brings us to…
◼ The getList Helper Method
This method gets the view from the scroll pane’s viewport, then verifies that it’s the JList we’re looking for. If not, it throws an exception. Then it gets the ListModel from the list:
private static void getList()
{
    JViewport       viewport    = scrollPane.getViewport();
    Component       view        = viewport.getView();
    if ( !(view instanceof JList) )
        throw new ComponentException( "JList not found" );
    jList = (JList<?>)viewport.getView();
    listModel = jList.getModel();
}
◼ The getListItems Helper Method
We can’t get the entire list of items from the ListModel all at once. Instead we have to get them one at a time.
private static void getListItems()
{
    int size    = listModel.getSize();
    listItems = IntStream.range( 0, size )
        .mapToObj( listModel::getElementAt )
        .collect( Collectors.toList() );
}
◼ A Little More about JButton
When we first looked at JButton, while writing the SelectItemDialog class, we instantiated it with the desired label, then added an ActionListener to it; when the operator pushes the button, its ActionListeners are invoked:
private JPanel getButtonPanel()
{
    JPanel  panel           = new JPanel();
    JButton okButton        = new JButton( "OK" );
    JButton cancelButton    = new JButton( "Cancel" );
    panel.add( okButton );
    panel.add( cancelButton );

    okButton.addActionListener( e -> setAndClose( OK_STATUS ) );
    cancelButton
        .addActionListener( e -> setAndClose( CANCEL_STATUS ) );
    // ...
If we wish, we change change the label on the button using the setText method, and we can get it using the getText method:
    cancelButton.setText( "Never mind" );
    String label = cancelButton.getText();
We can also programmatically “push” the button, causing its ActionListeners to be invoked… cancelButton.doClick();
… but there’s a catch; in Swing, all event handling, including invocation of ActionListeners, must occur on the Event Dispatch Thread (EDT). That means we can’t directly execute doClick in our test code; we have to ask the Event Dispatcher to do it for us.
◼ Digression: A little bit about threads
In Java (and most other modern execution environments) a thread represents an independent execution path. For example, every Java program consists of, at a minimum, a main thread of execution, and a garbage collector thread. When you start a program in a main method your code is executing on the main thread. At your convenience, from your main method you can start (or spawn) additional threads. The Java scheduler gets to decide which thread gets to execute when, and for how long.
When you have many threads executing, it’s difficult to know just when a particular thread will be given its chance to run (in fact, Java doesn’t promise that a particular thread will ever have a chance to run). At least conceptually, we always picture threads running simultaneously. Modern computers, with multiple processors and/or processors with multiple cores, can literally execute some threads simultaneously. When two or more threads try to access the same resource at the same time, problems like race conditions and deadlocks can occur. This isn’t the time to go into detail about these; if you’d like to know more, see:
- Lesson: Concurrency in the Oracle Java Tutorial
- Multithreading in Java, from W3chools
- Common Problems and Pitfalls with Multi-Thread Programming, from DigiKey
Any bit of code, from any class, can (potentially) execute in any thread. It doesn’t matter which class owns the code, or which class started the thread. The thread_demo package from the project sandbox demonstrates this. If you’d like to run it, the main method is in the Controller class. I’m not going to try to explain how it was written, but here’s an explanation of how it works.
The package contains four classes which implement the Element interface, also a part of the demo package. Each class contains a method which can be called passing an Element object.
| Class | Executable Method |
| Hydrogen | public static void hyMethod( Element obj ) |
| Helium | public static void heMethod( Element obj ) |
| Lithium | public static void liMethod( Element obj ) |
| Berylium | public static void beMethod( Element obj ) |
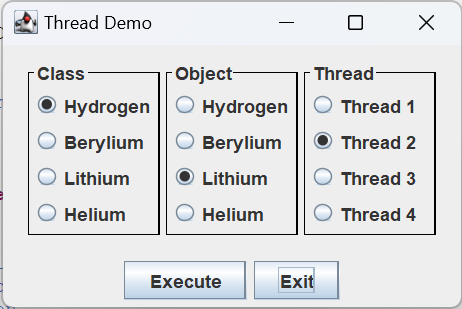
The application creates an instance of each class, and starts four threads. The GUI allows you to select a) one of the four classes, b) one of the four objects and c) one of the four threads. Then it tells the selected thread to call the specified method in the given class, passing an argument of the given type. All thread activity is logged in a separate window. The first thing that happens is the four threads come to life, and immediately wait for something to do.
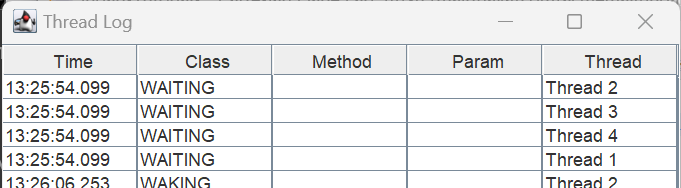
Note that in the code I started the threads in order: Thread 1, Thread 2, Thread 3, Thread 4, but that’s not the order that they were executed (Thread 2, Thread 3, Thread 4, Thread 1). Next, in the main window, I select class=Berylium, Object=Lithium and Thread=Thread 2. When I press the Execute button, Thread 2 wakes up and calls the executable method in the Berylium class, passing an argument of type Lithium, then Thread 2 goes back to a waiting state..

If I select [class=Lithium, Parameter=Hydrogen, Thread=Thread 4, Execute], Thread 4 wakes up, calls the method in the Lithium class passing an argument of type Hydrogen, and goes back to waiting.

When I’m finished I push the exit button and wait for all threads to terminate.

◼ Digression: The Event Dispatch Thread
In a GUI driven application, your code spends most of its time doing nothing. It sits there, waiting to be informed that something requires its attention, such as the Exit button was pushed, or an item in a JList was selected. So, if your code is doing nothing, who’s monitoring the system for events such as button pushes and key presses? The answer is that Swing is running a special thread that takes care of all this, called the Event Dispatch Thread (EDT). When the operator pushes a button, the EDT notices; it finds all the button’s ActionListeners and calls their actionPerformed methods.
Important: Your application starts in the main method on the main thread. From your main method you build a GUI, and attach an ActionListener, which lives in your code, to a push button. When the button is pushed, your action listener in your code gets executed, but which thread is executing it? The answer is the Event Dispatch Thread.
As mentioned earlier, multithreaded programming has a lot of pitfalls. If you look at just about any page in the Swing documentation, you’ll see a disclaimer: Swing is not thread-safe. Swing is extremely sensitive to multithreading issues. To avoid problems, Swing requires that any code you execute that affects your GUI must be executed on the EDT. That includes our code, when we programmatically push a button using doClick().
We do not have the ability to just jump to the EDT and start executing our code. What we can do, is ask the EDT to execute it for us. There are two class methods we can use to do that:
- SwingUtilities.invokeLater( Runnable task ): this method schedules a task to be executed on the EDT, then immediately returns, before the task is executed.
- SwingUtilities.invokeAndWait( Runnable task ): this method schedules a task to be executed on the EDT, but doesn’t return until after the task has completed, and all the events generated by the task have been processed.
Note: we’ve talked about some kinds of events, notably ActionEvents, but there are many kinds of events that we are not normally concerned with. Just a few of many examples: events are generated every time a Window becomes visible or invisible, every time a Window opens or closes, every time a component gains or loses keyboard focus, every time a component is resized or repositioned, etc.
To get to the point (finally!), if we want to start a dialog and push the OK button, we have to:
- Spawn a thread to open a dialog;
- Wait for the dialog on the new thread to become visible; and
- Schedule a task on the EDT that will push the OK button for us.
The third task looks like this: SwingUtilities.invokeLater( () -> openButton.doClick() )
The following figure summarizes the logical sequence of events that happen we we open the dialog and push the OK button:

Before we get to time 1, we have a main thread and an EDT, but the thread to start the dialog doesn’t even exist yet. At time 3 the main thread schedules the doClick() to be executed. Let me say that again. At time 3 the main thread does not execute doClick(); it schedules the doClick() to be executed at a future time. At time 4 the main thread goes to sleep, waiting for the start-the-dialog thread to terminate. Also at time 4, the EDT executes the doClick(), causing the dialog to become invisible, and the extra thread to terminate.
Now, armed with the above information, we’ll get back to ItemSelectionDialogTestDemo.
◼ The selectJListItem Helper Method
◼ The clickOKButton Helper Method
For practical purposes these helper methods are unnecessary. I broke them out for this lesson in order to emphasize the above EDT discussion. The setSelectedIndex() and doClick() methods affect the GUI, hence must be executed on the Event Dispatch Thread. We accomplish that with the SwingUtilities.invokeLater method.
private static void selectJListItem( int index )
{
    SwingUtilities.invokeLater( () -> jList.setSelectedIndex( index ) );
}

private static void clickOKButton()
{
    SwingUtilities.invokeLater( () -> okButton.doClick() );
}
◼ The getButtonPanel Helper Method
◼ The getOKButton Helper Method
◼ The getCancelButton Helper Method
The getButtonPanel method uses the getComponent method to search the content pane for the JPanel that it contains: buttonPanel = (JPanel)
getComponent( contentPane, c -> (c instanceof JPanel) );
The getOKButton and getCancelButton methods then use getComponent to search the button panel for a component that is an instance of a JButton, and has a label that identifies it as OK or Cancel:
Predicate pred = c -> (c instanceof JButton) && ((JButton)c).getText().equals( "OK" );
okButton = (JButton)getComponent( buttonPanel, pred );
Here are the getButtonPanel and getOKButton methods. You can find the getCancelButton method in the GitHub repository.
private static void getButtonPanel()
{
    buttonPanel = (JPanel)
        getComponent( contentPane, c -> (c instanceof JPanel) );
if ( buttonPanel == null )
throw new ComponentException( "ButtonPanel not found" );
}
private static void getOKButton()
{
Predicate<Component> pred = c ->
(c instanceof JButton) && ((JButton)c).getText().equals( "OK" );
okButton = (JButton)getComponent( buttonPanel, pred );
if ( okButton == null )
throw new ComponentException( "OK button not found" );
}◾Recursive Searching
I hope the previous section of the notes was instructive, but the coding strategy is clearly too tedious. We ought to be able to start at the top of the window hierarchy (with dialogs and frames) and search the entire component hierarchy until we find one that matches some given criteria. The utility RecursiveListComponents in the project sandbox shows how to do this. Before we get to the most interesting parts of this program let’s look at some of the helper methods.
The getContentPane( Window window ) method determines whether the given Window is a JDialog or a JFrame and obtains its content pane. If the Window is neither a JDialog nor a JFrame it throws an exception.
private static Container getContentPane( Window window )
{
    Container   container   = null;
    if ( window instanceof JDialog )
        container = ((JDialog)window).getContentPane();
    else if ( window instanceof JFrame )
        container = ((JFrame)window).getContentPane();
    else
    {
        String  name    = window.getClass().getName();
        String  message = "Not JDialog or JFrame: " + name;
        throw new ComponentException( message );
    }
    return container;
}
The printFrame( Window window ) method prints to stdout details about the given Window. It has to be careful to distinguish between JDialogs and JFrames. It throws an exception if it gets confused.
private static void printFrame( Window window )
{
    System.out.print( "class name: " );
    System.out.println( window.getClass().getName() );
    System.out.print( "window name: " );
    System.out.println( window.getName() );
    System.out.print( "title: " );
    if ( window instanceof JFrame )
        System.out.println( ((JFrame)window).getTitle() );
    else if ( window instanceof JDialog )
        System.out.println( ((JDialog)window).getTitle() );
    else
        throw new ComponentException( "Unexpected Window type" );
}
Method printComponent( Component comp, String indent ) is called with a component, and an indentation related to the the depth of the component’s position in the hierarchy. It prints details about the given component. If it detects a JLabel or a JButton it prints the component’s text.
private static void printComponent( Component comp, String indent )
{
    System.out.println( indent + comp.getClass().getName() );
    System.out.println( indent + "name: " + comp.getName() );
    String  text    = null;
    if ( comp instanceof JLabel )
        text = ((JLabel)comp).getText();
    else if ( comp instanceof JButton )
        text = ((JButton)comp).getText();
    else
        ;
    System.out.println( indent + "text: " + text );
}
Method dumpContainer( Container container, int indentNum ) is called recursively, increasing the indentation of its output each time to better visualize the depth of nesting. Details about the given container are printed, just like any other component, then all the components nested inside the container are processed by calling printContent for non-container components, and dumpContainer for container components.
Note: Interestingly, JComponent is a subclass of Container. If we limited ourselves to processing only dialogs, frames and JComponents we could simplify this logic a bit.
private static void dumpContainer( Container container, int indentNum )
{
    String          spaces  = "    ";
    StringBuilder   bldr    = new StringBuilder();
    IntStream.range( 0, indentNum ).forEach( i -> bldr.append( spaces ) );
    String          indent  = bldr.toString();

    Component[]     children    = container.getComponents();
    printComponent( container, indent );
    System.out.println( indent + "num children: " + children.length );
    System.out.println( indent + "====================" );
    for ( Component child : children )
    {
        if ( child instanceof Container )
            dumpContainer( (Container)child, indentNum + 1 );
        else
            printComponent( child, indent + spaces );
    }
}
Finally, dumpWindows is the public method that provides entry to this utility. The code is provided below, and is followed by some notes.
1 2 3 4 5 6 7 8 9 10 11 | public static void dumpWindows() { Predicate<Window> isDialog = w -> w instanceof JDialog; Predicate<Window> isFrame = w -> w instanceof JFrame; Predicate<Window> isDialogOrFrame = isDialog.or( isFrame ); Arrays.stream( Window.getWindows() ) .filter( isDialogOrFrame ) .peek( RecursiveListComponents::printFrame ) .map( RecursiveListComponents::getContentPane ) .forEach( c -> dumpContainer( c, 1 ) ); } |
- Line 3: Declares a predicate that’s satisfied if an object is an instance of JDialog.
- Line 4: Declares a predicate that’s satisfied if an object is an instance of JFrame.
- Line 5: Uses the default or method of the Predicate interface to declare a predicate that will pass if an object is an instance of a JDialog or a JFrame.
- Line 6: Generates a stream of all the top-level windows in the application.
- Line 7: Filters out any element of the stream that is not a JDialog or a JFrame.
- Line 8: Prints details about the Window being processed.
- Line 9: Maps the Stream<Window> to a Stream<Component>, where each element of the stream consists of the content pane from a JDialog or JFrame.
- Line 10: Recursively processes every content pane and its nested components.
The program RecursiveListComponentsDemo1 in the project sandbox uses the above utility to print out the window hierarchy of an application that consists solely of an ItemSelectionDialog. Here’s the program and its output. If you look closely at the output, you’ll see that the window hierarchy contains a lot of components that we were previously unaware of. That’s because instantiating a component often results in the creation of still more components.
public class RecursiveListComponentsDemo1
{
    public static void main(String[] args) throws InterruptedException
    {
        String[]    items   = { "Item 1", "Item 2", "Item 3" };
        ItemSelectionDialog dialog  =
            new ItemSelectionDialog( "RecursiveListComponentsDemo1", items );
        Thread      thread  = new Thread( () -> dialog.show() );
        thread.start();
        RecursiveListComponents.dumpWindows();
        thread.join();

        System.exit( 0 );
    }
}

class name: javax.swing.JDialog
window name: dialog0
title: RecursiveListComponentsDemo1
    javax.swing.JPanel
    name: null
    text: null
    num children: 2
    ====================
        javax.swing.JScrollPane
        name: null
        text: null
        num children: 3
        ====================
            javax.swing.JViewport
            name: null
            text: null
            num children: 1
            ====================
                javax.swing.JList
                name: null
                text: null
                num children: 1
                ====================
                    javax.swing.CellRendererPane
                    name: null
                    text: null
                    num children: 0
                    ====================
            javax.swing.JScrollPane$ScrollBar
            name: null
            text: null
            num children: 2
            ====================
                javax.swing.plaf.metal.MetalScrollButton
                name: null
                text:
                num children: 0
                ====================
                javax.swing.plaf.metal.MetalScrollButton
                name: null
                text:
                num children: 0
                ====================
        javax.swing.JPanel
        name: null
        text: null
        num children: 2
        ====================
            javax.swing.JButton
            name: null
            text: OK
            num children: 0
            ====================
            javax.swing.JButton
            name: null
            text: Cancel
            num children: 0
            ====================
The RecursiveListComponentsDemo2 program builds on the ListFrames program, opening a lot of top level windows with various levels of components nested inside their content panes. The display it produces is just like the one in Figure 1, except instead of displaying the JOptionPane dialog that saying “Push me to exit,” it displays a JFileChooser dialog. The main method follows, below. The program output can be found on this page. As a matter of interest, you might note that the output for the JFileChooser goes from line 87 to line 282. GUIs are not trivial things.
public static void main(String[] args) throws InterruptedException
{
    showBackground();
    root.start();
    showDialog( "Moses", "Let my people go", 100, 100 );
    showDialog( "Lincoln", "Fourscore and seven...", 150, 170 );
    showDialog( "Roosevelt", "Do one thing every day...", 200, 250 );
    showDialog( "Ginsburg", "Fight for the things...", 250, 325 );
    showDialog( "Sylvester", "Sufferin' succotash!", 300, 400 );
    JFileChooser    chooser = new JFileChooser();
    Thread          thread  =
        new Thread( () -> chooser.showOpenDialog( null ) );
    thread.start();
    RecursiveListComponents.dumpWindows();
    thread.join();

    System.exit( 0 );
}
A Search Utility
So we should probably be thinking about a reusable tool for tracking down frames, dialogs and their nested components. We don’t want to have to write the code for traversing a window hierarchy for testing ItemSelectionDialog, then again for testing FileManager, a third time for testing EquationMap, and yet again for the various parts of a GUI we’ll be designing in the next few lessons. But before we start on the details of this theoretical tool, there’s one more problem we need to be aware of.
■ The JUnit Window Propagation Problem
A quick review of JUnit reminds us that a JUnit test class consists of multiple test methods that are executed independently. However, they are all executed as part of the same process. Suppose I have two test methods in a JUnit test class, both of which instantiate an ItemSelectionDialog:
@Test
public void testItemSelectionDialogWithOKButton()
{
    ItemSelectionDialog dialog = new ItemSelectionDialog( "title", items );
    int                 status = dialog.show();
    JButton             button = geteButton( "OK" );
    // ...
}
@Test
public void testItemSelectionDialogWithCancelButton()
{
    ItemSelectionDialog dialog = new ItemSelectionDialog( "title", items );
    int                 status = dialog.show();
    JButton             button = geteButton( "Cancel" );
    // ...
}
What I might expect is that, when each method terminates, there’s no longer a reference to the dialog object it created and it will be garbage-collected. But that’s not what happens. Instead, after the second method is executed, both the dialog objects remain stacked up in the Window class array of top-level windows. JUnitTestWindowPropagationDemo1 from the project sandbox illustrates this problem.
This JUnit test has a test method that is executed four times. It has a @BeforeEach method that identifies all the top-level windows prior to executing the test. The code and its output follows. As you can see, before any test has executed there are no existing dialogs. After the first test there’s one dialog, after the second test there are two dialogs, etc.
Note: If you run this test you will have to dismiss each dialog yourself. I didn’t want to clutter up the code with new threads, etc.
class JUnitTestWindowPropagationDemo1
{
    @BeforeEach
    public void beforeEach() throws Exception
    {
        System.out.println( "===== BeforeEach Start =====" );
        Arrays.stream( Window.getWindows() ).forEach( w -> {
            String  title   = "none";
            if ( w instanceof JDialog )
                title = ((JDialog)w).getTitle();
            System.out.println( w.getClass().getName() );
            System.out.println( title);
            System.out.println( "visible: " + w.isVisible() );
            System.out.println( "displayable: " + w.isDisplayable() );
            System.out.println( "---------------------" );
        });
        System.out.println( "===== BeforeEach End =====" );
    }

    @ParameterizedTest
    @ValueSource ( ints= {1, 2, 3, 4 } )
    void test()
    {
        String[]            items   = { "Item 1", "Item 2", "Item 3" };
        ItemSelectionDialog dialog  =
            new ItemSelectionDialog( "JUnit Propagation Test", items );
        dialog.show();
    }
}|
===== BeforeEach Start ===== ===== BeforeEach End ===== |
Before any test |
|
===== BeforeEach Start ===== javax.swing.JDialog JUnit Propagation Test visible: false displayable: true ——————— ===== BeforeEach End ===== |
After one test |
|
===== BeforeEach Start ===== javax.swing.JDialog JUnit Propagation Test visible: false displayable: true ——————— javax.swing.JDialog JUnit Propagation Test visible: false displayable: true ——————— ===== BeforeEach End ===== |
After two tests |
|
===== BeforeEach Start ===== javax.swing.JDialog JUnit Propagation Test visible: false displayable: true ——————— javax.swing.JDialog JUnit Propagation Test visible: false displayable: true ——————— javax.swing.JDialog JUnit Propagation Test visible: false displayable: true ——————— ===== BeforeEach End ===== |
After three tests |
So, if I ask my test utility to find the OK button, which one will it find? By the time it gets to the fourth test there will be four to choose from. In this specific case we could solve the problem several ways, including only considering top-level windows that are marked visible. But this is to be a general purpose utility; what if we have a test that wants to consider a dialog whether its visible or not?
The solution I’ve chosen is to dispose every top-level dialog after every test. This will mark the window as “not displayable” (as you can see from the previous example, you can ask a window whether it’s displayable or not by calling its isDisplayable method). I usually do it in an @AfterEach method:
@AfterEach
public void afterEach()
{
    Arrays.stream( Window.getWindows() ).forEach( w -> w.dispose() );
}
Then, when looking for components, we will disregard any top-level window that’s not displayable. For example, to adapt the dumpWindows method from the sandbox program RecursiveListComponents:
public static void dumpWindows()
{
    Predicate<Window>   isDialog        = w -> w instanceof JDialog;
    Predicate<Window>   isFrame         = w -> w instanceof JFrame;
    Predicate<Window>   isDialogOrFrame = isDialog.or( isFrame );
    Arrays.stream( Window.getWindows() )
        .filter( w -> w.isDisplayable() )
        .filter( isDialogOrFrame )
        .peek( RecursiveListComponents::printFrame )
        .map( RecursiveListComponents::getContentPane )
        .forEach( c -> dumpContainer( c, 1 ) );
}
Of course it’s still possible, if unlikely, that a test will want to examine windows that have been disposed. So we’ll make disregarding disposed dialogs the default, and give the programmer the option to change it.
■ The Component Finder Utility: Design
So what sorts of things are we going to ask our new utility to do? I see two different areas of interest: configuring which top-level windows to traverse, and deciding the criteria for finding a specific component nested inside a the window hierarchy. The configuration parameters for searching that I can see are:
Note: Earlier in this lesson we said that we would restrict ourselves, as much as possible, to working with JDialogs, JFrames and JComponents. So a lot of the following discussion will ignore Windows that aren’t JDialogs or JFrames, and Components that aren’t JComponents.
- Consider only top-level windows that are type JDialog.
- Consider only top-level windows that are type JFrame.
- Consider top-level windows that are JDialogs or JFrames.
- Consider only top-level windows that are visible.
- Consider only top-level windows that are displayable.
- Consider only top-level windows that satisfy a user-configured predicate.
- Consider only JComponents that satisfy a user-configured predicate.
Of course we should be able to combine the above configuration parameters. For example, we might want to say “search only JFrames that are visible.”
Now, what sorts of things should our utility be able to do for us? The list that I came up with is:
- Find a component, anywhere in the window hierarchy, that meets specific criteria:
JComponent findComponent( Predicate<JComponent> pred ) - Find a component that is nested inside a specific top-level window:
JComponent findComponent( Window root, Predicate<JComponent> pred ) - Find a component that is nested inside a Container:
JComponent findComponent( Container root, Predicate<JComponent> pred ) - Find a specific top-level window:
Window findWindow( Predicate<Window> pred )
The above activities take care of searching. But, since this is a utility dedicated to working with Windows and Components, we should consider any other helpful methods for working with objects of this type. Here’s what I can think of for now:
- Dispose all top-level windows.
void disposeAll() - Get a predicate that can be used to identify a JButton with specific text.
Predicate<JComponent> getButtonPredicate( String label ) - Get a predicate that can be used to identify a top-level window with a specific title.
Predicate<JComponent> getWindowPredicate( String title )
Note: The reason for getButtonPredicate and getWindowPredicate will soon become clear. The declaration of such predicates is straigthforward, but messy, and they’re used a lot.
The last consideration is how do we combine search parameters for describing a component, and designating what part of the window hierarchy we search? For example, we could have a method that looks like this: JComponent findComponent( Predicate<Window> wPred, Predicate<JComponent> cPred )
where wPred contols what part of the hierarchy we search, and cPred describes the component we’re looking for. I suggest, however, that we design a class using this strategy, instead:
- An instance of the class will have configuration parameters that control what part of the top level of the hierarchy we search.
- Methods that search for components will require a predicate that describes the specific component being searching for.
- Methods that don’t require the top-level configuration parameters, for example:
JComponent findComponent( Window root, Predicate<JComponent> pred )
will be class methods, eliminating the need to instantiate the class when unnecessary. - Our class will be mutable. During instantiation we will specify the configuration parameters that control searching for top-level windows, but these parameters can be changed afterward.
■ The Component Finder Utility: Implementation
The first decision we have to make is where to put our utility. Up till now we have talked about the utility strictly in terms of testing, so your first thought might be to put in in the test source tree. But after we get further into GUIfying our project you’ll see that this kind of facility is useful in production code as well; in fact we’ll see our first example of that on the next page of this lesson. We’ll call our class ComponentFinder, and put it in the graphics_utilities package. We’re also going to need the ComponentException class we wrote earlier stored in the same location.
Let’s consider our class and instance variables, first. They’re listed below, followed by some notes.
1 2 3 4 5 6 7 8 9 10 11 12 13 14 15 16 17 18 19 20 | public class ComponentFinder { private static final Predicate<Window> isDialog = w -> w instanceof JDialog; private static final Predicate<Window> isFrame = w -> w instanceof JFrame; private static final Predicate<Window> isVisible = Window::isVisible; private static final Predicate<Window> isDisplayable = Window::isDisplayable; private static final Predicate<Object> isJComponent = c -> c instanceof JComponent; private boolean canBeFrame = true; private boolean canBeDialog = true; private boolean mustBeVisible = true; private boolean mustBeDisplayable = true; private Predicate<Window> topWindowFilter; // ... |
- Lines 3-4: Predicate that is satisfied when a Window is a subclass of JDialog.
- Lines 5-6: Predicate that is satisfied when a Window is a subclass of JFrame.
- Lines 7-8: Predicate that is satisfied when a Window is visible.
- Lines 9-10: Predicate that is satisfied when a Window is displayable.
- Lines 11-12: Predicate that is satisfied when an Object is a subclass of JComponent.
- Line 14: Boolean parameter indicating whether JFrames are considered when searching for components. Initially configured in a constructor, can be modified.
- Line 15: Boolean parameter indicating whether JDialogs are considered when searching for components. Initially configured in a constructor, can be modified.
- Line 16: Boolean parameter indicating whether only visible top-level windows are considered when searching for components. Initially configured in a constructor, can be modified.
- Line 17: Boolean parameter indicating whether only displayable top-level windows are considered when searching for components. True by default, can be modified.
- Line 19: Predicate combining the above Boolean parameters. Calculated during construction, and recalculated every time a parameter changes (see setTopWindowFilter, below). Can be overridden by the programmer.
Here are our constructors. The default constructor makes the can-be-frame, can-be-dialog and must-be-visible parameters true. The three-parameter constructor allows these three parameters to be configured according to user specification. The must-be-dislayable parameter cannot be set during instantiation. Note also that the constructors use a helper method to configure the topWindowFilter value; this is because the filter needs to be recalculated every time a parameter changes, and we want that logic to be in a single place.
public ComponentFinder()
{
    this( true, true, true );
}
public ComponentFinder(
    boolean canBeFrame,
    boolean canBeDialog,
    boolean mustBeVisible
)
{
    this.canBeDialog = canBeDialog;
    this.canBeFrame = canBeFrame;
    this.mustBeVisible = mustBeVisible;
    setTopWindowFilter();
}
■ Getters and Setters for the Can-be and Must-be Parameters
The getters and setters for the canBeDialog, canBeFrame, mustBeVisible and mustBeDisplayable parameters are pretty straightforward with one wrinkle: the setters all make use of a common helper method, ensuring that all necessary post-processing is performed when a parameter changes. At the moment, post-processing consists solely of realculating the topWindowFilter, but who knows what changes lurk behind the next bend in our path? Here is one pair of setter/getter, and the helper method. The complete code can be found in the GitHub repository.
public boolean isMustBeDisplayable()
{
    return mustBeDisplayable;
}
public void setMustBeDisplayable(boolean value)
{
    setParameter( value, b -> mustBeDisplayable = b );
}
private void setParameter( boolean value, Consumer<Boolean> dest )
{
    dest.accept( value );
    setTopWindowFilter();
}
This would be a good time to talk about the setTopWindowFilter method. The code is below, notes follow.
1 2 3 4 5 6 7 8 9 10 11 12 13 14 15 16 17 18 19 20 | private void setTopWindowFilter() { Predicate<Window> finalPredicate = w -> true; if ( canBeFrame ) { Predicate<Window> pred = isFrame; if ( canBeDialog ) finalPredicate = pred.or( isDialog ); } else if ( canBeDialog ) finalPredicate = isDialog; else ; if ( mustBeVisible ) finalPredicate = finalPredicate.and( isVisible ); if ( mustBeDisplayable ) finalPredicate = finalPredicate.and( isDisplayable ); topWindowFilter = finalPredicate; } |
- Line 3: This will be the final predicate that we use in case no parameters are set. (Technically this makes no sense, since it would make canBeFrame and canBeDialog both false, but it’s up to the user to ensure that the parameter configuration makes sense.)
- Lines 4-6: If canBeFrame is true, sets the final predicate to isFrame…
- Lines 7-8: If canBeDialog is also true, creates a logical or of the final predicate and isDialog.
- Lines 10-11: If canBeFrame is false, but canBeDialog is true, sets the final predicate to isDialog.
- Lines 15-16: If mustBeVisible is true, creates the logical and of finalPredicate and isVisible.
- Lines 17-18: If mustBeDisplayable is true, creates the logical and of finalPredicate and isDisplayable.
- Line 19: Sets the final configuration of topWindowFilter.
The setter for topWindowFilter is notable because, if the user sets this value, it completly overrides all the other configuration parameters:
public Predicate<Window> getTopWindowFilter()
{
    return topWindowFilter;
}
public void setTopWindowFilter( Predicate<Window> topWindowFilter )
{
    this.topWindowFilter = topWindowFilter;
}
Before we get to the heart of the implementation, there’s one more helper method we can look at. We’ve actually seen it before, in the RecursiveListComponents class in the project sandbox. The method Container getContentPane( Window window ) takes a given window, tries to interpret it as either a JDialog or a JFrame, and returns the window’s content pane. In the sandbox class, if it was neither a frame nor a dialog we threw an exception; in this version of the method we’ll return null under those circumstances.
private Container getContentPane( Window window )
{
    Container   contentPane;
    if ( window instanceof JDialog )
        contentPane = ((JDialog)window).getContentPane();
    else if ( window instanceof JFrame )
        contentPane = ((JFrame)window).getContentPane();
    else
        contentPane = null;
    return contentPane;
}
■ The findWindow method
This method takes a predicate as an argument, and returns the first top-level window that satisfies both it, and the parameter configuration for this ComponentFinder instance. If no such window is found, null is returned. Here is the anotated code.
1 2 3 4 5 6 7 8 9 | public Window findWindow( Predicate<Window> pred ) { Window window = Arrays.stream( Window.getWindows() ) .filter( topWindowFilter ) .filter( pred ) .findFirst() .orElse( null ); return window; } |
- Line 3: Streams all the top-level windows for this application.
- Line 4: Filters out any window that doesn’t satisfy the configuration parameters for this instance of ComponentFinder.
- Line 5: Filters out any window that doesn’t satisfy the user’s predicate.
- Line 6: Finds the first element of the stream that passes both filters.
- Line 7: As we’ve been reminded before: a) findFirst returns an Optional; if no element of the stream passes the Optional will be empty; b) any attempt to access an empty Optional will throw an exception. The Optional.orElse( arg ) method returns the content of the Optional if it’s non-empty, otherwise it returns arg.
Note: If all you want is the first top-level window to pass the default filter (i.e. you don’t want to use pred to specify any additional conditions), you can pass w -> true for pred.
■ The find( JComponent, Predicate) method
The find( JComponent container, Predicate pred ) method searches the component hierarchy rooted in the given container, and returns the first JComponent that satisfies the given predicate. Note that, since this method is not dependent on the top-level filters, it is a class method.
1 2 3 4 5 6 7 8 9 10 11 12 13 14 15 | public static JComponent find( JComponent container, Predicate<JComponent> pred ) { JComponent comp = null; if ( pred.test( container ) ) comp = container; else comp = Arrays.stream( container.getComponents() ) .filter( isJComponent ) .map( c -> find( (JComponent)c, pred ) ) .filter( c -> c != null ) .findFirst() .orElse( null ); return comp; } |
- Line 5: Tests the given container against the predicate, and returns the container if it passes.
- Line 8: If the given container does not pass the predicate, streams all of its nested components (recall, by the way, that JComponent is a subclass of Container).
- Line 9: Eliminates any component that is not a JComponent.
- Line 10: Recursively calls the find method, and maps the Stream<Component> to a Stream<JComponent>.
- Line 11: Eliminates any null value returned by the find method.
- Line 12: Encapsulates in an Optional the first component that gets past line 11.
- Line 13: Gets the value encapsulated in the Optional, or null if the Optional is empty.
- Line 14: Returns the result.
■ The find( Window, Predicate) method
The JComponent find( Window window, Predicate pred ) method gets the given window’s content pane, and passes the content pane to find( JComponent, Predicate) to find the first component that passes the given predicate. Note that, since this method is not dependent on the top-level filters, it is a class method.
public static JComponent
find( Window window, Predicate<JComponent> pred )
{
    JComponent  comp        = null;
    Container   contentPane = getContentPane( window );
    JComponent  jPane       =
        contentPane instanceof JComponent ?
        (JComponent)contentPane :
        null;

    if ( jPane != null )
        comp = find( jPane, pred );

    return comp;
}
■ The find(Predicate<JComponent>) method
The JComponent find(Predicate<JComponent> pred ) method iterates sequentially through the top-level windows. Each window that satisfies the top-level search parameters is passed to find( Window window, Predicate pred ), which searches the hierarchy rooted in the given window for the first component that matches the given predicate.
1 2 3 4 5 6 7 8 9 10 | public JComponent find( Predicate<JComponent> pred ) { JComponent comp = Arrays.stream( Window.getWindows() ) .filter( topWindowFilter ) .map( w -> find( w, pred ) ) .filter( c -> c != null ) .findFirst() .orElse( null ); return comp; } |
- Line 3: Streams all the top-level windows.
- Line 4: Eliminates any window that does not satisfy the top-level parameters.
- Line 5: Invokes the find( Windows, Predicate<JComponent> ) method.
- Line 6: Eliminates null values returnded by the find method.
- Line 7: Obtains an Optional encapsulating the first element to get past line 6.
- Line 8: Gets the element from the Optional, if it’s non-empty, or null if it’s empty.
■ The disposeAll() method
This method is mainly helpful during testing. It traverses the top-level window hierarchy and disposes all windows. Note that it does not use the top-level filter, so all application windows will be disposed.
public static void disposeAll()
{
    Arrays.stream( Window.getWindows() ).forEach( Window::dispose );
}
■ The getButtonPredicate( String label ) method
This is a convenience method that returns a predicate for finding a JButton with the given label. Its main advantage is that it eliminates a lot of typing for an often-used function. For example: Predicate<JComponent> pred = getButtonPredicate( "OK" );
JButton okButton = (JButton)finder.find( pred );
The code looks like this:
public static Predicate<JComponent> getButtonPredicate( String label )
{
    Predicate<JComponent>   isButton    = jc -> jc instanceof JButton;
    Predicate<JComponent>   hasLabel    =
        jc -> label.equals( ((JButton)jc).getText() );
    Predicate<JComponent>   pred        = isButton.and( hasLabel );
    return pred;
}
■ The getWindowPredicate( String title ) method
This is a convenience method that returns a predicate for finding a top-level window (a JDialog or JFrame) with the given title. Like getButtonPredicate, it eliminates a lot of typing for a frequently used function. For example: Predicate<Window> pred = getWindowPredicate( "Select Function" );
Window window = finder.findWindow( pred );
Here’s the annotated code:
1 2 3 4 5 6 7 8 9 10 11 12 | public static Predicate<Window> getWindowPredicate( String title ) { Predicate<Window> isDialog = w -> (w instanceof JDialog); Predicate<Window> isFrame = w -> (w instanceof JFrame); Predicate<Window> isDialogTitle = w -> title.equals( ((JDialog)w).getTitle() ); Predicate<Window> isFrameTitle = w -> title.equals( ((JFrame)w).getTitle() ); Predicate<Window> pred = (isDialog.and( isDialogTitle )).or(isFrame.and( isFrameTitle )); return pred; } |
- Line 3: Asserts that a given window is a dialog.
- Line 4: Asserts that a given window is a frame.
- Lines 5-6: Asserts that the given title is equal to a dialog title.
- Lines 7-8: Asserts that the given title is equal to a frame title.
- Lines 9-10: Asserts that a given window is a dialog AND has the given title
— OR–
a given window is a frame AND has the given title.
Tweaking ItemSelectionDialog
Let’s briefly revisit ItemSelectionDialog. Dialogs likes this are intended to allow an operator to choose an option, then approve the choice by pushing the OK button. But what if the list is empty? This may not occur very frequently, but it occurs often enough that we should consider it common, and be prepared for it to happen. Conventially when you display such a dialog you make it impossible for the operator to select the OK button. That’s easy enough to do, by disabling the button: okButton.setEnabled( false );
Actually, in some dialogs, the OK button can flash on and off multiple times, depending on the operator’s actions. So I’ve added to ItemSelectionDialog a helper method to change the status of the OK button. Then, if necessary, I call it from the constructor. The code looks like this:
private void enableOKButton( boolean status )
{
    Predicate<JComponent>   pred    =
        ComponentFinder.getButtonPredicate( "OK" );
    JComponent              comp    =
        ComponentFinder.find( dialog, pred );
    comp.setEnabled( status );
}
public ItemSelectionDialog( Window owner, String title, Object[] items )
{
    // ...
    if ( items.length > 0 )
        jList.setSelectedIndex( 0 );
    else
        enableOKButton( false );
}
Summary
This lesson was all about picking apart an application’s physical window hierarchy, and finding specific components to manipulate. To facilitate this, we wrote the ComponentFinder utility. This utility can be helpful during production, but especially during testing. On the next page we’ll look at a JUnit test for ComponentFinder. On the following page we’ll use ComponentFinder to improve the JUnit tests for ItemSelectionDialog, FileManager and EquationMap.